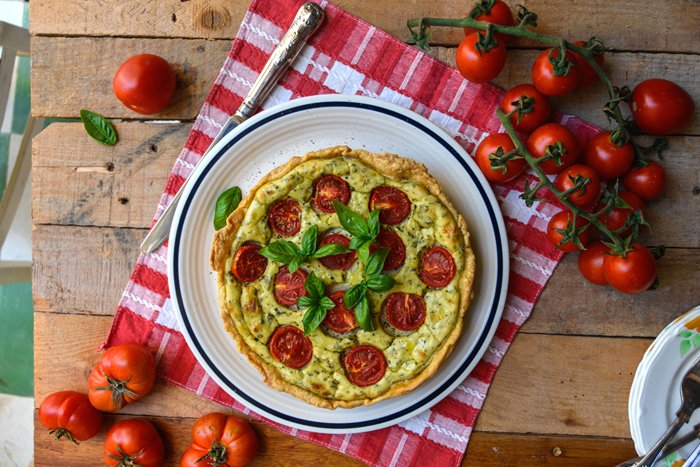
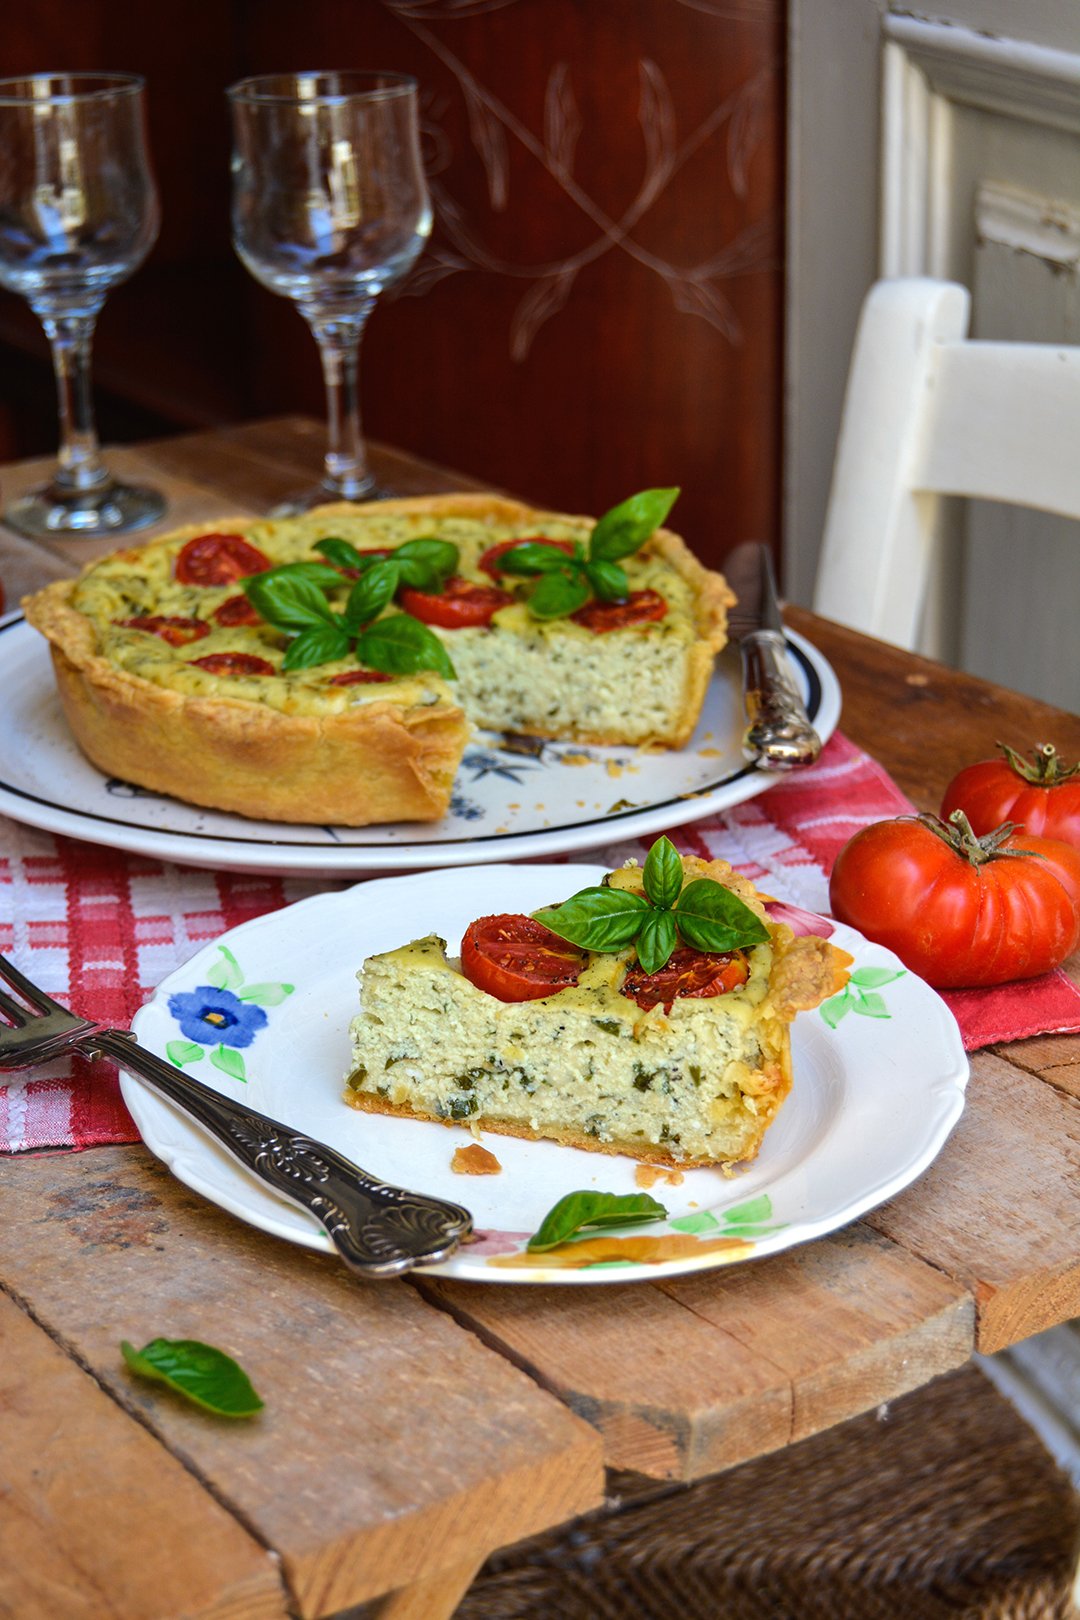
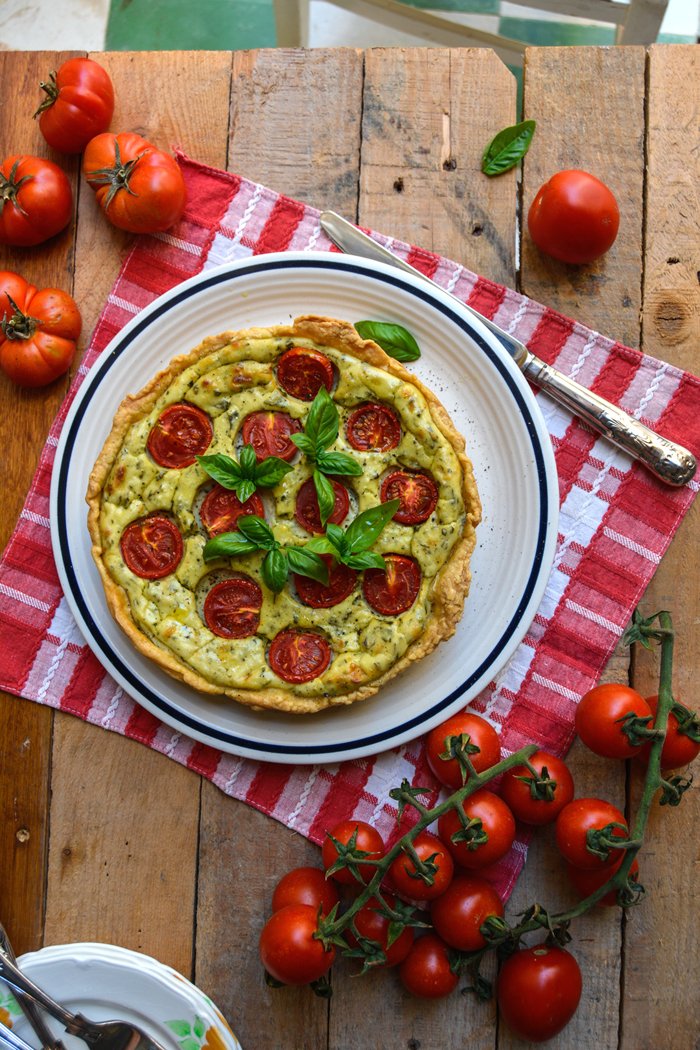
Basil Ricotta and Tomato Quiche
Malta, June 2016:
Walking aimlessly through the narrow streets of Malta is one of my favourite activities when I’m on the islands. Give me comfy shoes and a bottle of water and I'm ready to brave the heat. Valletta, with its imposing architecture, will always be my first destination when I need a break of my beach life. I love strolling along the limestone facades, shining golden in the late afternoon sun. Discovering new vegetable shops, peaking into little baroque chapels, or just gazing at the stunning grand palazzi built in the past centuries, are some of the most relaxing things I can think of. To extend my circle of adventures, I often take the ferry that connects Valletta and Sliema on one side of the capital, or I catch the boat that sails across The Grand Harbour on the other side, towards The Three Cities: Vittoriosa, Senglea and Cospicua.
If I need a complete change of scenery, I go to the sister islands, Comino or Gozo. And there, I spend most of the time under water. Snorkeling at Wied il-Għasri, Reqqa Point, and Qbajjar is always mesmerizing. The latest discovery, Reqqa, is one of the most spectacular diving spots I've ever been to. The water is very, very deep, the sunbeams dancing under water, cutting through the darkest blue, look like lightsabers - it's hypnotic.
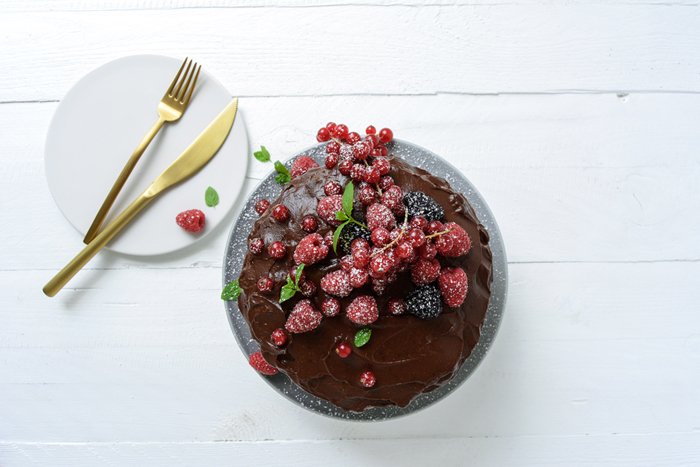
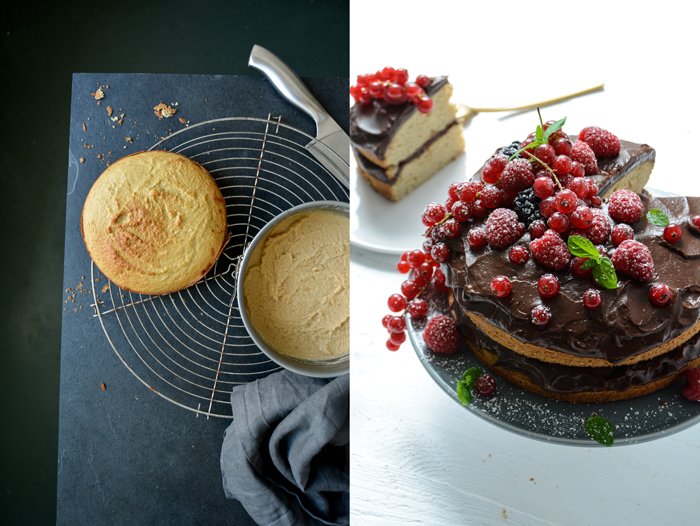
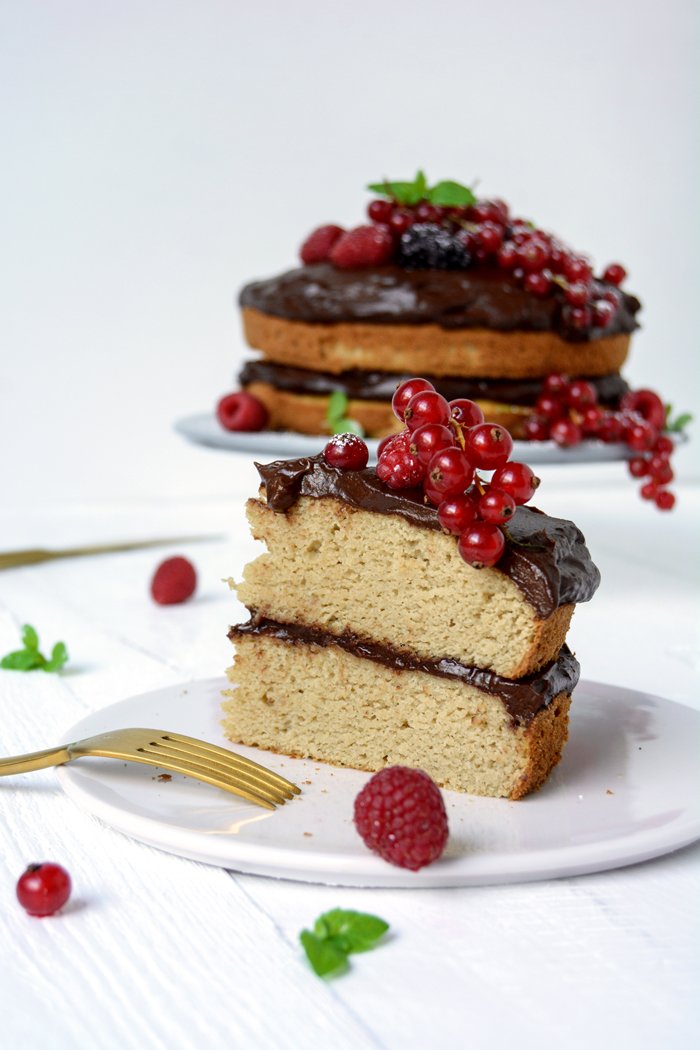
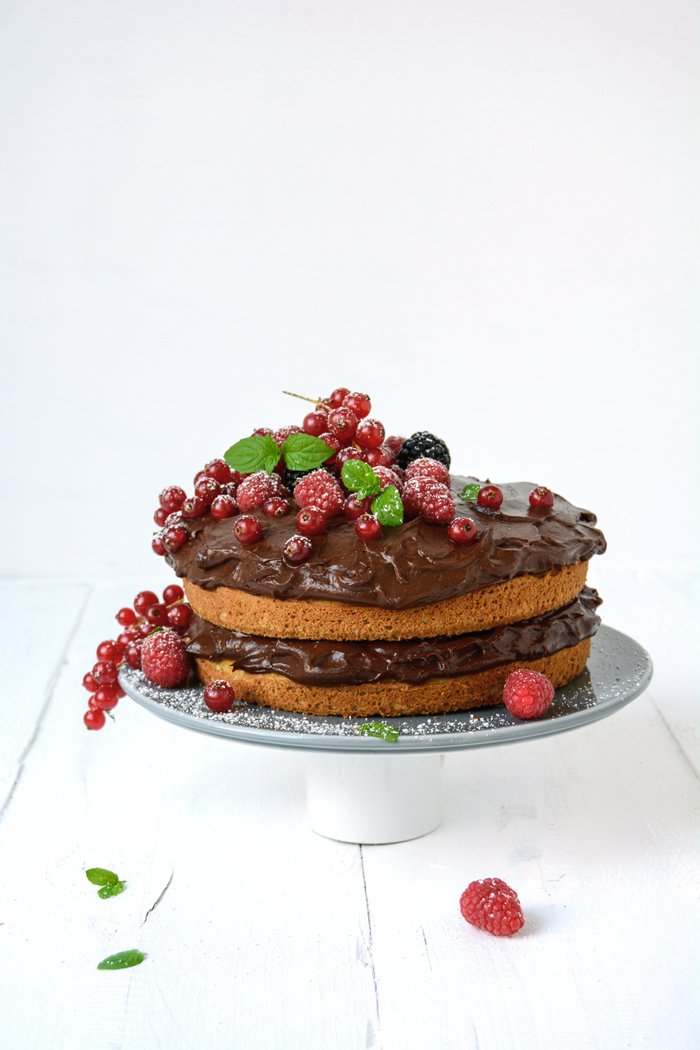
I usually finish my trip with a visit to the Cini family at the Xwejni Salt Pans where I always buy enough salt for a whole year of cooking (here’s a feature I did about the family). Their passion for their craft, their love for the salt from the sea, and their dedication to nature never ceases to amaze me. Some of this salt often ends up in a ricotta pie. Today’s pie looks a bit like a quiche, refined with lots of basil and sweet and juicy tomatoes - it’s delicious.


Basil Ricotta and Tomato Quiche
Makes 1 ( 20cm / 8″) quiche, serves 4
short crust dough 250g / 9 ounces (you can use 1/3 of the pastry from my fruit tart recipe, but leave out the sugar, click here)
ricotta 400g / 14 ounces
organic eggs 3
butter, melted and cooled, 40g / 2 heaping tablespoons
Parmesan, freshly grated, 60g / 2 ounces
chopped fresh basil leaves, 4 heaping tablespoons, plus a few leaves for the topping
lemon zest 1 heaping teaspoon
fine sea salt 1 teaspoon
ground pepper
cherry tomatoes, cut in half, 6
Prepare the dough, form a thick disc, wrap in cling film, and put in the freezer for about 15 minutes.
Preheat the oven to 200°C / 400°F (conventional setting).
Roll out the dough between cling film and line a 20cm / 8″ pie or quiche form with the pastry. Push the pastry into the pie form and prick with a fork. Bake for about 12 minutes or until golden. Take the pie form out of the oven and turn the heat down to 190°C / 375°F.
In a medium bowl, whisk the ricotta, eggs, butter, Parmesan, basil, lemon zest, salt, and pepper until well combined. Pour the ricotta on top of the pre-baked pastry, even it out, and arrange the tomatoes on top. Bake for about 45-50 minutes or until golden and the ricotta is just firm.
Let the quiche cool for a few minutes, sprinkle with fresh basil leaves, and serve warm or cold.


Italian Meringue with Honey Mascarpone and Figs
Most of the beaches and bays, restaurants and cafés, and markets and shops I visit in Malta are treasured finds of the past. Since I spent my first summer here 9 years ago, I gathered a long list of many places that I need to see at least once every time I come to the islands - I barely have enough time to discover something new. There are many traditions that I set up for myself, like my annual visit to the Sunday morning mass at Valletta's St John's Co-Cathedral, which is held in Latin and accompanied by the most ethereal choir. I went to this magnificent cathedral with my Maltese mama, the rest of the house was still asleep, and afterwards we enjoyed a strong cappuccino at Caffe Cordina. I recommend sitting inside with the locals, next to the bar and order some of their addictive treats. This time I went for spongy rum baba deeply soaked with sticky syrup followed by a buttery ricotta pastizzi - both were divine.
Fontanella Tea Garden in Mdina is another one of my favourite sweet spots. The view is breathtaking, sitting high up on a hill surrounded by ancient bastions, it allows you to see large parts of the island. Their chocolate cake is a classic, dark and juicy and a must whenever I visit Malta's old capital.
But all these sweets are still not enough of a reason to keep the oven back home in Msida switched off. The antique furniture, plates, and cutlery that fill our family's Malta home inspired me to come up with a dessert that suits all the beautiful lace doileys, fragile tea cups and silver tablets with floral patterns. An elegant meringue, lusciously topped with whipped honey mascarpone and Maltese figs was just right - visually and in taste. It's sweet and creamy, light and crunchy, with a juicy hint of fruit. Italian meringues are large and pale, crunchy on the outside and still a little soft inside. I preheated the oven to 160°C / 325°F, turned it off, and left the meringue in overnight, they came out perfect. The mascarpone whipped with a bit of heavy cream and warm honey was a nice contrast to the meringue's crunch.


Italian Meringue with Honey Mascarpone and Figs
For the meringue
large organic egg whites 3
a pinch of salt
granulated sugar 200g / 1 cup
cider vinegar 1/2 teaspoon
For the honey mascarpone
mascarpone, drained, 250g / 9 ounces
heavy cream 2 tablespoons
aromatic honey, like thyme or orange blossom, 2-3 tablespoons
For the topping
ripe figs, quartered, 6
It's best to prepare the meringues a day ahead and leave them in the oven overnight.
Preheat the oven to 160°C / 325°F (conventional setting) and line a baking sheet with parchment paper.
For the meringue, in a large bowl of a stand mixer, whisk the egg whites and salt for 1 minute. Continue whisking for 15 minutes, adding 1 tablespoon of the sugar at a time. The meringue should be stiff and glossy, then whisk in the vinegar. Spoon 6 large mounds onto the lined baking sheet and, using a spoon, swirl the tops a little. Place the baking sheet in the oven, switch off the oven, and bake the meringues overnight (for about 8 - 12 hours), without opening the door. If the meringues are still too soft on the outside, turn on the oven again and bake for a few minutes until crunchy on the outside.
For the honey mascarpone, in a medium bowl whisk the mascarpone and heavy cream until creamy, add more cream if necessary. Warm up the honey in a saucepan over low heat for about 1 minute until liquid and slightly warm, and stir into the mascarpone. Keep in the fridge until serving.
Cut a small top off each meringue, top with the honey mascarpone and figs, and close with the meringue tops. Serve immediately once the meringues are filled.


Back on the islands: Grouper with Watermelon and my first days in Malta
I'm back, I'm back, I'm back! My first days in Malta have been packed with excitement, overwhelming joy, and a tight schedule. When you haven't seen your Maltese family and friends for so many months, you have to be prepared that everybody wants to see you as soon as possible - which led to two weeks of dinner parties and long chats at breakfast tables and in beach bars. Whenever it was possible, I squeezed in extensive snorkeling trips and my beloved visits to the fish market, my vegetable man Leli, and the (almost) daily treats at my confectionary in Msida, Busy Bee.
We went to a beautiful wedding just two days after we arrived to celebrate the love of Michelle and Michelangelo. The event was announced as a 'farm wedding', so I slid into a simple flowery dress. However, my German idea of a farm had nothing to do with the venue that extended before my eyes as the heavy gates opened. We passed countless trees, a gorgeous cubistic house built of golden Maltese limestone, and a bubbling fountain. After a quick stop at the tempting cocktail bar, I found myself in the middle of a huge space surrounded by fields, filled with beautiful people wearing long dresses and swallow-tailed coats. Needless to say I felt a little underdressed, but that didn't matter at all, as the food was served and the dancing began, no one gave any thought to the dress code.

The following days were so windy that most of our favourite snorkeling spots were not safe for swimming, the currents were too strong. Luckily, my Maltese mama Jenny pointed out a protected bay I had never visited before, which allowed us to jump into the clear blue Mediterranean Sea despite the strong winds. Xrobb l-Għaġin bay is framed by white cliffs and a nature park situated on a small peninsula in the south east of Malta. It's a hidden spot, which isn't known by many tourists and a bit hard to find, so we had the whole bay almost to ourselves. Sunday morning started with a creamy cappuccino in Marsaxlokk and a look at the fishermen's latest catch. After a little bargaining we drove home with 2 pounds of sardines and the same amount of mackerel, an octopus, and some swordfish. Lunch was long, accompanied by a nice bottle of chilled white wine, and the rest of the day was rather lazy.


I celebrated my birthday last week and I always have the same gift for myself: a day in Gozo with my man and no internet. We went to Il-Kantra at the tip of the Mgarr ix-Xini bay, had an espresso, and enjoyed the sparkling blue as we jumped off the rocks. It's one of my favourite spots for swimming and snorkeling. You can see a lot of fish there - and bright red starfish. There were a few jellyfish this time, they looked beautiful, sparkling purple in front of the bay's mesmerizing turquoise. I always wear my goggles to avoid an unpleasant and painful collision with these slow moving creatures. I could have stayed in the refreshing waters for hours but our lunch appointment urged me out of the sea. A table at my most beloved restaurant in the whole world was waiting for us. Noel treats his guests at his Rew Rew Kiosk/ beach bar/ restaurant to the most amazing seafood fresh from the sea and the glasses are filled with Livio Felluga's wonderful Sharis wine, an elegant cuvée of Chardonnay and Ribolla-Gialla grapes. We ate grilled Barracuda, which was divine, juicy tuna belly, and calamari from the BBQ. A chameleon came to visit us in the branches above our heads before we finished the meal with a scrumptious crème brûlée. We left Noel and his restaurant 4 hours later with happy smiles on our faces. The Blue Hole at Dwejra was next on our schedule, a moody spot in the sea, which is too rough to swim in most of the time. We were luckily, the sea was almost as calm as a lake and allowed us to explore its breathtaking underwater scenery until we felt ready for dinner. We picked up our obligatory Gozitan ftira pizzas at the Maxokk Bakery, our appetite was surprisingly strong after our luscious lunch, and enjoyed them on the rocks of Daħlet Qorrot bay. We had a sundowner at Gleneagles Bar in Mgarr (another one of our countless traditions) and took the ferry back to Malta. It was a happy birthday.
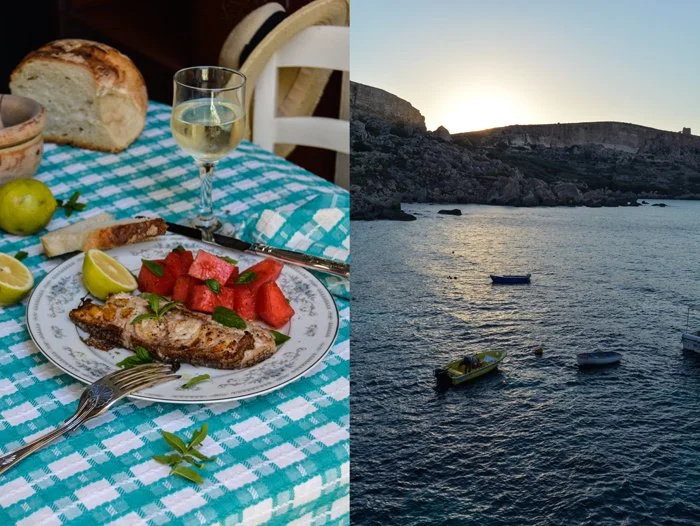
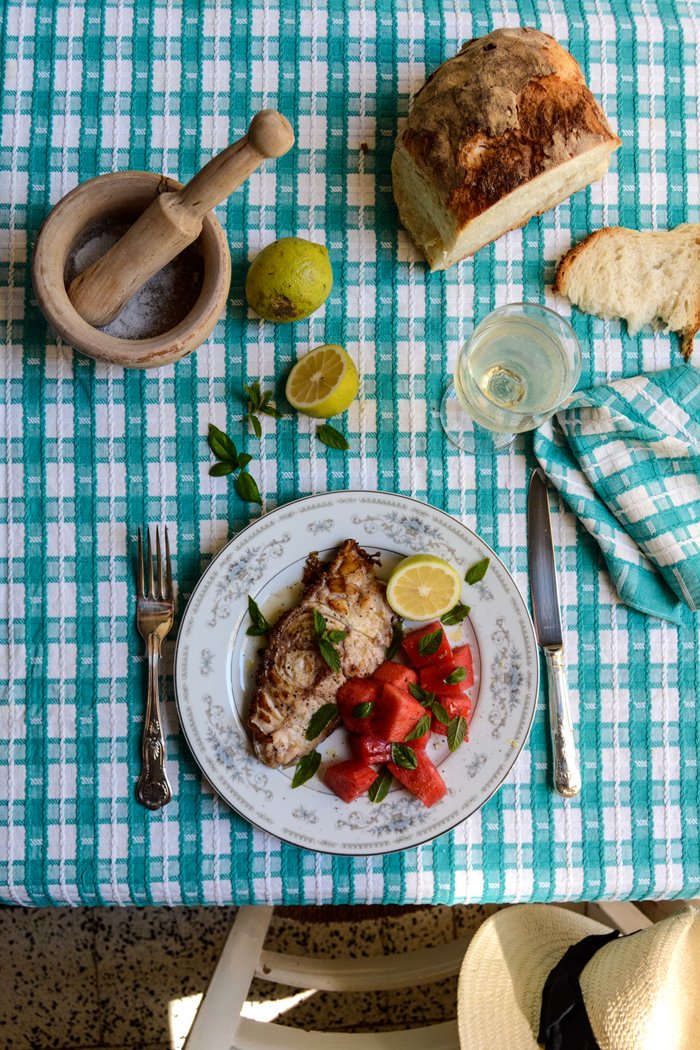
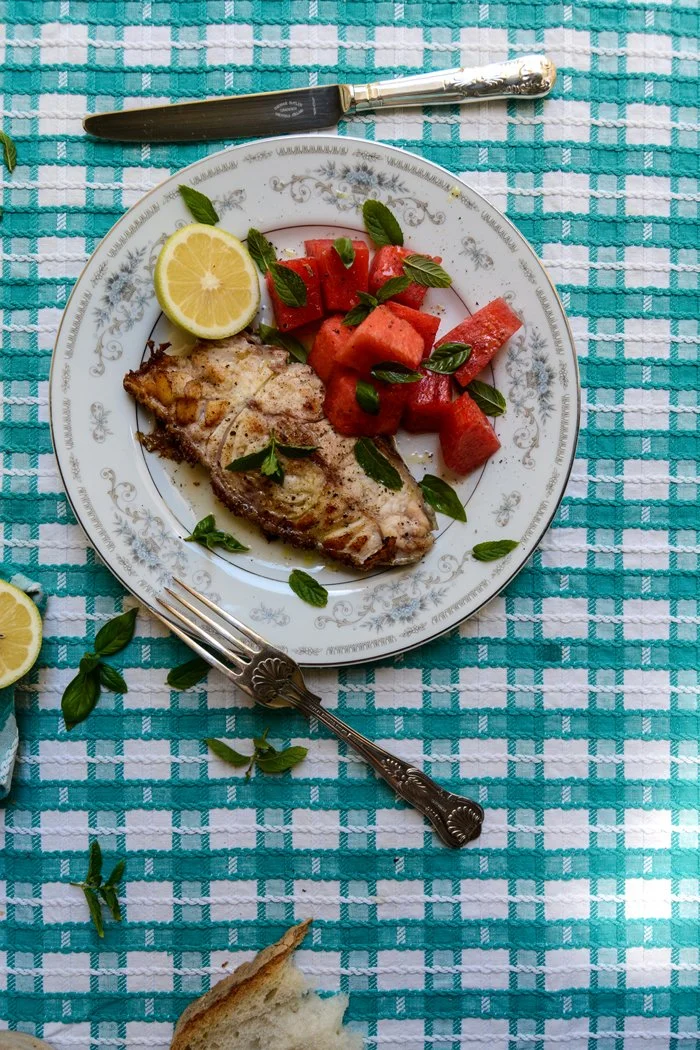
Cooking in Malta feels so different to cooking in Berlin. The produce is fresher - straight from the fields and the sea - and everything seems tastier, the food is honest and pure and so satisfying that I don't even bother mixing too many ingredients together most of the time. This leads to very simple salads, seafood seasoned only with pepper and a little lemon and some herbs. To combine grouper, called Ċerna in Maltese, with watermelon, basil, and mint, is as far as it gets at the moment. I'm after easy treats when I live under the hot Mediterranean sun. The combination of the firm fish and the sweet and juicy fruit didn't let me down, we enjoyed every single bite of our lunch snack.

Grouper with Watermelon, Basil and Mint
For 1-2 people (makes a lunch snack for 2)
large slice of watermelon, peeled and seeded, cut into chunks
olive oil
lemon 1/2
flaky sea salt
black peppercorns, crushed in a mortar
grouper fillet 1 (about 200g / 7 ounces)
fresh basil leaves, a small handful
fresh mint leaves, a small handful
Divide the watermelon between plates, drizzle with olive oil and a little lemon juice, and season with salt and pepper.
In a heavy pan, heat a splash of olive oil over high heat and cook the grouper for about 2 minutes on each side until just done. Cut the fish in half and divide between the plates, then season with salt and pepper and drizzle with a little lemon juice. Sprinkle with basil and mint and enjoy with a glass of chilled white wine!


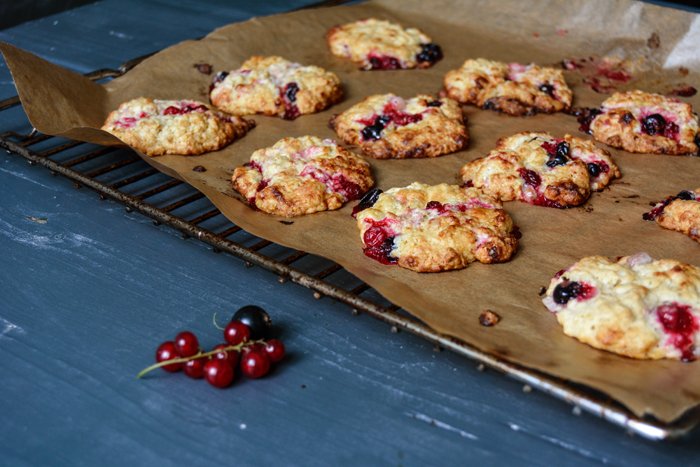
Black, White, and Red Currant Cookies with White Chocolate

This is my annual currant cookie recipe. It's quite a young tradition, I only started it last year, when I introduced a cakey cookie made with red currants, oats, mashed banana, and a strong hint of vanilla to the blog. It was a sweet hit. But 2016 is the year of colours - black, white, and red currants add vivid flavour and beauty to my new creation. It's still not crunchy, the fresh fruit is just too juicy, but it's less soft and spongy than last year's treat. I left out the banana and replaced it with chopped white chocolate, which brought in a different kind of sweetness, with a slightly milky touch.
The problem with cookies is that I always think I'll make a large batch and keep them in a glass jar to present them in all their prettiness and grab one to go along with my cup of tea or espresso whenever I feel like. However, reality is different. They barely last for two days. It's surprising how quick 24 cookies can vanish with only 2 people in the house - I'm impressed!

Black, White, and Red Currant Cookies with White Chocolate
Makes about 24 cookies
plain flour 130g / 1 cup
rolled oats 90g / 1 cup
salt 1/2 teaspoon
baking powder 1/2 teaspoon
baking soda 1/4 teaspoon
butter, at room temperature, 110g / 1/2 cup
granulated sugar 130g / 2/3 cup
vanilla bean, split and scraped, 1/4
organic egg 1white chocolate, roughly chopped, 100g / 3 1/2 ounces
mixed fresh currants (black, white, and red), preferably frozen for at least 2 hours, 140g / 5 ounces
It's easier to stir the currants into the dough when the fruits have been frozen, it looks prettier and less messy.
Preheat the oven to 180°C / 350°F (preferably convection setting). Line 2 baking sheets with parchment paper.
In a large bowl, combine the flour, oats, salt, baking powder and baking soda.
Add the butter, sugar, and vanilla seeds to the bowl of a stand mixer fitted with the paddle attachment and beat for a few minutes until light and fluffy. Add the egg and beat for about 1 minute or until well combined. Using a wooden spoon, stir in the flour mixture and mix until you have a lumpy dough (with a bit of flour left here and there). Fold in the white chocolate, then quickly, but gently the black, white, and red currants. Try not to damage the berries too much, you want their juices to stay inside their skins.
For each cookie, drop a generous tablespoon of dough onto the lined baking sheets, don't push the dough down and leave enough space between the cookies. Bake, 1 sheet at a time, for about 13 minutes or until golden brown, the cookies will be quite soft. Take them out and let them cool on the tray for a few minutes before you transfer them to a wire rack.


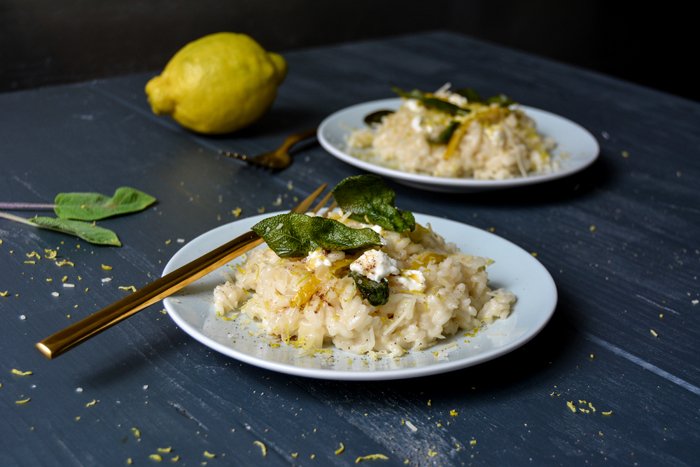
Lemon Mascarpone Risotto with Crispy Sage
Since I started sharing my recipes on eat in my kitchen, I've been wanting to make this risotto. It took a while, but here it is:
I don't know why, but there's something about risotto that only inspires me when I see the cooked rice on my plate, ready to dig a fork into the white grains. I can't say that I don't like risotto, indeed, I find it delicious when it's made well, but somehow it's not an easy relationship. Originally I had something more puristic in mind: just lemon zest and juice stirred into Arborio rice cooked to creamy perfection. I had enough time to think about the recipe - about 2 and 3/4 years - so it changed a little over the years and in the end, the composition became a bit more refined.
I cooked the starchy grains with a few slices of the citrus fruit's tangy peel, a dash of white wine, and my homemade vegetable broth, which I always keep in my freezer in stacks of tupperware. When the texture was just right - neither too soggy nor too dry - I stirred in a scoop of rich mascarpone and let it sit for a minute. While the rice thickened, I took out the pan and fried some fresh sage in butter for less than 20 seconds. The leaves should retain their deep green colour and only become a little golden and crispy. If they turn too dark, you can throw them in the bin, they will be bitter and inedible. I grated Parmesan and a bit more lemon zest on top and enjoyed one of the lightest, freshest, and most summery risottos I can imagine. Needless to say, a glass of white wine goes very well with the citrusy version of this Italian classic.

Lemon Mascarpone Risotto with Crispy Sage
Serves 2
olive oil
butter 2 tablespoons
medium onion, finely chopped, 1
Arborio rice 200g / 7 ounces
white wine 60ml / 1/4 cup
vegetable broth about 900ml / 3 3/4 cups
long strips of lemon peel 4
mascarpone 2 tablespoons
salt
ground pepper
large fresh sage leaves 12
freshly grated lemon zest 1-2 teaspoons
freshly grated Parmesan 1 tablespoon
In a large pot, heat a splash of olive oil and 1 tablespoon of the butter over medium-high heat. Add the onion and cook, stirring constantly, for about 2-3 minutes or until golden and soft. Stir in the rice and cook for 1 minute. Add the wine and a ladle of the broth, the rice should be covered. Stir in the lemon peel and reduce the heat to medium-low. Add more broth when it's all soaked, a little at a time, stirring gently. When the rice is al dente and the broth is more or less absorbed, take it off the heat, and stir in 1 tablespoon of mascarpone. Season with salt and pepper to taste, close with a lid, and let the risotto sit for a minute.
In a small saucepan, heat 1 tablespoon of the butter over high heat and add the sage leaves. Let them cook for about 20 seconds or until golden and crispy, but still green.
Divide the risotto between 2 plates, drizzle with the sage oil, and sprinkle with the sage leaves, lemon zest, and Parmesan.


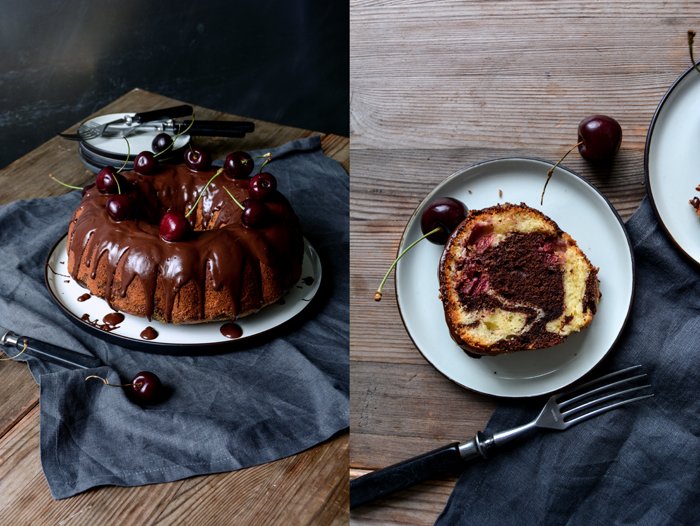
Cherry and Chocolate Marble Bundt Cake
Marble cake is a childhood memory baked in a Bundt pan. It was one of my granny Lisa's fabulous cake classics and it always impressed me with its light texture and the right balance of sweet sponge and bittersweet chocolate. Lisa must have had a weak spot for this duo. There's another masterpiece of hers, the decadent Donauwelle, which is basically the same combination baked flat on a tray, topped with cherries, German buttercream, and chocolate icing. It's a luscious, sweet bomb, perfectly fitting when it's cold and grey outside and you want to keep cosy. But the current mood is far from that, so let's forget about buttercream and all that stuff and think fruity.
You can keep it simple and dust a marble cake with a little icing sugar, but I find that a dark chocolate glaze gives it the necessary crunch and depth to balance out the softness and sweetness. To add a summery feel to it, I stirred some cherries into the batter. You can use fresh or preserved fruits, I go for preserved cherries, as it reminds me of my granny. Lisa used to have the most beautiful cherry tree in her garden, it was huge. The crop was generous, so she used to preserve the fruits and fill the shelves in her pantry. I remember long lines of jars, all filled with cherries ready to be turned into Donauwelle.
The cherries added a hint of pleasant fruitiness to the marble cake, which I liked a lot. I can imagine that apricots or peaches would work just as well, but I've never tried it, that's next on the baking schedule.

Cherry and Chocolate Marble Cake
Makes 1 Bundt cake
organic eggs, separated, 6
a pinch of salt
granulated sugar 250g / 1 1/4 cups
plain flour, sifted, 300g / 2 1/3 cups
baking powder 3 teaspoons
butter, at room temperature, 200g / 3/4 cup plus 2 tablespoons
vanilla bean, split and scraped, 1/4
whole milk 100ml / 1/3 cup plus 2 tablespoons
cocoa powder 30g /1/4 cup
pitted jarred or fresh cherries 200g / 7 ounces
breadcrumbs, to sprinkle the pan
For the glaze
bittersweet chocolate 200g / 7 ounces
butter 1 tablespoon
fresh cherries 8, for decorating (optional)
Preheat the oven to 180°C / 350°F (preferably convection setting). Butter a 23cm / 9″ Bundt pan and sprinkle with breadcrumbs.
In the large bowl of a stand mixer fitted with the whisk attachment, beat the egg whites, salt, and 1 tablespoon of the sugar until stiff.
In a medium bowl, combine the flour and baking powder.
In the large bowl of a stand mixer fitted with the paddle attachment, beat the butter, the remaining sugar, and vanilla for a few minutes until fluffy. Add the egg yolks, one at a time, and continue mixing until thick, creamy, and light yellow. Add the milk and mix until well combined. Using a wooden spoon, fold the egg whites and the flour mixture into the butter mixture, alternating about 1/3 at a time, combining well in between.
Scrape 1/2 of the batter into the prepared Bundt pan and spread the preserved cherries on top; push them gently into the batter. Stir the cocoa powder into the remaining batter, mix until well combined, and dollop on top of the light batter. Spread the dark batter carefully, then swirl with a small fork through the 2 batters, once is enough, carefully from top to bottom, pulling slowly all the way through the pan. Bake for about 40 minutes (slightly longer if using a conventional oven) or until golden and spongy. Check with a skewer, it should come out clean. Let the cake cool for 2-3 minutes, then shake the pan a little and flip onto a wire rack to cool completely. If the cake won't come out, place the warm Bundt pan into a large bowl filled with cold water. This will help loosening the cake from the pan.
For the chocolate glaze, in a small saucepan, melt the chocolate and butter on low heat, whisk until well combined. Let the chocolate cool for a few minutes, then drizzle over the cake. Decorate with the fresh cherries while the chocolate is still warm.


Gooseberry and Fennel Chicken with Mint
Fruits are my new vegetables!
Recently, stone fruits and berries replaced zucchini, tomato, and aubergine in quite a few of my recipes, I became experimental and now I'm hooked. The acidity of gooseberries and red, white, or black currants can be challenging, but at the same time it's exactly this quality that makes them a perfect partner for meat and seafood dishes. I don't have to worry about overpowering natural sweetness, instead I work with their slightly sour juices. Cooking makes them less harsh and a dash of maple or elderflower syrup or honey mellows the most pungent fruit.
I found my inspiration for this recipe in my own archive. Almost 2 years ago, I pulled the most delicious tray of Moscato Chicken with Grapes and Thyme out of my oven. The meat was wonderfully succulent, infused with the honey-like aroma of Moscato grapes and woody thyme. The chicken thighs needed less than half an hour to be done, including a few minutes under the broiler for the skin to become nicely browned and crispy. There was no reason to change this promising cooking method, but I introduced different flavours to the palate. The sweet grapes gave way for sour gooseberries, I stirred some maple syrup into the white wine, and placed the whole composition on a bed of thinly sliced fennel. Some mint on top and my summer chicken was done.
Yesterday, I received the first advance copy of my book, you can see the happy moment on Instagram!

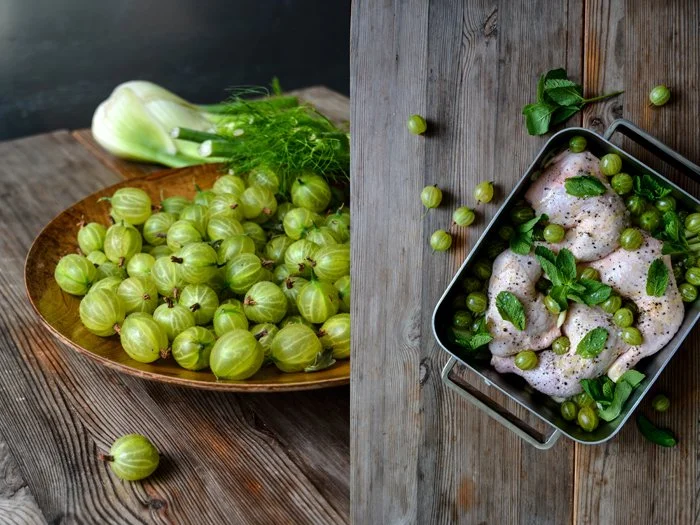
Gooseberry and Fennel Chicken with Mint
Serves 2 to 4
medium sized fennel bulb, cut in half, cored, and thinly sliced, 1
bone-in, skin-on chicken thighs 4
gooseberries 300g / 10 ounces
fruity white wine 5 tablespoons
maple syrup 4 tablespoons
olive oil 1 tablespoon
black peppercorns, crushed with a mortar and pestle
flaky sea salt
fresh mint leaves, a small handful
Preheat the oven to 220°C / 425°F (conventional setting). If your oven is equipped with a Rotitherm roasting setting, use this setting instead. You just have to adjust the cooking time (it'll need a few minutes less) and skip the broiler at the end of the recipe.
Cut off any large chunks of fat from the chicken thighs.
Spread the fennel on the bottom of a medium sized baking dish and place the chicken and gooseberries on top. Whisk together the white wine, maple syrup, and olive oil, pour it over the meat and fruit, and rub it in a little with your fingers. Sprinkle with crushed peppercorns and salt. Sprinkle with 3/4 of the mint and roast, spooning the juices from the pan over the chicken every 10 minutes, for 25 to 30 minutes or until the juices run clear when you prick the thickest part of a chicken thigh with a skewer. Turn on the broiler for a few minutes until the chicken skin starts sizzling. Sprinkle with the remaining mint, and season with flaky sea salt and crushed peppercorns to taste.


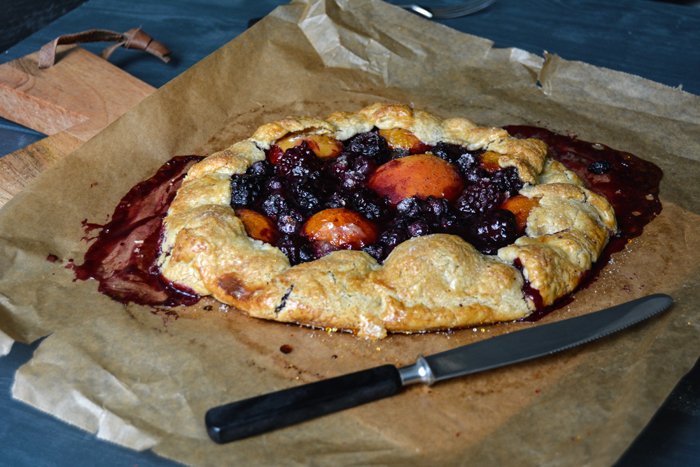
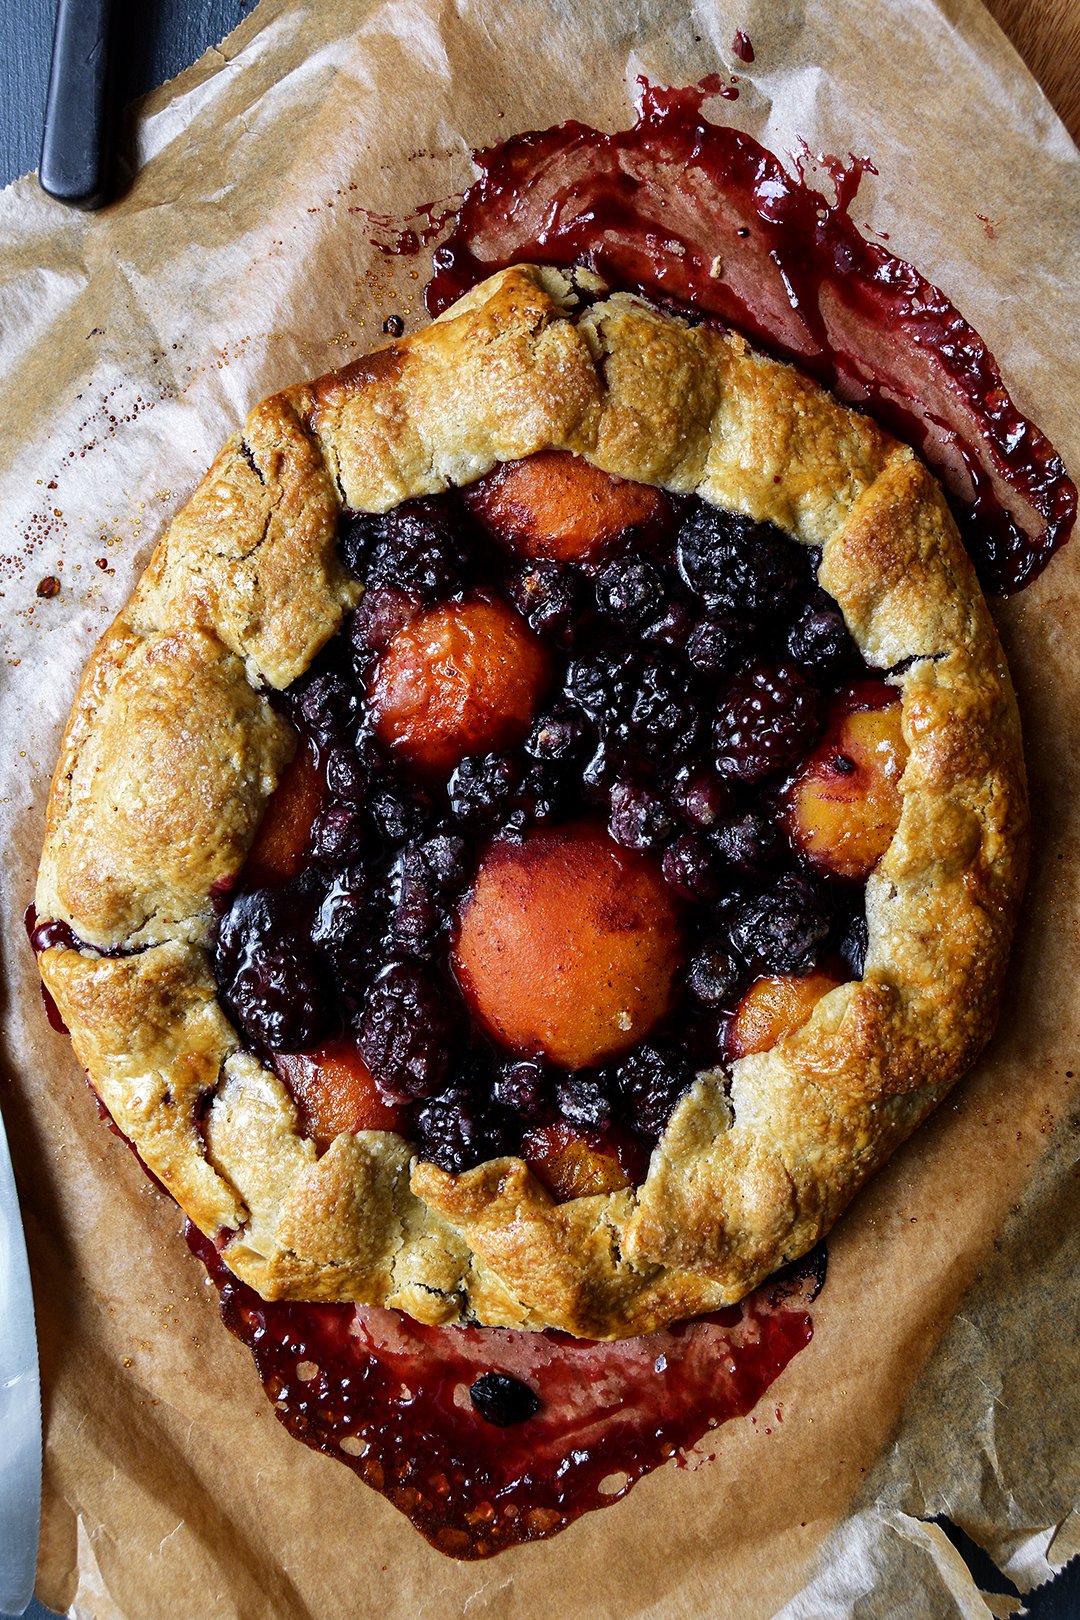
Yossy Arefi's fantastic Apricot and Berry Rye Galette with Saffron Sugar
Yossy and I share the same passion for one of the best combinations a coffee table has ever seen: juice-dripping fruit and buttery pastry. When I first saw one of Yossy's famous fruit galettes a couple years ago, I immediately fell in love with its honest and rustic look. And as the New York food writer and photographer announced the birth of her first cookbook, Sweeter Off The Vine, a couple months ago, I was hoping that she'd include a recipe for one of her gorgeous open pies. Yossy didn't let me down and she had my full attention when I spotted her Apricot and Berry Galette with Saffron Sugar made with rye pastry. This innocent pie tastes as good as it looks. Theoretically, I could have eaten the whole cake on my own - and I would have loved to! - but we had guests over for dinner and they enjoyed our fruity dessert just as much as I did, so I had to share.
Yossy Arefi is the creator behind the beautiful blog Apt. 2B Baking Co. and she managed to create a second masterpiece (after her blog) with Sweeter Off The Vine. The book is a gorgeous recipe collection from start to finish, following the seasons with colourful creations that celebrate nature's crop at its peak. Rhubarb and berries, stone fruits and melons, figs, apples, and pears, Yossy didn't leave a single craving of mine unanswered. As I thumbed through the pages, I got lost in her honest and pure, and somehow poetic photography. Nothing feels artificial, the whole book is true and manages to speak to the hungry mind without distraction. Her ice creams, tarts, desserts, and pies look like the food you want to eat in your granny's kitchen, but the young woman from New York always manages to sneak in her little additions that make the recipes very modern at the same time. Aromatic spices, like saffron, vanilla and citrus, orange blossom and rose water, or fresh vanilla bean are used in almost all of her recipes. Yossy's family roots are in Iran, and this heritage brought in her great fascination for the wonderful flavours of Middle Eastern cooking and her love for contrasts.


Apricot and Berry Rye Galette with Saffron Sugar
Recipe from Sweeter off the Vine: Fruit Desserts for Every Season by Yossy Arefi, Ten Speed Press.
Makes 1 9" (23cm) galette
For the rye pie crust
2/3 cup (85g) rye flour
2/3 cup (85g) all purpose flour
1/2 teaspoon salt
1/2 cup plus 1 tablespoon (125g) very cold unsalted butter
1/2 tablespoon apple cider vinegar
4 tablespoons (60ml) ice water
For the galette
1/2 vanilla bean
3 tablespoons granulated sugar
pinch saffron threads
2 teaspoons all purpose flour
pinch salt
8 ounces (225g) apricots
1/2 cup (80g) blueberries
1/2 cup (80g) blackberries
1/4 cup (60g) apricot jam (I used blueberry jam)
1 large egg, lightly beaten for egg wash
1 tablespoon turbinado sugar
Whisk the flour and salt together in a large bowl, cut the butter into 1/2-inch (1 1/4cm) cubes, and add the apple cider vinegar to the ice water.
Working quickly, add the butter to the flour and toss to coat. Then use your fingers or the palms of your hands to press each cube of butter into a flat sheet. Keep tossing the butter in the flour as you go to ensure that each butter piece is coated with flour. The idea is to create flat, thin shards of butter that range from about the size of a dime to about the size of a quarter.
If at any time the butter seems warm or soft, briefly refrigerate the bowl.
Sprinkle about 3 tablespoons of the icy cold vinegar-water mixture over the flour mixture. Use a gentle hand or wooden spoon to stir the water into the flour until just combined. If the dough seems dry, add more cold water a couple of teaspoons at a time. You have added enough water when you can pick up a handful of the dough and easily squeeze it together without it falling apart.
Press the dough together, form into a disk, and wrap in plastic wrap. Chill the dough for at least 2 hours before using, but preferably overnight. Keeps for up to three months in the freezer wrapped in a double layer of plastic wrap and a layer of foil. Thaw in the refrigerator before using.
Line a large baking sheet with parchment paper. On a lightly floured surface, roll the dough into a roughly 12-inch (30cm) circle, just under 1/4-inch (1/2cm) thick; it’s okay if it isn’t perfectly round. Transfer the dough to the prepared baking sheet. Store in the fridge while you prepare the filling.
Use the tip of a knife to cut the vanilla bean in half lengthwise and scrape out the seeds. Reserve the pod for another use. Add the granulated sugar to a mortar, add the vanilla seeds and saffron threads, and grind with a pestle until finely ground. The sugar will turn pale yellow and smell wonderful. Stir in the flour and salt.
Gently tear the apricots in half. Place the apricot halves into a large bowl and discard the pits. Add the berries and the saffron-vanilla sugar mixture to the bowl and toss with your hands to combine.
Remove the dough from the fridge and spread the jam on top, leaving a 2-inch (5cm) border around the edges, then top with the fruit. Fold the edges of the pastry over the fruit and press gently to seal the folds. Chill the formed tart until the dough is firm, about 15 minutes.
Position a rack in the center of the oven and preheat to 400ºF (200ºC). When the tart is nice and cold remove it from the fridge and gently brush the dough with the egg wash; sprinkle with the turbinado sugar.
Bake until the fruit juices bubble and the pastry is deep golden brown, 30 to 40 minutes. Let cool slightly before serving. This tart is best served the day it’s made.


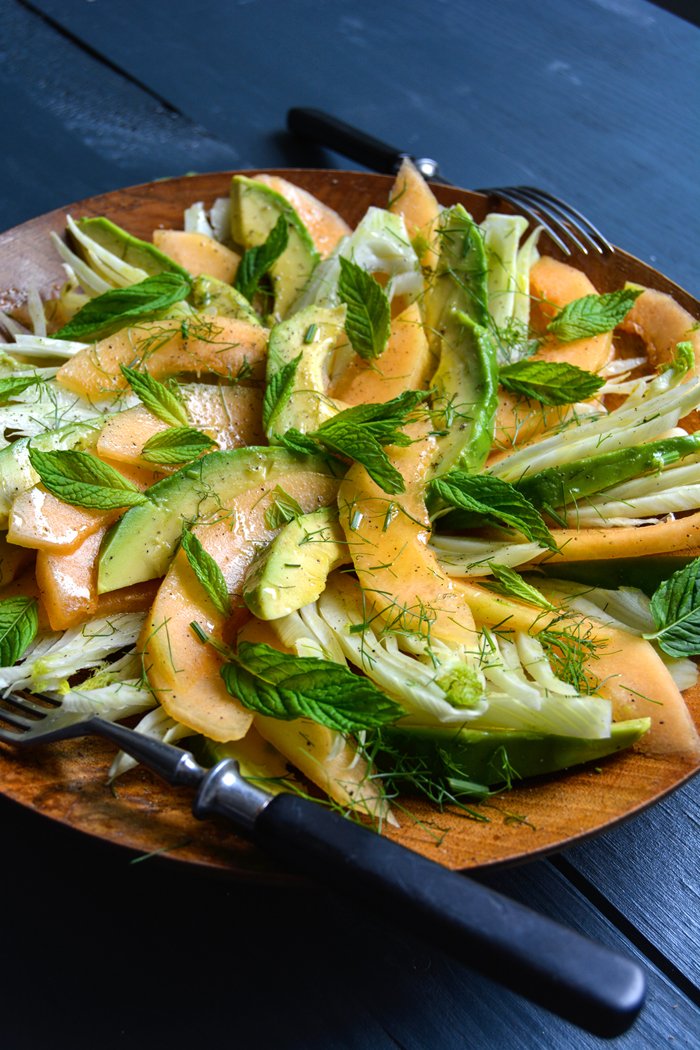
Avocado, Melon and Fennel Salad with Mint
This is the official start to my salad season. In the next month, I'll be indulging - daily - in simple yet scrumptious compositions of tasty vegetables and juice-dripping fruits. Chopped and tossed with a quick vinaigrette or just a dash of olive oil and some flaky sea salt from Gozo. Ripe tomatoes, cucumber, fennel, radicchio, carrots and peas, the sweetest peaches, pears, and plums - summertime offers a firework of flavours and I'm ready to celebrate each single one of them.
My next few weeks will bring the kind of temperature into my life that makes you think twice if it's really necessary to switch on the gas cooker. We'll be off to Malta soon and that means it will be 30°C (90°F) in the early morning and more than 40°C (105°F) at noon - this calls for a different menu. It'll be hot, but I won't complain, it's the time of the year that I look forward to the most. I can run around in an airy dress all day and late night swims won't leave me chilled - it's warm enough to sit on the rocks with wet hair when the sun has already sunk into the sea. I can basically live outside 24 hours a day, that's my kind of paradise.
In the Mediterranean, you have to go with the flow and stay flexible, so we keep the cooking plan as open as possible to adjust to our mood. You can always find a large jar of fresh, homemade basil pesto in the fridge and, of course, the whole variety of Malta's crop fresh from my favourite farmer Leli's fields, all piled up on the table and shelves. Fresh oregano, marjoram, basil, and the spiciest arugula are ready to be picked in the garden and always at hand to refine a chunk of creamy mozzarella di bufala, a crunchy bruschetta from the BBQ, or a 5-ingredient pasta dish: Give me spaghetti, olive oil, salt, pepper, and fresh herbs and I'm happy. If I'm lucky, there will still be a few lemons on the tree in the family garden in Msida. The season's over but my Maltese mama always keeps a few fruits on the tree for me, she knows how much a German girl enjoys the treat of picking the lemon for her morning tea straight from the branch.
I decided that I'll spoil myself with a kind of luxury that doesn't cost anything: To slow down and keep it simple, to let go of constant planning and rigid expectations. I know that I'll sit at the sea for hours, quite possible every day, but that's as far as my schedule goes. We'll be away for a month to stay with our Mediterranean family, we won't stop working, but we'll definitely take a great chunk of time off, it will be a different pace. To give myself enough time for the transition from my northern to my southern rhythm, I'll prepare a few recipes here in Berlin to share with you in the first two weeks of my holiday. Once I get into the groove, I'll write about my Maltese kitchen life. Until then, I will enjoy a foretaste of what my taste buds have to expect: a simple salad of velvety avocado, honey-sweet Cantaloupe melon, and crispy fennel - topped with fresh mint and a light vinaigrette.


Avocado, Melon and Fennel Salad with Mint
Serves 2
For the dressing
olive oil 3 tablespoons
white balsamic vinegar 1 tablespoon
freshly squeezed lemon juice 1 tablespoon
fine sea salt
ground pepper
For the salad
soft avocado, peeled and cut into thin wedges, 1
small fennel bulb, cored and very thinly sliced, 1
small Cantaloupe melon, peeled and cut into thin wedges, 1/2
fresh mint leaves, a small handful
For the dressing, whisk the olive oil, vinegar, and lemon juice and season with salt and pepper to taste.
Arrange the avocado, fennel, and melon in layers in a wide bowl. Drizzle with the dressing and sprinkle with mint leaves and serve immediately.


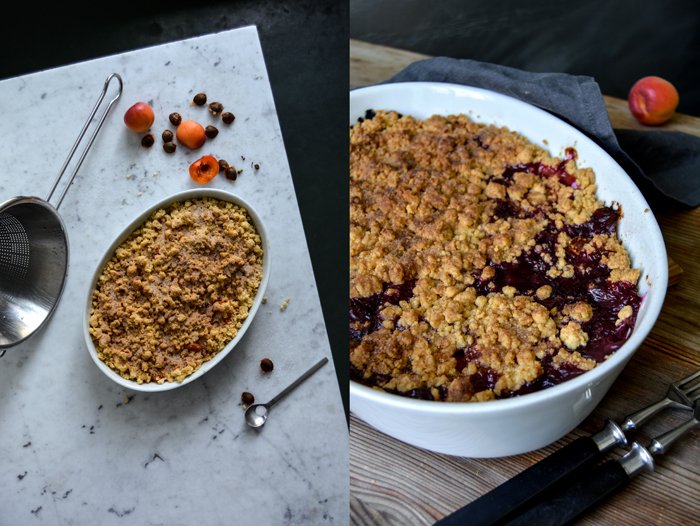
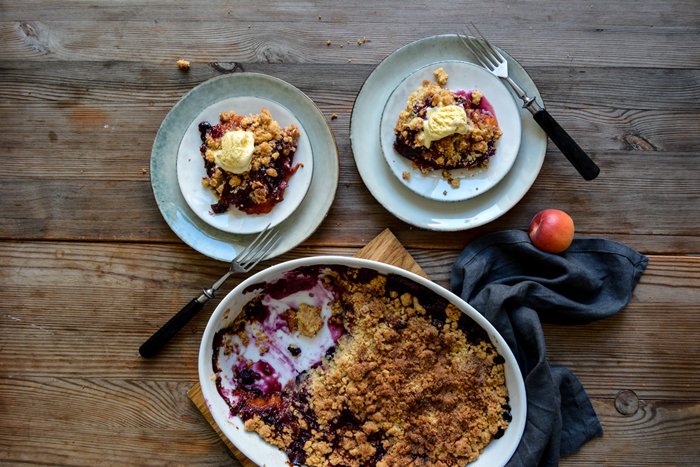
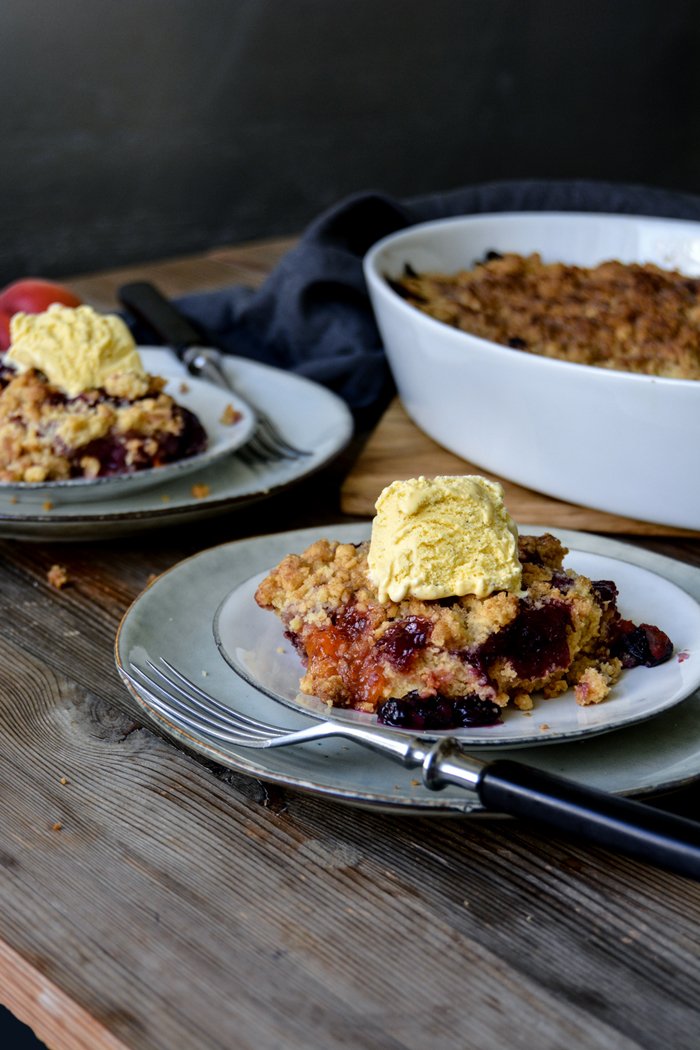
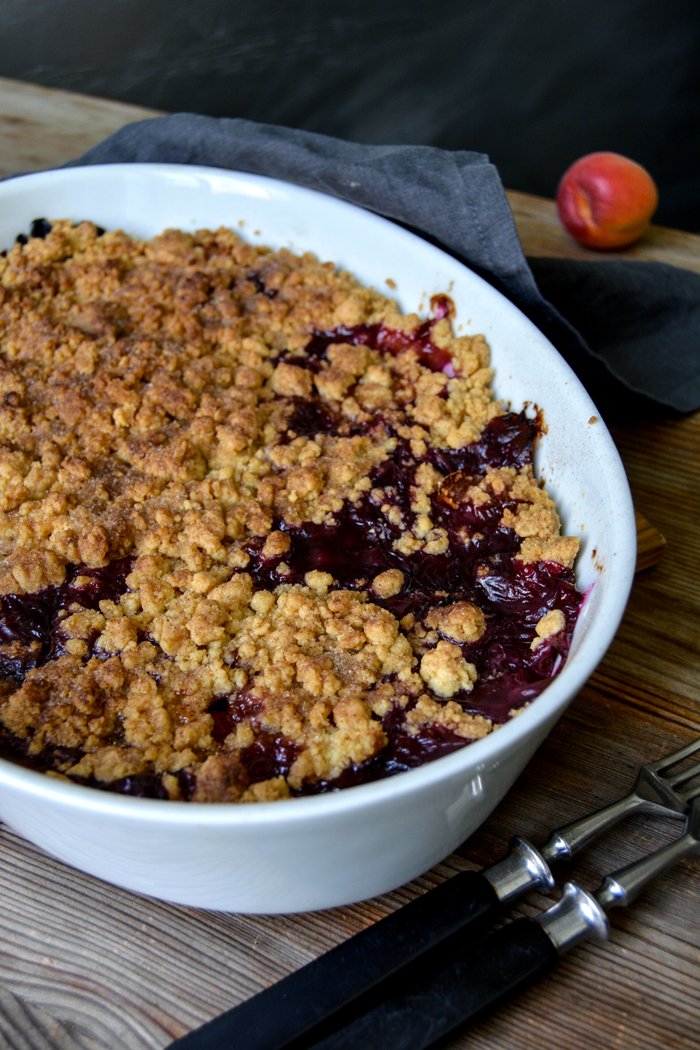
Crunchy Apricot Blueberry Crumble with Vanilla Ice Cream

A few years ago, a friend visited me in Berlin. It was a short visit, we only had a few hours, but we made the most of it and enjoyed an afternoon of baking in my kitchen. The result was nothing less than heavenly: Cristina's addictive Gooseberry Crumble!
Cristina has always been obsessed with baking, so many afternoons I’ve seen her standing in the kitchen, excitedly staring at the oven to see her sweet creations rise and turn into bites of happiness. She always reminded me of myself as a teenager. Those afternoons with my girls, a pound of flour, sugar, and eggs, created some of the best memories of my early teenage years. There's something about the combination of young girls and baking that seems like a match made in heaven. How much we enjoyed trying out new recipes or baking our old classics again and again and again (red wine cake was always high up on our list!). It was an innocent time, before the real troubles of life started.
When I saw the pictures again of Cristina in the meet in your kitchen feature I did with he, how she made this wonderful crunchy crumble in her pretty white dress, I felt reminded of my early baking days - and of her fantastic recipe. As I got over the first wave of nostalgia, I pulled out the baking dish and made a sweet and fruity crumble with apricots and blueberries. I'm sure Cristina would approve of it, especially with a scoop of vanilla ice cream on top.

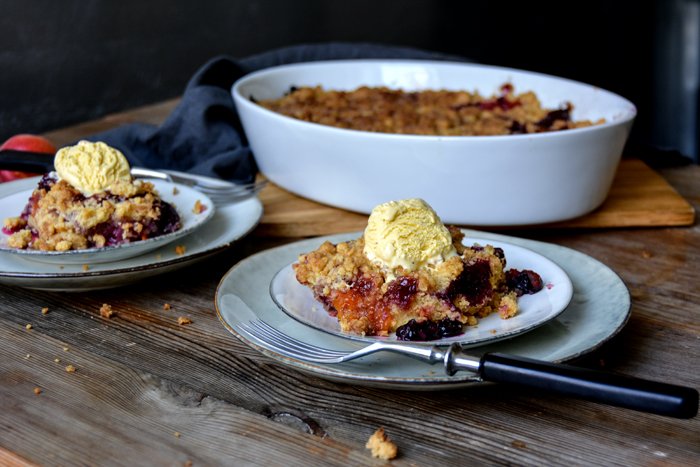
Apricot Blueberry Crumble with Vanilla Ice Cream
Serves 4-6
For the crumble
apricots, pitted and cut in half, 10
blueberries 250g / 9 ounces
plain flour 300g / 2 1/3 cups
Demerara sugar 160g / 3/4 cup plus 1 tablespoon
a pinch of salt
butter, at room temperature, 200g / 3/4 cup plus 1 tablespoon
For the topping
Demerara sugar 2 tablespoons
ground cinnamon 1 teaspoon
For serving
vanilla ice cream
Preheat the oven to 190°C / 375°F (preferably convection setting) and butter a medium baking dish (mine is oval, 19 x 28cm / 7 1/2 x 11").
Spread the apricots and blueberries in the prepared baking dish.
For the topping, combine the sugar and cinnamon.
In a large bowl, combine the flour, sugar, and salt. Add the butter and quickly mix with your fingers until you have a crumbly mixture. Spread the crumbles on top of the fruit and sprinkle with the cinnamon sugar. Bake for about 40 minutes, or until golden brown and crisp. Let it cool for about 10 minutes and serve warm or cold with vanilla ice cream.


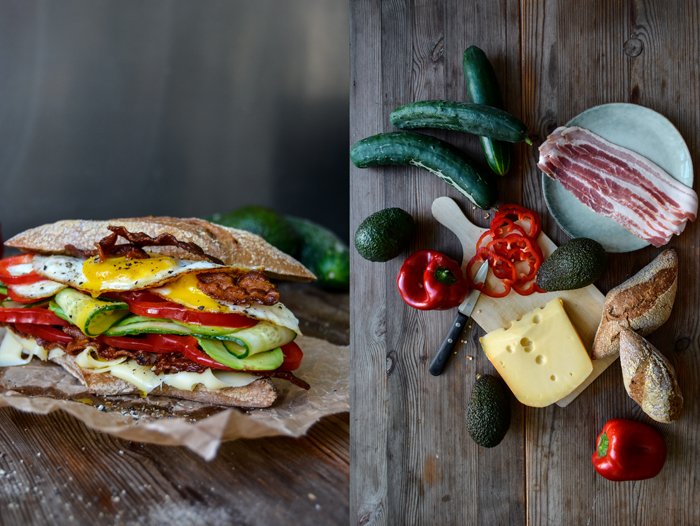
Bacon, Egg and Cheese Sandwich with Garden Vegetables
In a couple weeks I'll be off to Malta and my heart is already there. There isn't a single day that passes without thinking of my family and friends in the Mediterranean. With every month that summer gets closer, I feel the urge to go there and the pain of not yet being there becomes almost unbearable. As much as I love Berlin - it's my home - I see myself spending far more time on my beloved archipelago south of Sicily.
You can ask any Maltese person living abroad what he or she misses the most and almost everybody will tell you the sea and family. I'm not Maltese, but I agree. With every passing year I feel closer and closer to the life we live there. Being surrounded by the sea and the people who are so important in my life is a great gift I don't really want to let go off, but it's also the food, the pace, the culture and lifestyle that makes me miss this place so much.
In two weeks I'll be starting my days with a cup of tea in my Maltese mama's garden, sitting under her citrus trees. Then I'll pick some honey sweet fruits and crisp vegetables from my favourite mobile vegetable truck in Msida and prepare a luscious breakfast. For whatever reason we started the ritual to have very opulent and rich breakfast sandwiches when we live in the South. If we leave out my spontaneous (but very regular) visits to bakeries, cafés and pastizzi shops, we only eat twice during the day: before we go to the beach and afterwards, and both meals are little feasts. We end our days with Mediterranean inspired dishes but we start the day following the small country's British tradition. There are fried eggs, different kind of cheese, and a bit of meat on the table. Be it crisp bacon or a selection of course sausages from our butcher in Sliema - classic Maltese style with fennel and coriander or English sausage with apple and sage - our breakfast is quite a hearty affair, often sandwiched between two slices of Malta's amazing sourdough bread. But what comes with baked beans in the cold North is served with fresh garden vegetables in the South. Juicy cucumber and tomatoes, sweet bell peppers, or sautéed zucchini - qarabali in Maltese - there are always the freshest fruits from the garden involved. You could easily leave out the meat and keep it light and vegetarian, sliced fennel bulb, sautéed onions, or a juicy caponata are nice too, but the current star of the toast scene - thinly sliced avocado - made it into my creation, along with cucumber and red bell pepper.
This is the third sandwich of the tasty trilogy I created for Leerdamer:
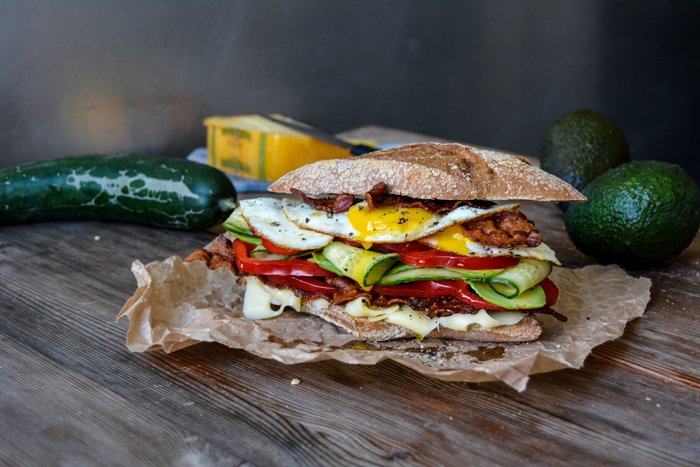

Egg, Bacon and Cheese Sandwich with Garden Vegetables
Makes 2 large sandwiches
olive oil
bacon 8 thin slices
organic eggs 4
flaky sea salt
peppercorns, crushed in a mortar
large rustic buns, cut in half, 2
Leerdammer cheese, or another mild hard cheese, very thinly sliced, about 170g / 6 ounces
small red bell pepper (and or tomato), cut into rings, 1
small organic cucumber, rinsed and scrubbed, very thinly sliced with a mandoline or cheese slicer, 1
medium ripe avocado, very thinly sliced with a mandoline or cheese slicer, 1
In a heavy pan, heat a splash of olive oil and cook the bacon until golden brown and crispy. Transfer to a plate lined with kitchen paper, but leave the fat in the pan.
In the pan used to cook the bacon, cook the eggs for a few minutes until the egg yolk is still liquid, season with flaky sea salt and crushed pepper.
Divide the cheese between the bottom sides of the buns and arrange the bacon and vegetables on top. Drizzle with a little olive oil and season with salt and pepper. Finish it off with 2 eggs for each sandwich and close the bun. Squeeze and enjoy!


meet in your kitchen | Tasting Rome with Kristina's Maritozzi con La Panna

As soon as the air is filled with flickering heat and the sky over Berlin is painted in the deepest sparkly blue, my mind tends to travel to the South, I'm desperately lost in Mediterranean daydreaming. One of my favourite imaginary destinations - apart from Malta - is Italy. Take me to the soft hills of Tuscany, the Renaissance statues at Florence's Piazza delle Signora, or to the ancient city of Rome and my heart is filled with joy. My schedule doesn't allow me to travel in person, but thanks to two American girls and their gorgeous cookbook Tasting Rome I can travel without having to leave (although I wouldn't mind moving south for a few days).
The first time I was in touch with Kristina Gill, she asked me to come up with a sandwich recipe for her In the Kitchen With column on DesignSponge.com. She was happy with my creation, a lusciously stuffed Mediterranean Baguette, and we stayed in touch. I always assumed that Kristina lives in the US, Design Sponge is an American site. But the girl from Nashville moved to Rome almost two decades ago and dug deep into la dolce vita - into the culture, food, and history of her newly adopted hometown.
Years of walking down Rome's cobblestoned streets, soaking up the loud scenes on the piazzas, and passing by baroque fountains and silent palaces also made her aware of the city's vivid contrasts. To see the past and present meet, old buildings taken over for unconventional use, kitchen traditions being respectfully transformed into contemporary dishes - this lively process fascinated Kristina. When she met her pal, Katie Parla, who's a New Jersey native, the two girls realized that they explore and experience their city in a similar way. Katie, who has a master's degree in Italian gastronomic culture, and Kristina, the photographer and food and drinks editor, both loved documenting Rome's lost recipes and contemporary innovations. So they decided to use their vast insider knowledge to write a cookbook together.
Tasting Rome is a collection of traditional Roman recipes and their modern interpretations. You can find pasta, vegetable, and meat classics side by side with scrumptious pizza variations and sweet Italian treats. I was impressed - and also glad - that the authors didn't skip the city's peasant tradition of using the whole animal, including offal, like sweetbread, liver, or tongue, and the more simple cuts of meat. It's a tradition that corresponds with the great movement of eating sustainably and with respect for our environment.

The two women developed the recipes together and asked the city's great chefs for advice when it came to pizza and cocktails. The colourful pictures in the book that make you want to pack your bags and go straight to the airport - or at least to a Roman restaurant for dinner - were all taken by Kristina. Together, Kristina and Katie manage to share a taste of Rome through their words and delicious dishes.
I chose to share their recipe for Maritozzi con La Panna with you, tender sweet yeast buns filled with whipped cream. Apart from enjoying 4 (!) of these little temptations in one go with great pleasure, I was quite impressed to learn about a very simple technique that they use to roll the buns to give them a tight surface. Usually, I roll yeast buns between my two hands, holding one like a dome and the other one flat, rolling the dough about 20 times. Tasting Rome taught me to use only one hand, rolling the piece of dough and pressing it against a lightly floured kitchen counter until it's a firm ball. It works perfectly!
The beautiful Rome pictures are by Kristina Gill, the food pictures are taken by me.
Update, June 13th, 2020:
Statement by Kristina Gill about the work on Tasting Rome "... my editor forced my voice and views on the book to be subordinate to my co-author's.", click here and here for Kristina's full statement.

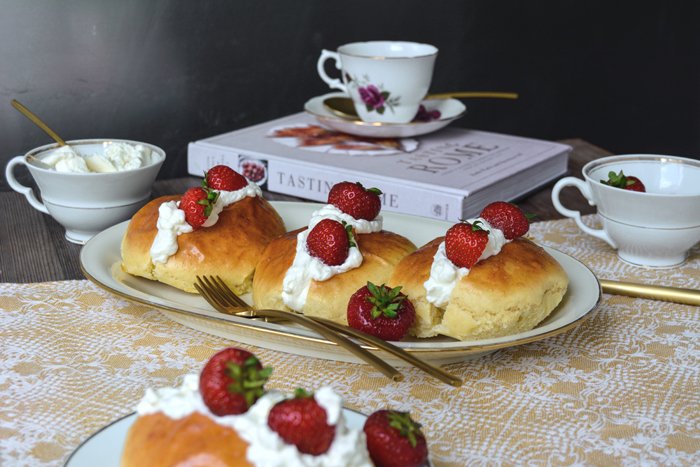
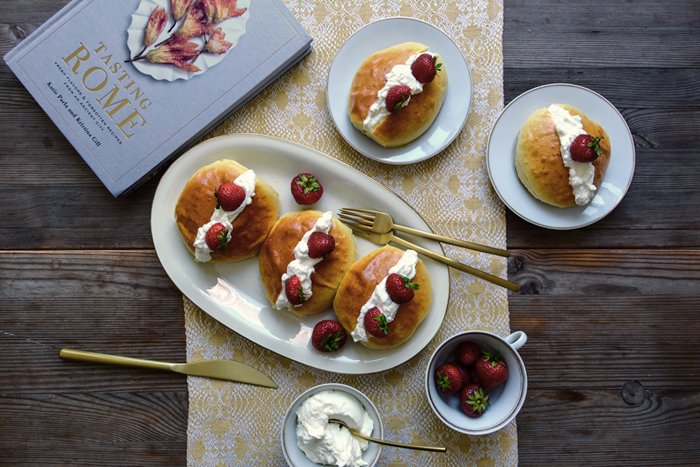
Maritozzi con La Panna - Sweet Buns with Whipped Cream
Makes 12 maritozzi
For the sponge
warm milk (between 40-45°C / 105-115ºF) 120ml / 1/2 cup
active dry yeast 1 1/4 tablespoons (I used fast-acting yeast)
bread flour 130g / 1 cup (I used white spelt flour)
granulated sugar 1 tablespoon
For the dough
unsalted butter, at room temperature, 100g / 7 tablespoons
granulated sugar 100g / 1/2 cup
fine sea salt 1/8 teaspoon
large eggs, at room temperature, 4
bread flour, plus more for dusting, 325 g / 2 1/2 cups (I used white spelt flour. I added 90g / 2/3 cup to the dough)
For the egg wash
large egg 1
whole milk 1 tablespoon
For the filling
heavy cream 480ml / 2 cups
granulated sugar 1 tablespoon
my addition: ripe strawberries
Make the sponge: In a medium bowl, whisk the yeast into the milk, then add the flour and sugar and stir to combine. Cover the mixture with plastic wrap and set aside until it becomes puffy, about 20 minutes.
Make the dough: In the bowl of a stand mixer fitted with the paddle attachment, combine the butter, sugar, salt, and eggs on low speed.
Replace the paddle with the dough hook. Pour in the sponge, mix for a few turns, then add half of the flour. Mix on low until the dough is smooth, about 5 minutes. Add the remaining flour and mix again on low until the dough is smooth, about 2 minutes, scraping down the sides of the bowl as necessary. When the dough was smooth, but still too sticky, I added 90g / 2/3 cup of flour and mixed it for another 2 minutes on '4' on my KitchenAid.
Allow the dough to rest in the bowl for 10 minutes, then run the mixer on low for 10 minutes to stretch the gluten. Meanwhile, line two rimmed baking sheets with parchment paper.
Turn the dough onto a lightly floured surface and divide it into twelve equal-size pieces (each approximately 70g / 2 1/2 ounces). Using one hand, roll each piece into a tight ball, pressing it against the counter to ensure a smooth, tight surface. Next, using both hands, roll each ball into an elongated loaf shape, fatter in the middle and tapered on the ends, about 4 inches long, similar to a small football.
Place the maritozzi on the prepared baking sheets, spacing them (at least) 4cm / 1 1/2" apart. Cover with plastic wrap, then a kitchen towel, and allow to rise in a warm place (20-25°C / 70-80ºF) until doubled in size, about 2 hours.
Preheat the oven to 175°C / 350ºF.
Make the egg wash: Whisk the egg with the milk in a small bowl. Immediately before baking, brush the tops of the maritozzi with the egg wash.
Bake until deep brown, 12 to 15 minutes. Remove from the oven and allow to cool for 5 minutes on the baking sheet before transferring to a wire rack.
While the maritozzi cool, make the filling: Whip the cream and sugar to firm peaks.
Slice each maritozzo open without cutting all the way through. Fill with the whipped cream, dividing it evenly, and serve immediately. Optionally: serve with fresh strawberries.
From Tasting Rome: Fresh Flavors and Forgotten Recipes from an Ancient City. Copyright (c) 2016 by Katie Parla and Kristina Gill. Published by Clarkson Potter/Publishers, an imprint of Penguin Random House LLC.

When and why did you move to Rome?
I moved to Rome in October 1999 for work. I was in the US diplomatic corps.
What fascinates you about Roman culture? Was it easy to adapt, to become a part of it?
Roman culture was a bit different then than now - internet was far less diffuse, and people were still pretty insular. It is hard to break into a ‘friendship’ culture in which bonds are created from childhood and don’t really change. Luckily, one summer several years before I moved here for work, I stayed in an apartment in Rome with other students, and they introduced me to their friends, so when I subsequently studied in Florence and Bologna, their parents made sure I was introduced to families in both cities with children my age. I guess you could say I adapted well because I was adopted! I spent a lot of time with these families - I was never alone on holidays. As time went on, the internet brought more curiosity about other places and people, and provided a way for Romans to cultivate their interests more - people wanted to connect more and that sped up forming relationships, especially around common interests, that their traditional network didn’t provide, so I’ve seen over time that Romans have become much more open to expanding their friendships beyond that childhood crew.
What do you miss about your life in the US?
Where to start? The cheeseburgers, the supermarkets, the variety of food available from different cultures, the variety of food available period, gourmet ice cream, parking, airconditioning, well-heated homes in winter… The ability to realize a dream with your own two hands. There’s a sense of freedom in the US that I don’t feel here - young people are leaving Italy in droves so that they can pursue their dreams. I’m lucky that I am able to be a part of both places.
What is your favourite spot in Rome and why?
My Savoir Bed is my favorite place…sleeps like a dream! But if you mean in the city, there are so many public squares to sit in and soak up thousands of years of history, which I find so mindblowing and relaxing. But lately, I think my favorite place is the MAXXI Museum, designed by Zaha Hadid, where I can check out contemporary art exhibitions. Just a small modern parenthesis in the middle of an otherwise gorgeous ancient landscape.
Can you see yourself living in Rome for the rest of your life?
I would like to move back to the United States to be with my family after so many years of being away and missing everyone. Seems like my cousins’ children were born last year, but are already studying at university!! I’ve missed out on a whole generation!
You wrote your book, Tasting Rome, together with Katie Parla. How long have you known each other and who came up with the idea to write this book together?
I can’t remember how long, however, we met over Twitter, a few years back. I already had the full proposal written when I met Katie, and a couple years after we knew each other, she mentioned that she had written a proposal, a memoir I think, that had been unsuccessful and was a bit down so I said - well, I have one that you might be interested in that we could do together! I sent it to her and asked her if she thought she saw herself in it. We added her name and bio to the proposal, and worked on some refinements with an agent I had already been in contact with. I approached Katie because I thought her knowledge of the history of Roman dishes and food culture would be a valuable addition to the book that would help ground it in fact and set it apart from the typical expat book that is written more from a personal perspective and is often an adaptation of cuisine. I wasn’t wrong!
How did you develop the recipes in your book?
From the proposal and through signing the deal, I was originally going to do all of the recipes and photography in the book, and Katie the features and headnotes, but once we started working on the book and came up with the list of recipes, there were clearly items that I had never eaten, like the offal chapter, and items for which I had no capacity to develop recipes, like the baking chapter and the cocktails chapter. Also, for the classics: Amatriciana, Gricia, Carbonara, and Cacio e Pepe, since Katie spends a lot of time eating out and had written numerous articles on which restaurants’ versions were the best in Rome, we agreed that she was in the best position to identify those recipes. That left roughly half of the book for me to develop, which I did over the course of four and a half months. Sometimes I did eat out to test recipes against my memories, but for the most part, I had clear ideas of how I liked the food I was working on, I knew the elements and knew more or less how to prepare. I had to check technical books for proper frying temperatures as starting points, or baking science (sweets). I did also consult with a friend who is a pastry chef for guidance on the maritozzi because I knew I wanted a rich soft brioche dough for that, and wanted to explore various options. I also talked with a couple of chefs to find out their views on the “proper” way to prepare certain dishes. Interestingly enough, they went over both the tradition and their variations. This gave some latitude and discretion in determining an approach for the book which remained authentic. For the other half, Katie procured recipes from local mixologists, local chefs and restaurant owners, and a good friend of hers who is an amazing baker for the baking chapter. When I look at the book, I think it represents the perfect mix of everything you would encounter in Rome today that defines Rome.
Who is your biggest inspiration in the kitchen?
On a personal level, Lucia, the mother of the family I stayed with when I studied in Florence. She has since passed away. She grew up in a town called Ristonchi a little outside of Florence, with chickens and a garden and the usual rural life. She could make the best food out of any ingredients you gave her. I loved the food made from leftovers the most. Her ribollita was the best on the planet, and her mother’s chicken broth which was liquid gold (and pure fat) made an indelible mark on my palate! She introduced me to Alessandra from Padova, whose mother, Gianna, took the cooking crown (and still wears it). Lucia, Alessandra and I both agreed that Gianna is the best - and between the three of us, we have eaten a lot of Italian cooking. Eating at Gianna’s house was better than any restaurant - and she took ‘orders’ in the morning before each meal so that when lunch or dinner came around, you had anything and everything you wanted. My inspiration from Gianna and Lucia came from their knowledge of how to prepare food, and how to be resourceful, and really how to eat. Gianna’s father was a baker. Food was always a central part of both households and you could tell that each meal was to be savored.
Has food always played an important role in your life? Do you come from a family of foodies?
Not really in the way you would think. I grew up in a household which consumed its fair share of whatever junk food was popular at the time - but which also shopped at the farmer’s market for weekend meals. My grandmother kept her own garden and fruit trees, and three freezers to keep all the produce throughout the year. I used to think she was a magician because this amazing feast appeared on the dinner table from food I hadn’t seen in the refrigerator during the day. It wasn’t until I was older that I learned about the other freezers!!
You took all the pictures in your book, when and how did you discover your passion for photography? What do you love about it?
I started taking pictures to be able to produce the In the Kitchen With column on DesignSponge, in 2008 I think. I think I started to love photography when I started taking more than just food pictures and found that capturing my environment was a way to see all the things I overlooked when I just passed through on my daily routine. It was like discovering a new world.
Do you prefer to capture the atmosphere of a city with your camera or delicious food?
Both. I love to explore a culture through its food, why certain ingredients or cooking techniques play the role they do, how the cuisine of one city differs from another and why. I love to capture the mundane and everyday of a city with my camera.
What was the first dish you cooked on your own, what is your first cooking memory?
I can’t remember! But in high school I think I used to make pizza from ready made pizza dough, and at university, I prepared a meal from an African cookbook, featuring mostly Ethiopian food and my friends and I all liked it a lot!
What are your favourite places to buy and enjoy food in Rome?
My Saturday routine is concentrated in one neighborhood. Before the market I have a pastry (made in house) from Fabrica, a cafe near the market. Then at the Trionfale market I buy fish, produce, and a lot of Asian food staples (lime, rice noodles, bok choy, tamarind paste, palm sugar, ginger, galangal etc). I get cheese and nduja from La Tradizione (which is near Trionfale market). I pick up wine and alcohol from an enoteca named Costantini. I pick up oatmeal (flakes) from the healthful store around the corner from my office. It is a chain called Il Canestro. When I don’t have time for breakfast at home, I stop by Bar Benaco on the way to work because they make all their pastries in house and I can get them while they are still warm. I don’t eat out a lot because I have a bazillion cookbooks and am always excited to try new recipes, but when I do, I eat most often at Cesare al Casaletto because they always find me a table, or takeaway pizza from a place near my house or at pizzeria Tonda.
If you could choose one person to cook a meal for you, who and what would it be?
Bryant Terry, anything he’d like. I would love it all. Unless it had beets in it.
You're going to have ten friends over for a spontaneous dinner, what will be on the table?
I learned about Bo Ssam pork at a meal at Matt Armendariz and Adam C. Pearon’s house. I would prepare Bo Ssam, and a selection of Asian-inspired salads. For dessert, a maple hazelnut cookie by Nigel Slater, and a selection of chocolates and coffee.
What was your childhood's culinary favourite and what is it now?
This is tough because I have no memory of a favorite food… Meatloaf maybe! Now… I have too many favorites, but cheeseburgers are top of my list. And dumplings. Chinese, Korean, Japanese…
Do you prefer to cook on your own or together with others?
I’ve spent a lot of time over the past two years working on the book alone - not just developing the recipes, but also preparing food for the photography. I styled about half of the recipes in the book, and Adam C. Pearson did the other half and the cover. When I was in the studio shooting, I did a lot of food prep as well, and enjoyed the atmosphere and working with Adam and his team of stylists. It’s definitely easier working with others! But sometimes, cooking is therapy and being alone is great.
Which meals do you prefer, improvised or planned?
As long as it’s good, either is fantastic!
Which meal would you never cook again?
I made some dog biscuits for my dog once that were made of like chopped liver and garlic or something. When they started to bake, the smell was SO BAD, I thought I’d have to move out of my apartment. He loved the cookies, but that smell stayed around for a LONG time and it was AWFUL.
Thank you Kristina!


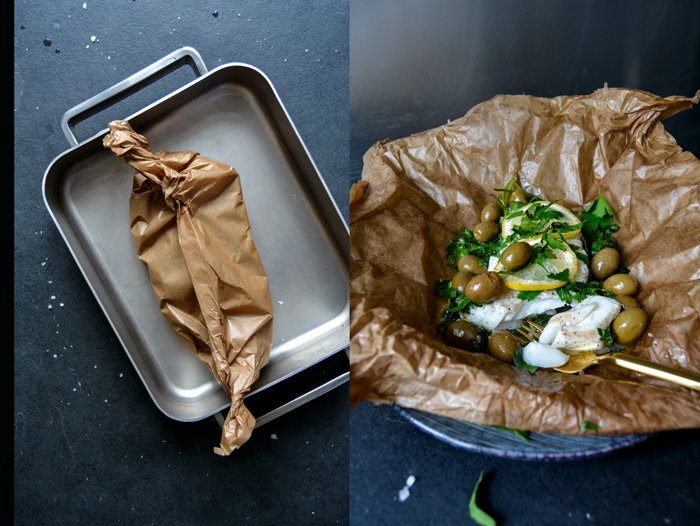
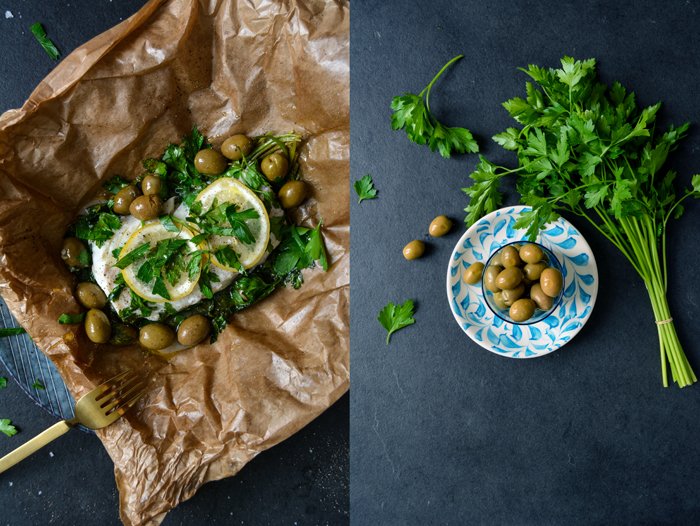
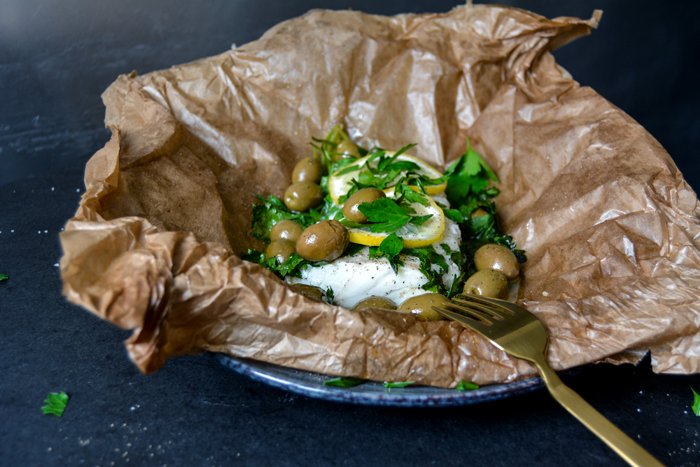
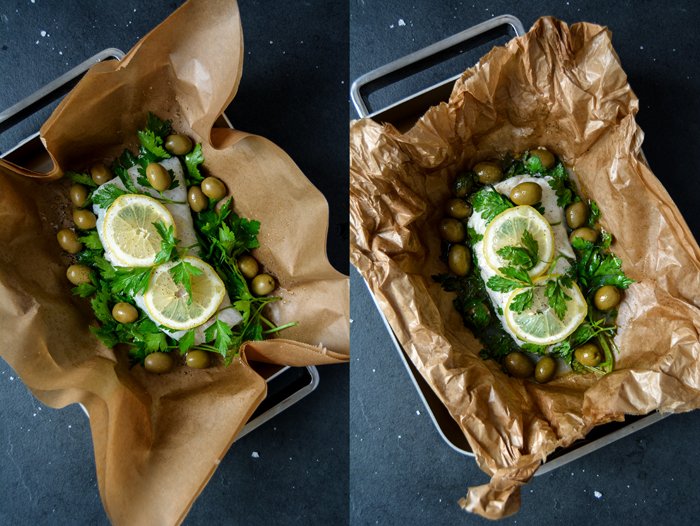
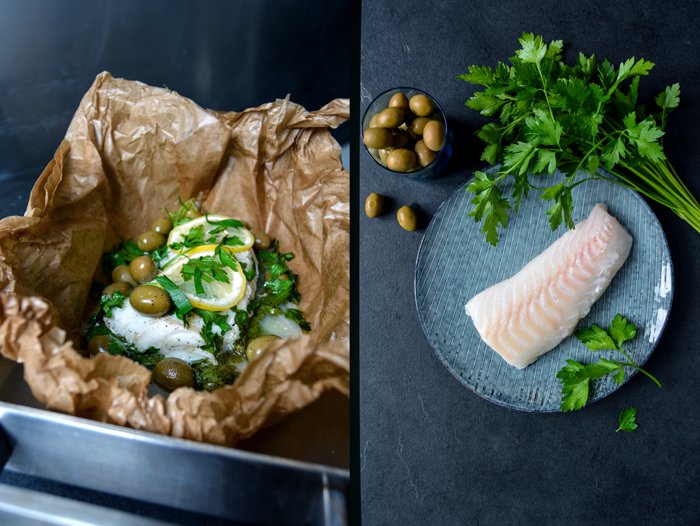
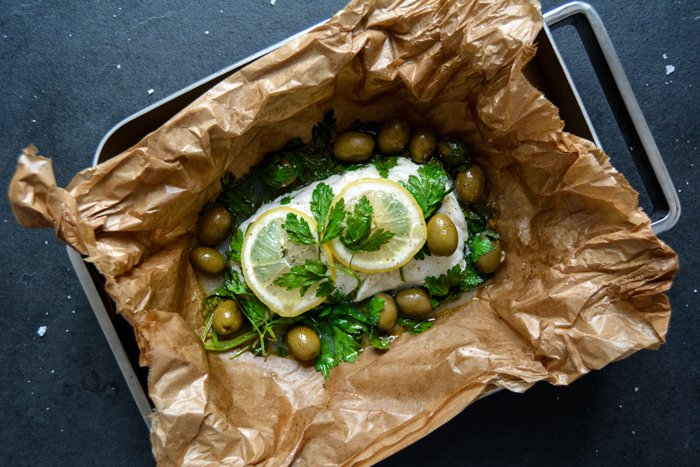
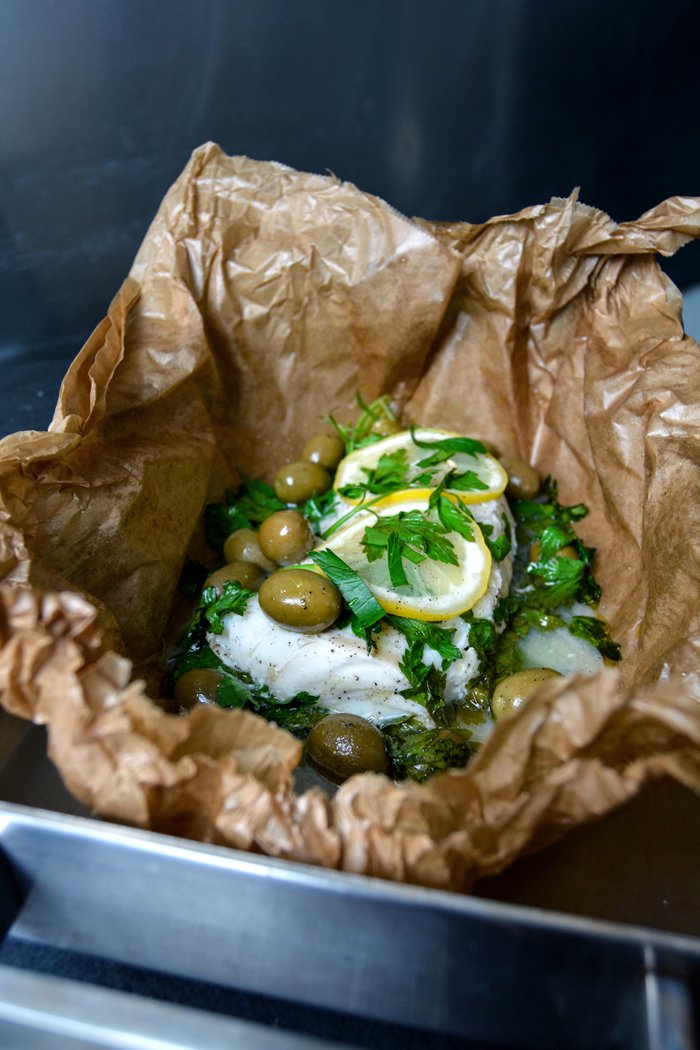
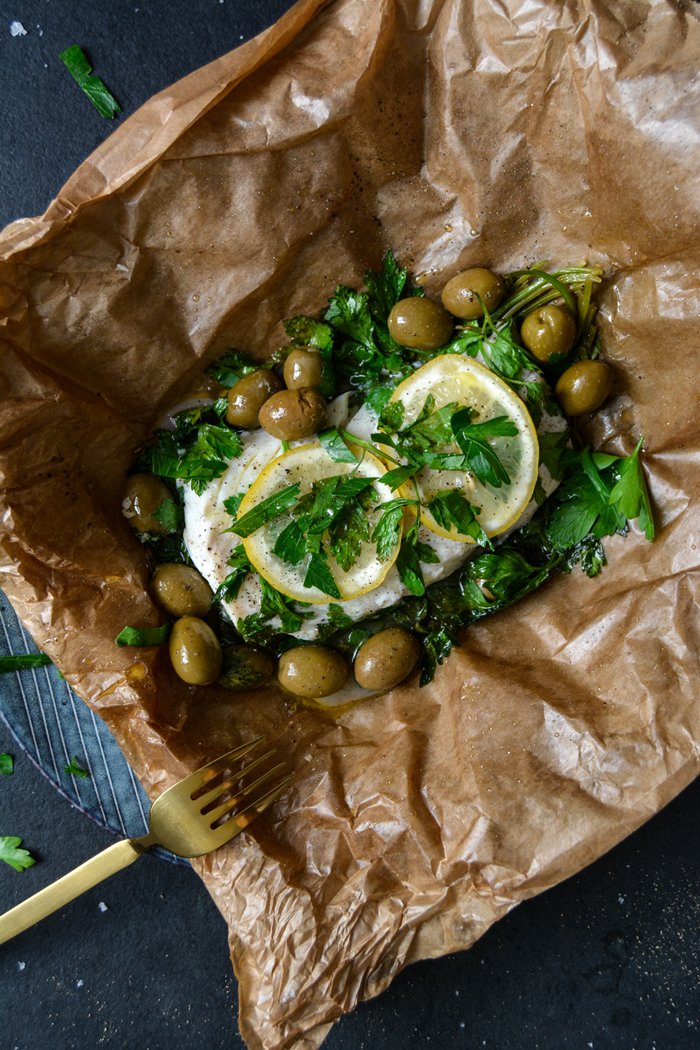
Cod al Cartoccio with Olives, Parsley and Lemon

Whenever I cook fish al cartoccio and I enjoy the tasty fillet's firm perfection, I ask myself, why should I ever cook cod, salmon, trout, or monkfish any other way? If the timing and seasoning is right, the texture will be flaky and the meat infused with whatever aromas you decide to add to the paper bag. Fresh herbs, warming spices, fresh or preserved lemon, olives, capers, thinly sliced vegetables or prosciutto even, there are endless possibilities to turn dinner into an exciting package of flavours. However, when I'm in my Maltese mama Jenny's garden in Msida, I feel the same about barbecued fish: Why should I ever turn on the oven again when there's a nice catch from the fisherman on the table?
When we set up our BBQ in Berlin, there's mainly meat and vegetables on the roast, fresh fish is a rather rare occasion, it stays in my indoor kitchen most of the time. In the city, I never plan my seafood meals, I buy what looks fresh and yummy and then I decide what's going to happen with it. My thick piece of cod from the Atlantic got wrapped in a package, but before I closed it, I added lots of fresh parsley, green olives, white wine, and lemon slices. It was a beautiful Mediterranean lunch, which you should enjoy on a Saturday or Sunday, when there's no more work waiting for you and you can pull a bottle of crisp white wine out of the fridge (without feeling guilty). Just relax and break chunks off an oily loaf of ciabatta to dip into the juices - summer perfection!
Cod al Cartoccio with Olives, Parsley and Lemon
Serves 2 for lunch
olive oil
cod fillet (or any firm, white fish, such as monkfish or halibut), preferably a thick center piece, about 350-400g / 12-14 ounces
fresh flat-leaf parsley 1 medium bunch
green olives, with pits, 14
organic lemon, rinsed and scrubbed, 2 slices
white wine 2 tablespoons
freshly squeezed lemon juice 1 tablespoon
fine sea salt
ground pepper
Set the oven to 200°C / 400°F (convection setting).
Cut 2 pieces of parchment paper large enough to wrap the fish and lay them on top of each other. Brush the top sheet with olive oil, place all but 1 sprig of the parsley in the middle, and lay the cod on top. Season to taste with salt and pepper. Put the remaining parsley on top of the fillet and finish it off with the lemon slices. Arrange the olives around the fish. Whisk the wine with 2 tablespoons of olive oil and the lemon juice and pour over the fish. To close the package, fold the sides over, twist both ends of the parchment paper, and fold the top twice so it’s well sealed. Place the parchment package in a baking dish and bake for 10 minutes. If you can flake the fish gently with a fork, it’s done. If not, close the parchment again and continue baking for up to 5 minutes. The cooking time can vary depending on the fillet's thickness, but mind that you don’t overcook it.


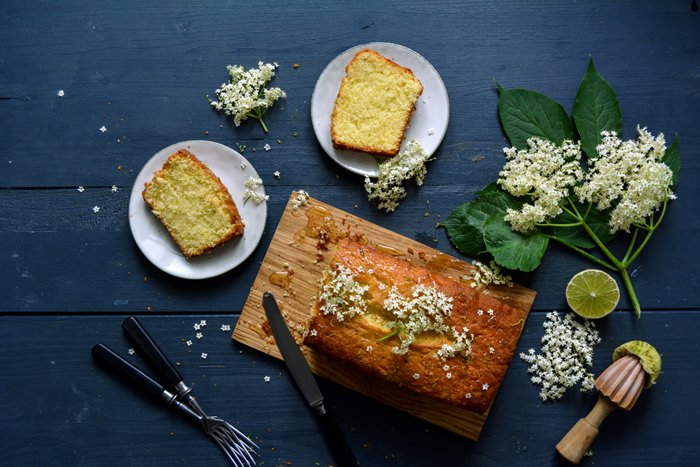
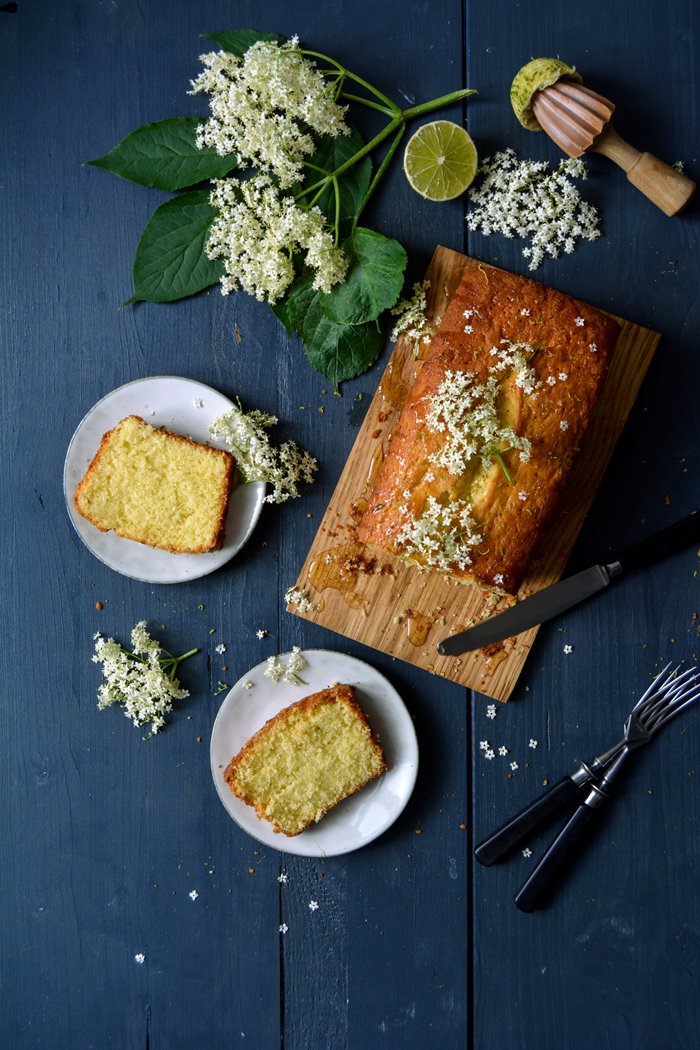
Elderflower Lime Cake

Whenever I ride around the city on my bike at the moment, I feel enwrapped in the sweetest smell of elderflower, black locust (acacia), and chestnut flowers. An invisible cloud meandering through the city. As soon as I open my kitchen window in the morning until I close it at night, I'm mesmerized by this perfume of early summer.
Together with a group of friends, I recently went on a bike tour to the countryside. We chose Beelitz, an area outside Berlin, to spend a day away from noise and distraction. I wrote about this area two years ago, it's a picturesque village surrounded by fields and dense woods and it's famous for Germany's best asparagus (you can see the pictures here). Last time we went a little earlier, in May, the asparagus fields were still covered in foil - white asparagus grows in the dark - but now, in June, the scene looks completely different. What used to grow under ground, pale and slender, turned now into a filigree green plant gently swinging in the breeze. The white asparagus season in Beelitz’ forest is now over.
After our 2-hour bike ride through forest and fields we needed a break and enjoyed asparagus with Hollandaise sauce at a secluded restaurant, called Landgasthof Rieben. We chatted with the owner and learned that you can only grow asparagus on the same field for 7 years, then it also needs a break, for another 7 years. The magic number.
So one of the flowers that smell the most captivating right now, are elderflowers and their season is almost over too. I love to use their sticky syrup for refreshing Hugo cocktails (you find the recipe in the link for the syrup), or to make caramelized onions or chicken taste even sweeter; but using it for baked sweets, is one of the best ways to enjoy elderflower on a Sunday afternoon. I went for a simple lime loaf cake, the warm cake soaked with a wonderfully fragrant syrup made of lime juice and elderflower. Sometimes, these simple cakes are just the best.
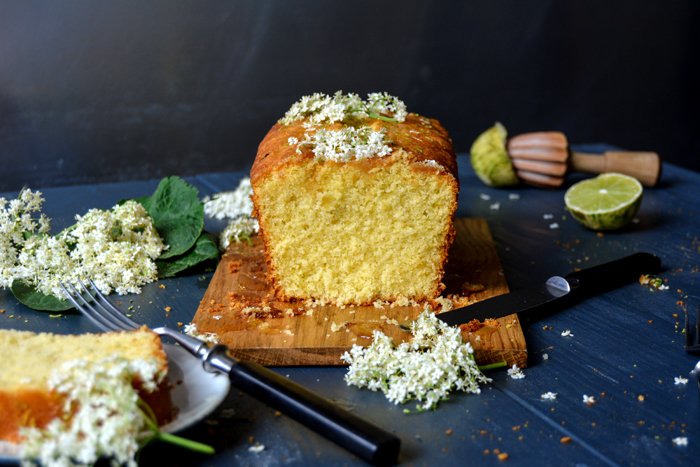
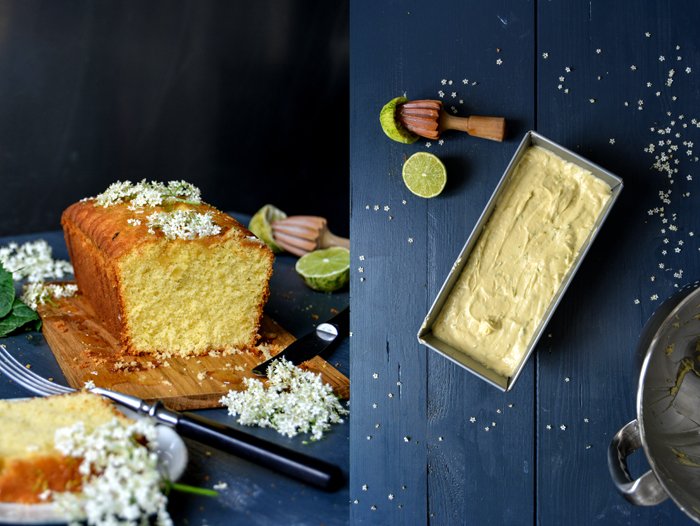
Elderflower Lime Cake
Serves 4 to 6
For the cake
plain flour 210 g / 1 1/2 cups plus 2 tablespoons
cornstarch 70 g / 1/2 cup plus 2 tablespoons
baking powder 3 teaspoons
fine sea salt 1/4 teaspoon
butter, at room temperature, 180g / 3/4 cup plus 1 tablespoon
granulated sugar 180g / 3/4 cup plus 2 tablespoons
organic eggs 3
freshly grated lime zest 2 tablespoons
freshly squeezed lime juice 3 tablespoons
buttermilk 90ml / 1/3 cup plus 1 tablespoon
For the syrup
elderflower syrup 100ml / 1/3 cup plus 1 tablespoon
freshly squeezed lime juice 3 tablespoons
For the topping
a few elderflowers (optional)
Preheat the oven to 160°C / 325°F (preferably convection setting). Butter a 23 x 10 cm / 9 x 4-inch loaf pan.
For the cake, in a large bowl, whisk together the flour, cornstarch, baking powder, and salt. In a second large bowl, beat the butter and sugar for a few minutes or until light and fluffy. Add the eggs, 1 at a time, incorporating each egg before adding the next one, and beat for 2 to 3 minutes or until light and creamy. Add the lime zest and juice and beat for 1 minute. With a wooden spoon, fold about 1/3 of the flour mixture gently into the batter, followed by 1/3 of the buttermilk. Repeat with the remaining flour mixture and buttermilk, folding just until combined. Pour the batter into the prepared pan and bake for about 50 minutes (slightly longer if using a conventional oven) or until golden on top. If you insert a skewer in the center of the cake, it should come out clean. Let the cake cool in the pan for a few minutes before turning it out onto a wire rack.
For the syrup, in a small saucepan, bring the elderflower syrup and lime juice to the boil and cook for 1 minute over high heat.
Prick the warm cake all over with a skewer and slowly pour the elderflower-lime syrup over the top. Decorate with elderflowers just before serving.


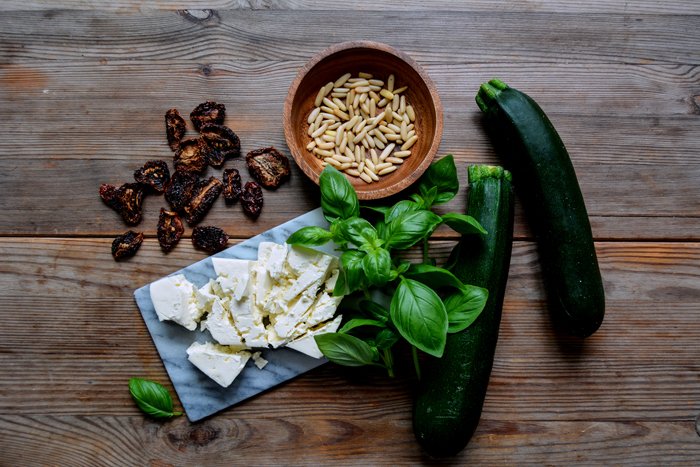
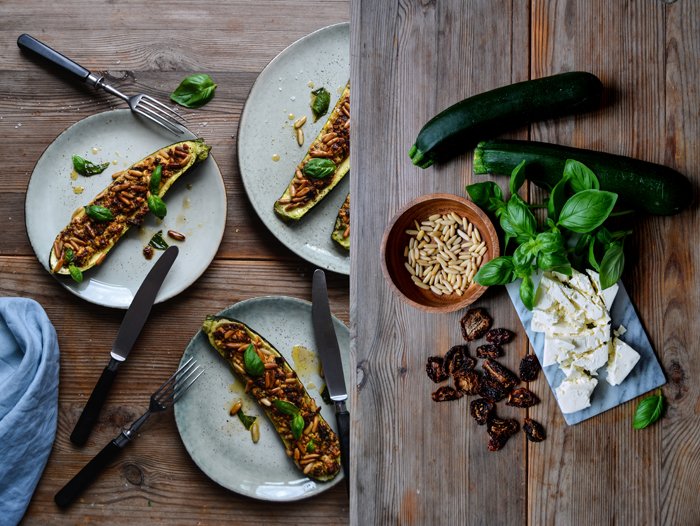
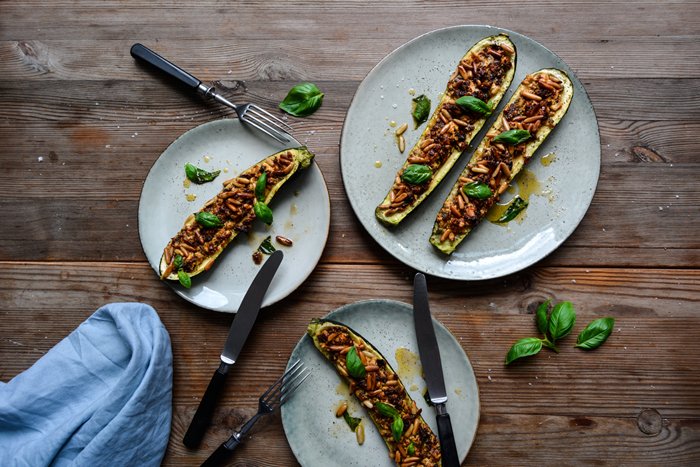
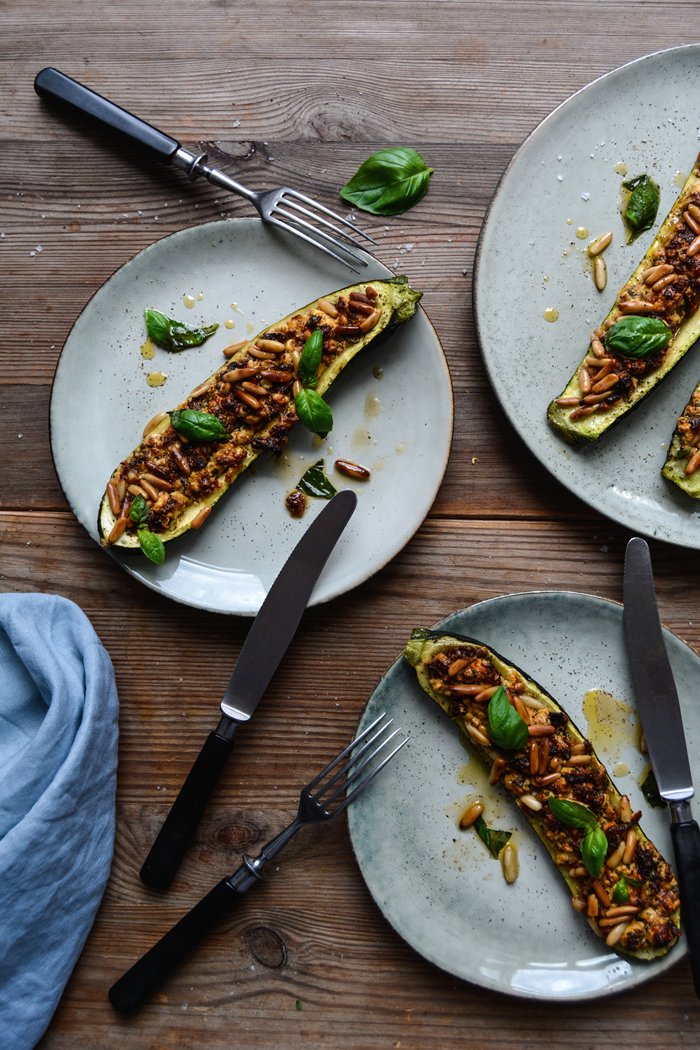
Mediterranean Stuffed Zucchini with Feta, Basil, and Pine Nuts

Soon I'll be eating stuffed vegetables in the kitchens of many Maltese mamas and I know that I'll never want to eat anything else again once I get into the groove. This dish is a cozy classic in Malta's Mediterranean cuisine and I love it for its simplicity just as much as for its pure taste of summer. Ripe zucchini, bell pepper, and eggplant turn into juicy shells full of flavour to wrap scrumptious fillings of cheese, meat, seafood, or even more vegetables. Brunġiel mimli (Maltese for stuffed eggplant) is the most popular of them all - and the richest, stuffed with Bolognese - but there are endless possibilities to turn this recipe into a lighter summer treat.
In mid July we'll be off to spend a few weeks with our family in the South and this will have a huge effect on our daily routine and on our cooking and eating habits. There will be far more fruits and vegetables on the table, they will taste much better than in the North, I will complain less about quality (or not at all), and the results that I stir up in the pots and pans in my Maltese mama's kitchen will give me deep satisfaction. I love to cook in Jenny's kitchen (on gas), with the best produce you can possibly ask for, fresh from my favourite farmer.
There's always a pile of round and long zucchinis in the vegetable drawer, which I either slice up and sauté until al dente or scrape out and stuff - often with ricotta, the island's most popular dairy product. To get into the mood, I came up with a recipe that uses a fragrant composition of dried-tomatoes, pine nuts, basil, and orange zest stirred into feta - instead of ricotta (I'll eat so much of it while I'm in Malta that I should take it easy for now). It looked and tasted like a summer holiday and it was so easy to prepare that I'll make it soon again.
Here's one of my posts from last year, which always makes me want to go straight back to Malta (just in case you're not in the mood for summer yet)!

Mediterranean Stuffed Zucchini with Feta, Basil, and Pine Nuts
Serves 2
sun-dried tomatoes (preserved in salt) 3
pine nuts, toasted until golden, 40g / 1/2 cup
medium zucchini, cut in half lengthwise, soft pulp scraped out, 2
olive oil
fine sea salt
ground pepper
feta 200g / 7 ounces
fresh basil, chopped, about 15g / a large handful, plus a few leaves for the topping
freshly grated orange zest 1 teaspoon
flaky sea salt
Preheat the oven to 200°C / 400°F (conventional setting).
In a small saucepan, bring the sun-dried tomatoes and a little water to the boil and cook for about 3 minutes or until soft. Rinse and pat dry with kitchen paper and chop finely.
Chop half the pine nuts with a large knife or in a food processor.
Spread the zucchini in a large baking dish (cut side up), brush with olive oil, and season with salt and pepper to taste.In a medium bowl, mash the feta with a fork and add the chopped pine nuts, basil, dried-tomatoes, orange zest, and 4 tablespoons of olive oil. Mix and mash until well combined and season with pepper to taste. Divide the feta mixture between the zucchini halves, drizzle with a little olive oil, and sprinkle with the remaining pine nuts and a little flaky sea salt. Cover the bottom of the baking dish with a little water and bake for about 45 minutes or until the zucchini feels soft when you prick it with a metal skewer. Sprinkle with fresh basil and serve.
It makes a great lunch or easy dinner, but you can also serve it at a summer picnic.


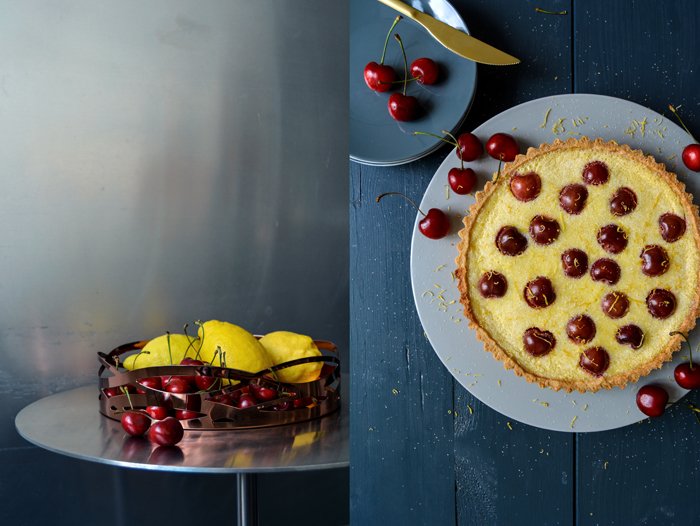
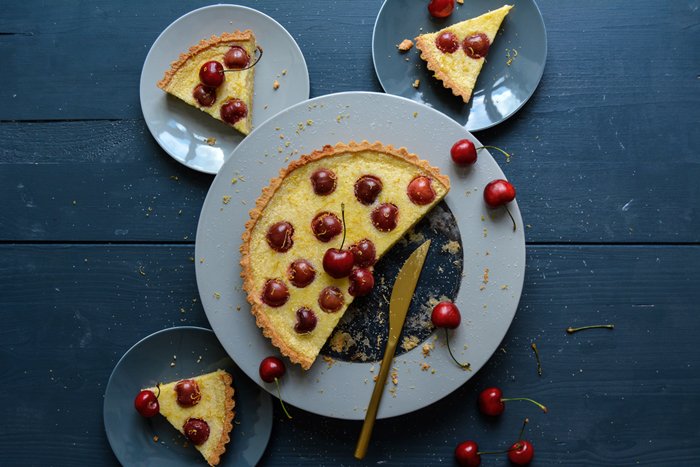
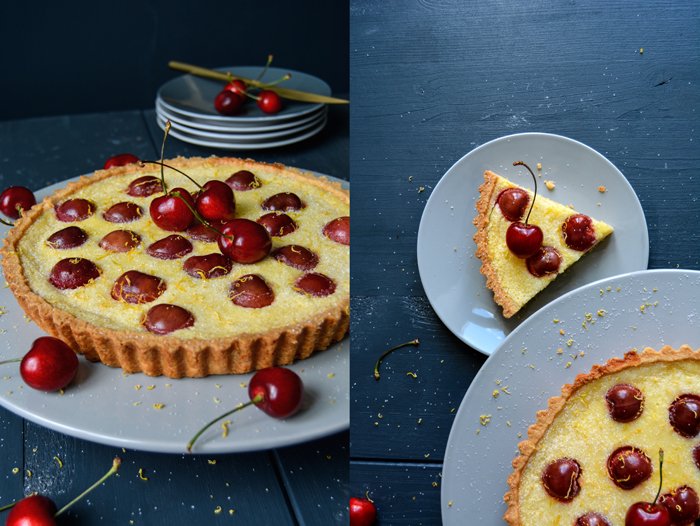
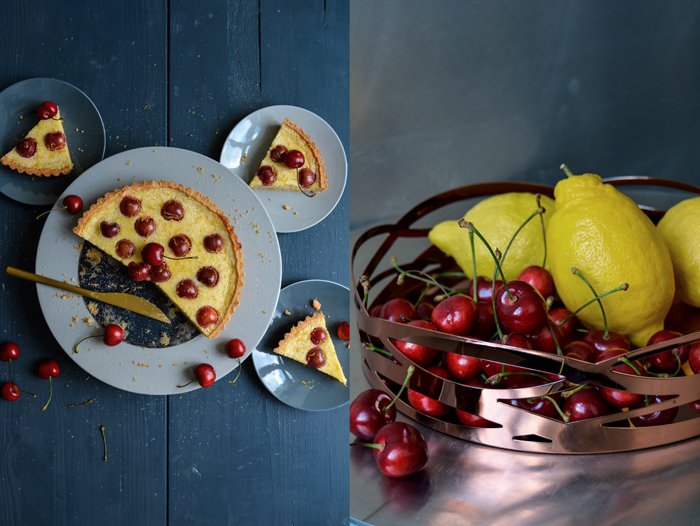
Cherry Lemon Tea Time Tart
I had a passionate discussion about 'the best cherries' with the owner of a vegetable shop in my neighborhood. He's a very kind, very hard working guy from Turkey who never seems to sleep. No matter what time I pass by his shop, the young man is always busy as a bee. He helped me out many times when I needed a certain fruit or vegetable for a photo shoot that wasn't in season. Calling his buddies from all over, he makes the impossible possible. He managed to bring red currants to my kitchen when everyone else laughed at me when I asked for the little berries weeks before their season. He always finds someone in Spain, Greece, or Turkey to make me happy and my photo shoot work. My private cooking follows the season but unfortunately, editorial schedules don't.
So last week he told me that he has very good cherries at the moment, he praised their glossy beauty and outstanding taste. He went even further and said that they are better than German cherries, which, in all respect, is quite a bold statement. In my eyes, I had the best cherries of my life in my granny Lisa's garden and I don't think that anything in the world is ever going to change that. Her juicy fruits were not only packed with so much flavor, but also with the most precious memories. And this is something I love about summer fruits. Take strawberries, blackberries, red or black currants, or cherries, almost everybody, seems to have childhood memories connected not only to these fruits but also to picking and eating them. This is priceless and in a very beautiful way, saved for a lifetime. For my vegetable man from Turkey, the Turkish cherries will always be the sweetest and juiciest and I understand why this is how he feels, and for me, the crop from Lisa's garden used to beat every cherry in the world, because it was her tree - and I miss it.
When I tried my friend’s cherry at the shop, I had to admit that they were really good. So I bought a huge bag full of them, went straight home, and baked a cherry lemon tart. It's a tea time classic in my kitchen and the sweet and sour filling can easily take a little summer-makeover - the cherries make it a bit sweeter and juicier. Next time I'll make it with red currants, but they'll have to be in season.
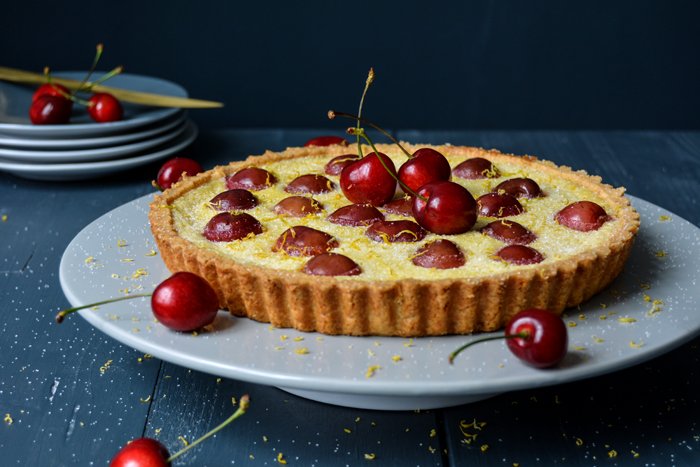
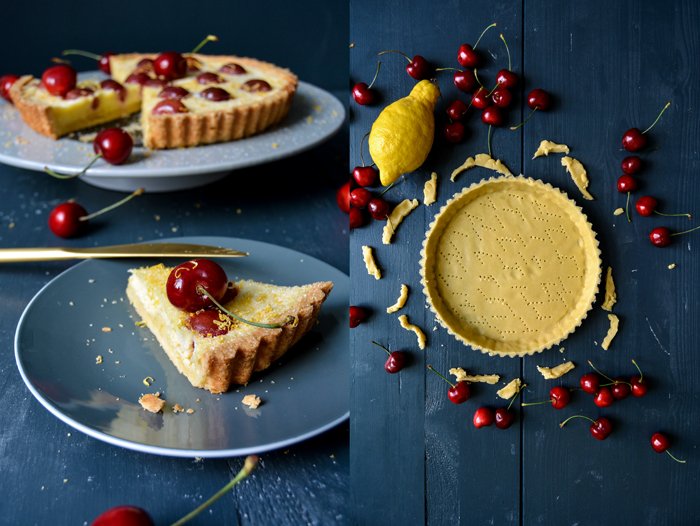
Cherry Lemon Tart
Serves 6-8
For the pastry
flour 200g / 1 1/2 cups
granulated sugar 65g / 1/3 cup
a pinch of salt
butter, cold, 110g / 1/2 cup
organic egg yolks 2
For the lemon filling
organic eggs 2
organic egg yolks 2
heavy cream 100ml / 1/3 cup and 2 tablespoons
crème fraîche or sour cream 3 tablespoons
granulated sugar 100g / 1/2 cup, plus 1-2 teaspoons for the topping
a pinch of salt
ground cardamom 1/4 teaspoon
freshly squeezed lemon juice 3 tablespoons
lemon zest 2 1/2 tablespoons, plus 1-2 teaspoons for the topping
fresh cherries, with their pits, 20 (plus a few cherries for decoration, optional)
For the pastry, combine the flour, sugar, and salt in the bowl of a stand mixer fitted with the dough hook. Add the butter and use a knife to cut it into the flour until there are just small pieces left. Quickly rub the butter into the flour with your fingers until combined. Add the egg yolks, set the mixer to medium speed, and mix until crumbly. Form the dough into a thick disc, wrap it in plastic wrap, and freeze for 12 minutes.
Preheat the oven to 200°C / 400°F (conventional setting).
Roll the dough out between cling film and line a 23cm / 9″ tart pan (preferably loose-bottom) with the pastry. Prick with a fork and bake for about 10-12 minutes or until golden and crisp. Take the pan out of the oven and set aside.
Turn the oven down to 180°C / 350°F.
For the filling, in a large bowl, beat the eggs, egg yolks, heavy cream, crème fraîche, sugar, salt, and cardamom for about 2 minutes until well combined. Stir in the lemon juice and zest and mix well. Pour the lemon filling on top of the pre-baked pastry, spread the cherries in the filling, and carefully transfer the tart pan back to the oven. Sprinkle with a little sugar and bake for about 40 minutes or until set.
Let the tart cool for 10 minutes, then sprinkle with a little lemon zest and decorate with the remaining cherries (optional). Serve warm or cold.


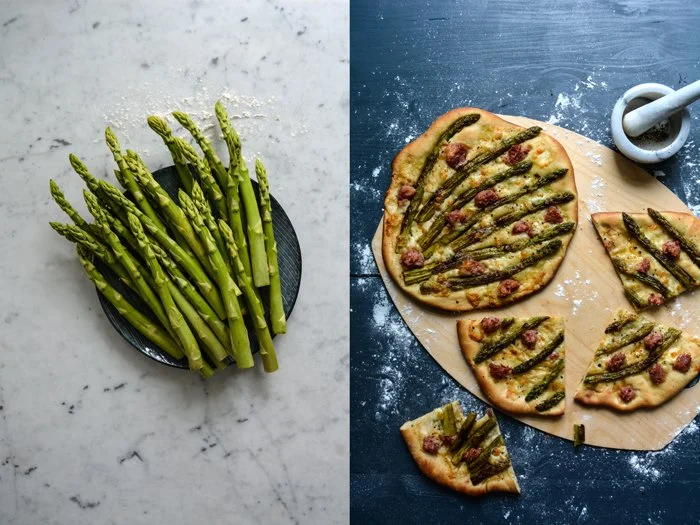
Pizza Bianca with Green Asparagus, Salsiccia, and Mozzarella di Bufala
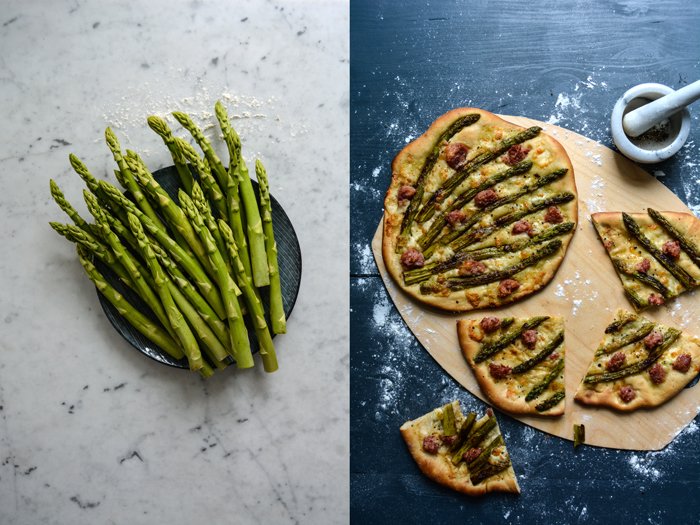
I got my first KitchenAid and I feel like a little girl on Christmas Eve. To call the current mood in my kitchen excitement would be a serious understatement.
After years of seeing - and admiring - these sparkly, polished beauties in the kitchens of my friends and family (my sister has two!), the time had come to get my own. At a certain age, one deserves these special treats. I'm a strong believer that it's good to wait for things in life, it strengthens your character and makes you deeply appreciate what you have. But 20 years of waiting was more than enough, that's how long it took me to finally see this powerful stand mixer on my marble counter tops.
In various phases of my life, I always had my favourite KitchenAid colour. In my young twenties, I loved the creamy white surface, followed by a fascination for the 50s and its soft pastels. Light blue, mint, or pink, I would have taken any of them. Then I got into puristic minimalism and only a black mixer would have made it into my kitchen. In my thirties, I fell for light yellow, but now, all of a sudden, I had to make a decision and decide which colour I would finally get and see for the rest of my life. It wasn't easy and it took a few visits to various appliance shops. In the end, I had to weigh the advantages and disadvantages of cream, yellow, black, copper (which looks really hot), and brushed stainless steel. This process brought back lots of memories of the different eras of my life connected to each colour. After a couple weeks, my decision was made: brushed stainless steel is the winner! When the large package arrived I couldn't wait to see my object of desire on my counter tops - I was almost hysterical, which is excusable in my eyes, it's been 20 years after all. So here it is and it looks amazing. The mixer's metallic surface fits perfectly to my white marble and brushed aluminium wall panels. I'm totally in love and can't stop looking at it.
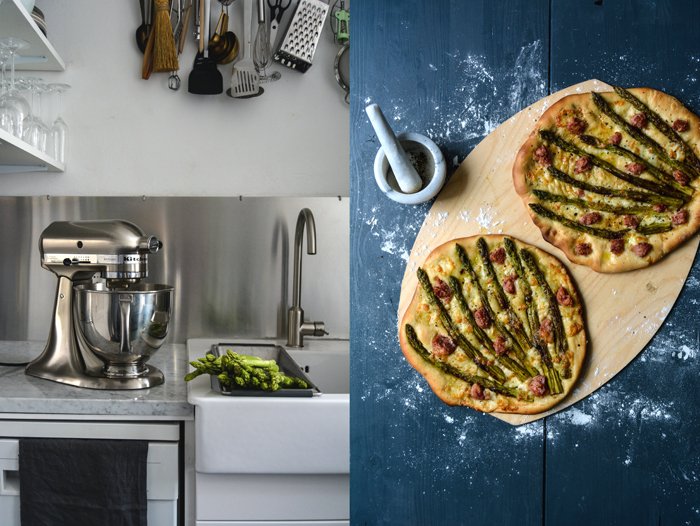
Testing its functionality was the next step, I had never used a KitchenAid before. My unbreakable hand mixer, a gift from my mother when I moved into my first flat two decades ago, has been a loyal partner during all my kitchen adventures. I was a little nervous and decided to start with two easy recipes - Sunday morning pancakes and Sunday evening pizza. This allowed me to get used to the three different attachments. My hand mixer only has two, but my new beauty offers a whisk, a paddle, and a hook - I needed a conference call with my sister to figure out when to use what.
Before I switched on the power, I had to call my boyfriend for this special moment. And this was our maiden voyage: I - rather the mixer - started beating the egg whites with such calm, persistence, and firm perfection that I thought I'd never touch my hand mixer ever again (sorry hand mixer). My next project - pizza dough - gave me the same satisfaction. The yeast dough was well mixed, smooth, and ready to be kneaded with my hands for a few minutes, which I always do to turn it into a soft and silky ball. I thought I'd use the time while the dough was getting mixed in the machine to prepare the toppings, however, I couldn't help but sit next to it with a glass of rosé wine in my hand and watch it work with elated enthusiasm.
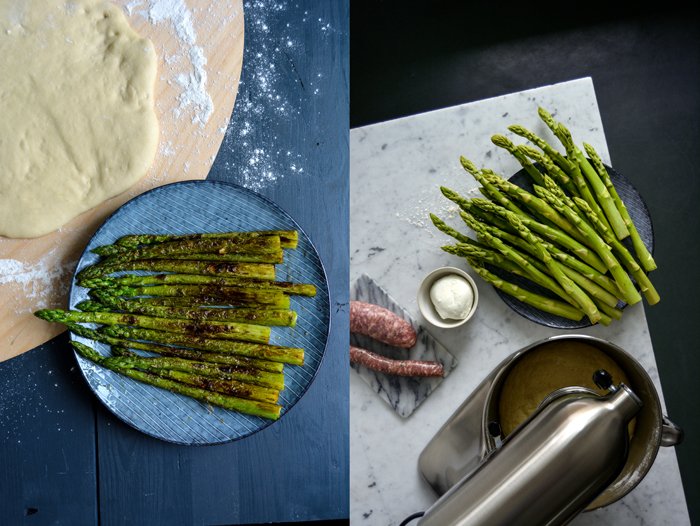
Our first KitchenAid pizza was such a great success that I made another one only three days later, but this time it was an oily pizza bianca topped with green asparagus, Italian salsiccia, and mozzarella di bufala. On our latest Saturday leisure trip, we went to the food market at Markthalle Neun in Kreuzberg in Berlin and enjoyed a luscious piece of very oily pizza bianca at Sironi. The baker, Mr. Sironi, went for a topping of broccoli, sausage, and mozzarella. It was very minimal and very good and a reminder that it's time for a white pizza in my kitchen. I find it lighter and quicker to prepare and it tastes just as good when it's cold, which makes it perfect for summer picnics or easy dinners on the balcony or in the garden. I'm really impressed by the simple combination of greens, mozzarella, and sausage. Asparagus is in season at the moment, but feel free to replace it with broccoli, leek, zucchini or whatever veg comes to your mind. You could also add a little garlic oil, which I don't find necessary. But we're talking about pizza, so everybody should just follow their personal preferences. Enjoy!
Click here for more pizza inspiration.
Thank you KitchenAid for helping me make my little kitchen dream come true!
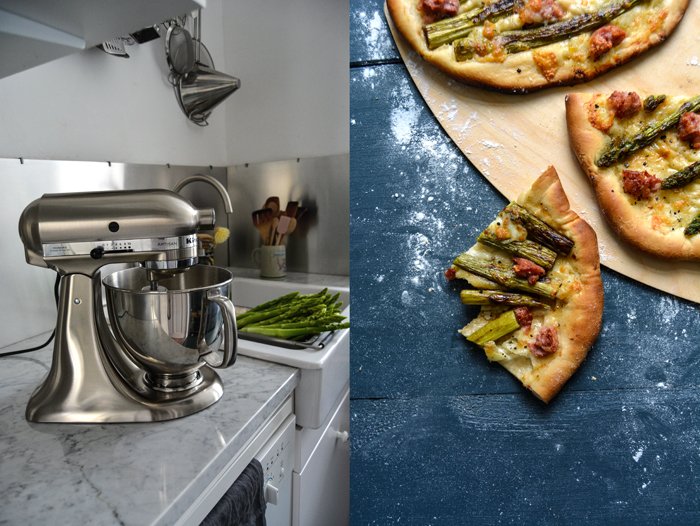
Pizza Bianca with Green Asparagus, Salsiccia, and Mozzarella di Bufala
I start to prepare the dough 2 hours before I bake the pizza to give it enough time to rise and I bake it on a hot baking sheet, which has a similar effect to a pizza stone.
Makes 2 pizzas
For the dough
plain flour 350g / 2 2/3 cups
fast-acting yeast 1 (7g / 1/4 ounce) envelope
fine sea salt 1 teaspoon
water, lukewarm, 180ml / 3/4 cup
olive oil 6 tablespoons
For the topping
olive oil
green asparagus, trimmed, 14 young stalks
flaky sea salt
black peppercorns, crushed in a mortar
large Italian salsiccia sausage (or any other coarse sausage), skin removed and cut into chunks, 1
mozzarella di bufala, torn into chunks, 125 g / 4 1/5 ounces
For the dough, combine the flour, yeast, and salt in the bowl of a stand mixer fitted with the dough hook. Add the lukewarm water and olive oil and knead on medium-high speed for a few minutes until well combined. If the dough is too sticky, add more flour. Transfer the dough to a table or countertop and continue kneading and punching it down with your hands for about 4 minutes until you have a smooth and elastic ball of dough. Place the dough back in the mixer bowl, cover with a tea towel, and let rise in a warm place, or preferably in a 35°C / 100°F warm oven, for about 60 minutes or until doubled in size.
While the dough is rising, prepare the topping: Heat a generous splash of olive oil in a large, heavy pan and sauté the asparagus, turning occasionally, on medium-high heat for about 7 minutes. Season with flaky sea salt and crushed pepper to taste and set aside.
When the dough has doubled in size, punch it down, take it out of the bowl, and divide into 2 parts. On a well-floured work surface or pizza peel, stretch or roll each piece of dough into a 28cm / 11" disc. Cover with a tea towel and let rise for about 30 minutes or until puffy.
Place a baking sheet (or pizza stone) on the bottom of the oven and preheat the oven to the highest temperature, 260°C / 500°F or higher.
Once the baking sheet is hot, carefully take it out of the oven, flip it over, and place it on a trivet or other heat-safe surface. Arrange 1 of the risen dough discs on the baking sheet and spread half the asparagus, salsiccia, and mozzarella di bufala on top. Push the asparagus gently into the dough. Sprinkle with 1 tablespoon of olive oil, a little flaky sea salt, and crushed pepper and bake on the bottom of the oven for about 10 minutes or until the crust is golden brown and crisp and the mozzarella is golden. Repeat to make the second pizza and serve hot or cold.

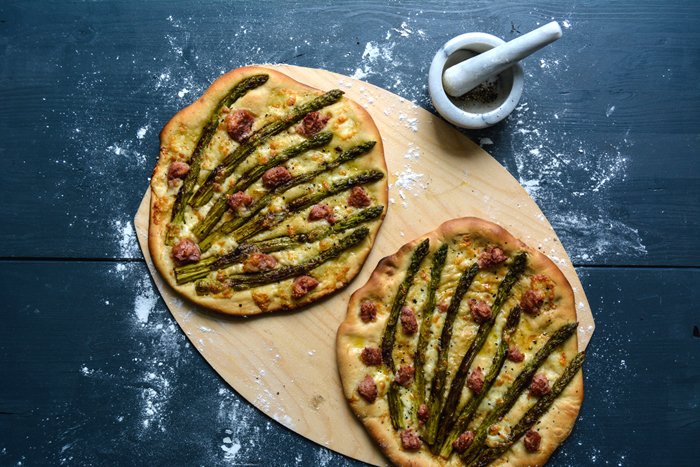

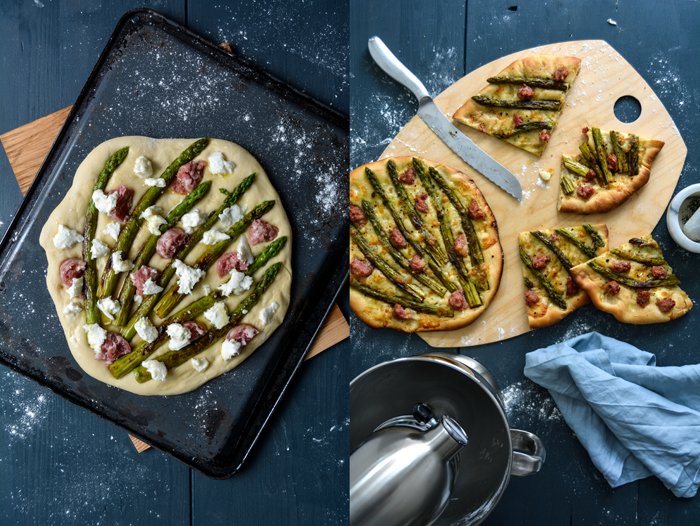
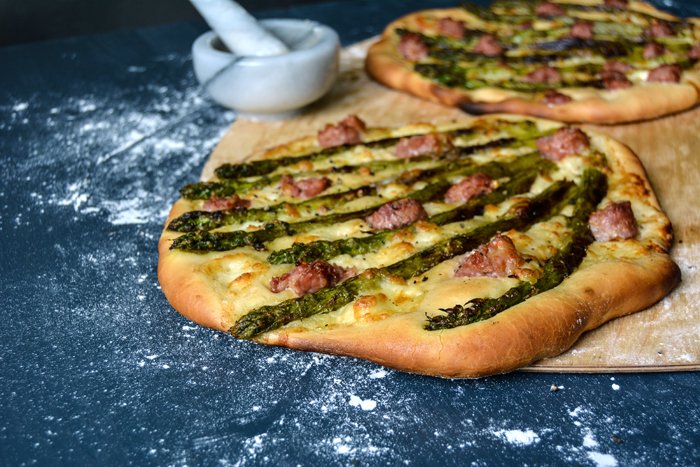
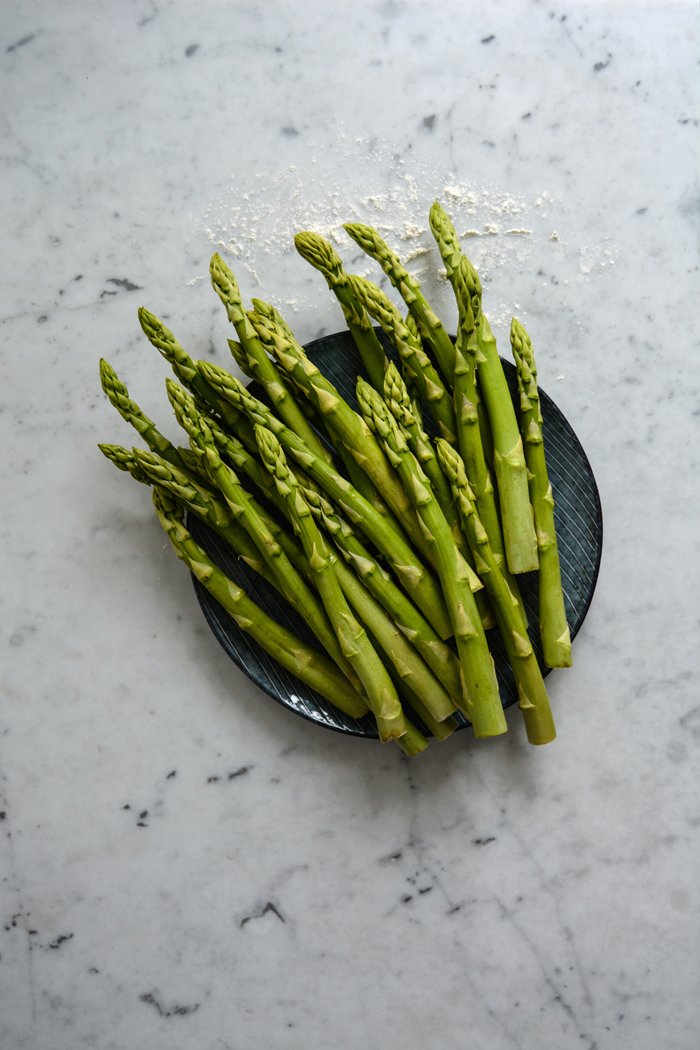
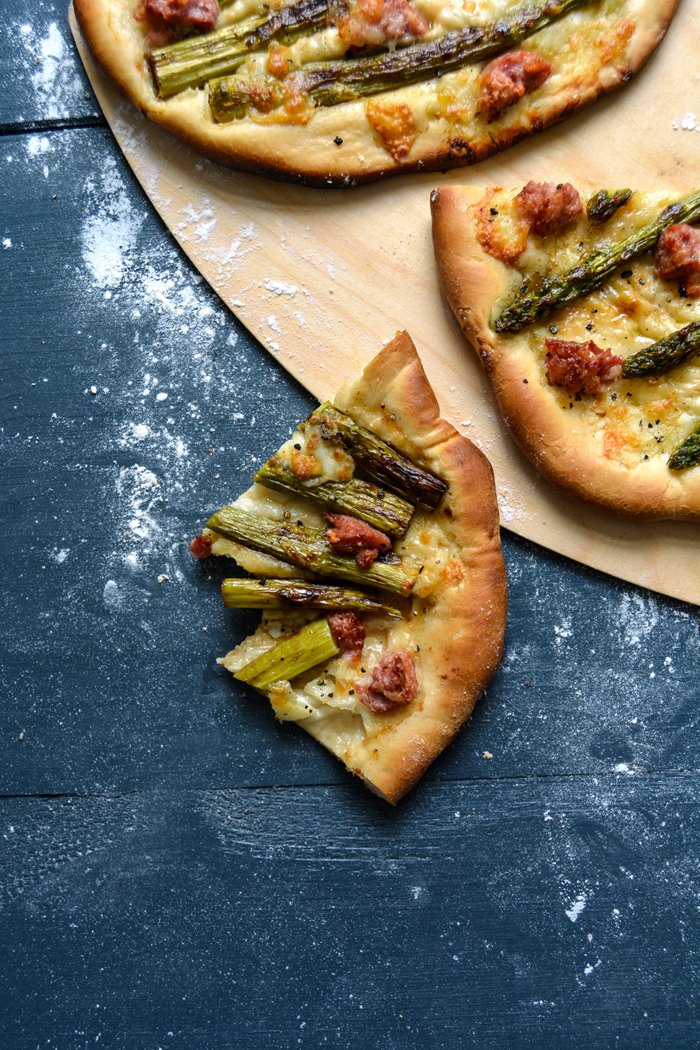
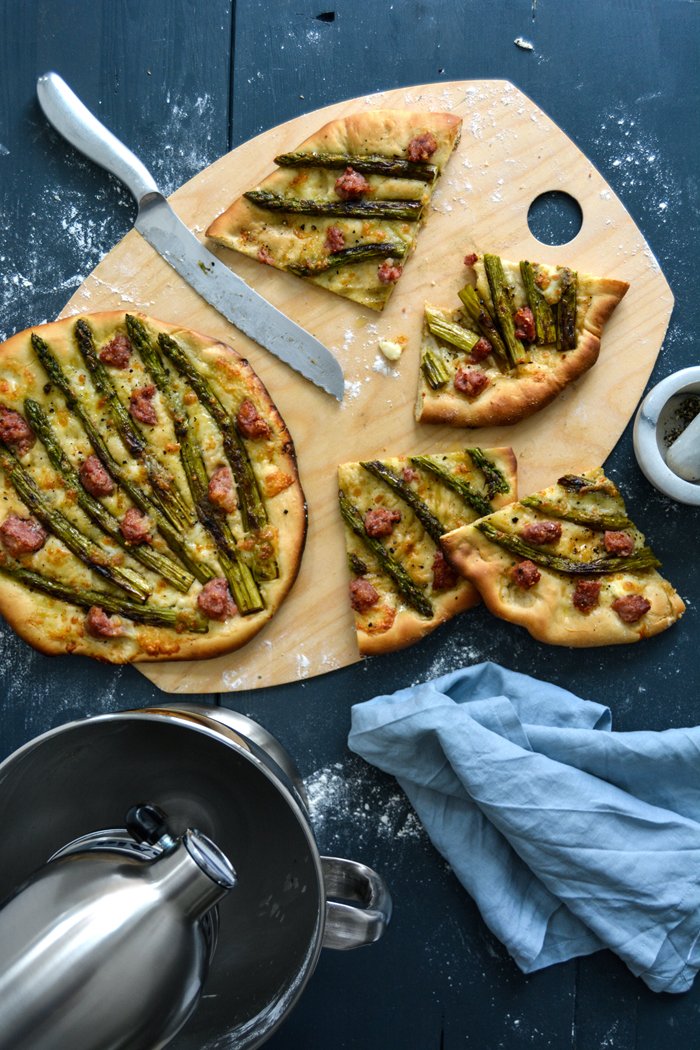


The juiciest Rhubarb Chocolate Cake
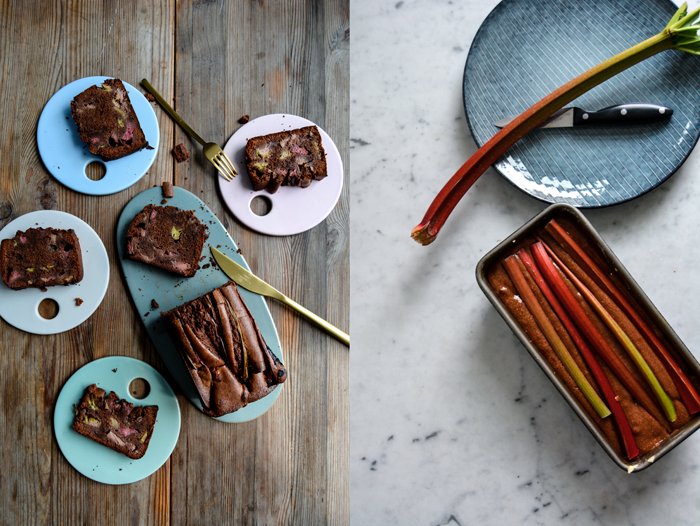
The amount of recipes I've been creating by request in the past few months could almost fill another book. My mind had to come up with all sorts of sandwiches, roasts, seafood dishes, salads, and cakes, which to be honest, is one of the most satisfying things I do amongst all the fields that I've worked in since I started my blog. I love to write and take food photos, but there's something very calming and, at the same time, very exciting about creating recipes. Re-thinking culinary traditions, playing with old and new combinations and various ingredients in my head until a whole dish finally comes to the table is my true passion. It's one of the few things that never pressures me, it comes out so easily that I wouldn't dare to call it work.
Working on so many new creations at the same time has one side effect: I have to remind myself to keep it simple - my personal kitchen mantra. I tend to go further and further, adding more and more ingredients, and forgetting that kitchen magic often lies in the little details. A small change can add a completely new quality to a dish, like to my chocolate cake - or the darkest Gâteau au Chocolat. It's a good cake, with chocolaty depth and a moist texture. As in all of my baked treats, I prefer chocolate over cocoa powder, taste and texture is what I'm after when I want to satisfy my chocolate cravings. Back to my cake, there was no need to improve on this formula, it's just right, but I've been wanting to bake a rhubarb cake for days so I just combined the two. I added so much rhubarb to my dark loaf cake that it ended up being the juiciest and fruitiest chocolate cake I ever baked - with a slightly sweet-sour note.
A short note: I let the loaf cool for just a few minutes before I cut it - I was too impatient - but I recommend letting it cool completely, otherwise it's a little too fudgy. So be patient, let it cool, and enjoy! For my Gâteau au Chocolat, I used very dark chocolate (99%), however, for this rhubarb chocolate cake I would go for a lighter one, 55% was my chocolate of choice.
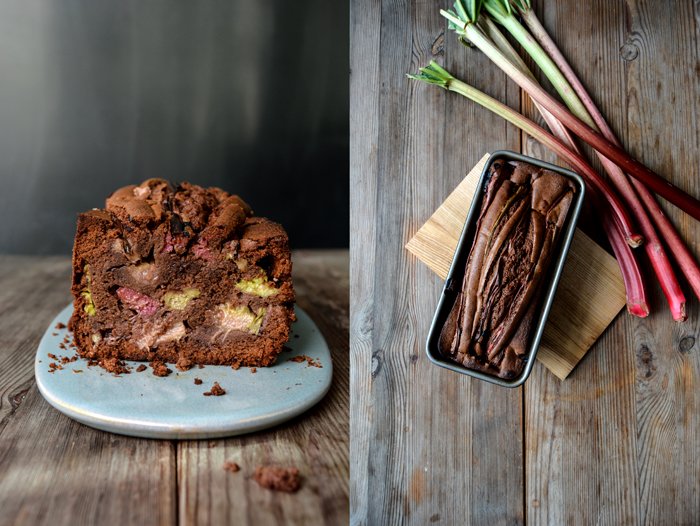
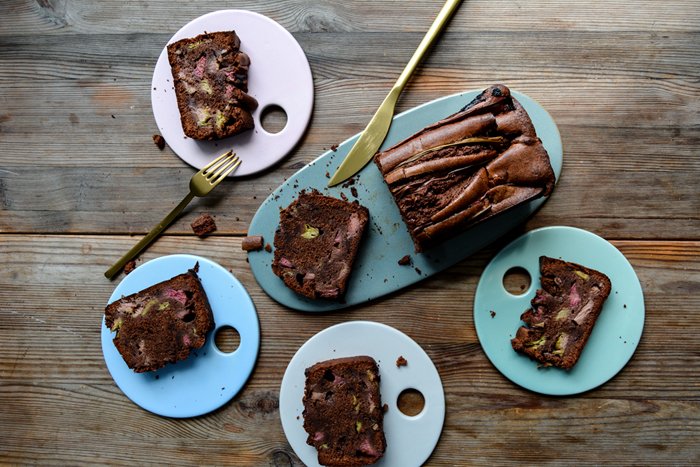
Rhubarb Chocolate Cake
Serves 6
trimmed rhubarb 450g / 1 pound
dark chocolate (about 55%) 150g / 5 ounces
butter 150g / 2/3 cup
organic eggs 4
a pinch of salt
plain flour 130g / 1 cup
ground cinnamon 1 teaspoon
ground cardamom 1/2 teaspoon
granulated sugar 180g / 3/4 cup plus 2 tablespoons
For the top of the cake, cut 5 thin long pieces of rhubarb, about 25cm / 10" long. Cut the remaining rhubarb into 2cm / 3/4" long pieces.
Set the oven to 180°C / 360°F (preferably convection setting) and butter a 11 x 25cm / 4 1/2 x 10" loaf pan.
In a medium saucepan, melt the chocolate and butter over low heat, whisk well, and let cool for a few minutes.
Whisk the egg whites and salt until stiff.
Combine the flour, cinnamon, and cardamom.
Mix the egg yolks and sugar until light yellow and thick, then whisk in the chocolate-butter mixture. Using a wooden spoon, stir in the flour mixture and mix until well combined, then gently fold in the beaten egg whites. Fold in the shorter rhubarb pieces and scrape the batter into the buttered pan. Arrange the long rhubarb pieces on top of the cake and bake for about 75 minutes (slightly longer if using a conventional oven) or until the cake is golden brown and firm on top. If the top of the cake gets too dark, cover it loosely with aluminium foil. Check with a skewer, it should come out almost clean. Let the cake cool completely for a couple hours before you take it out of the pan.
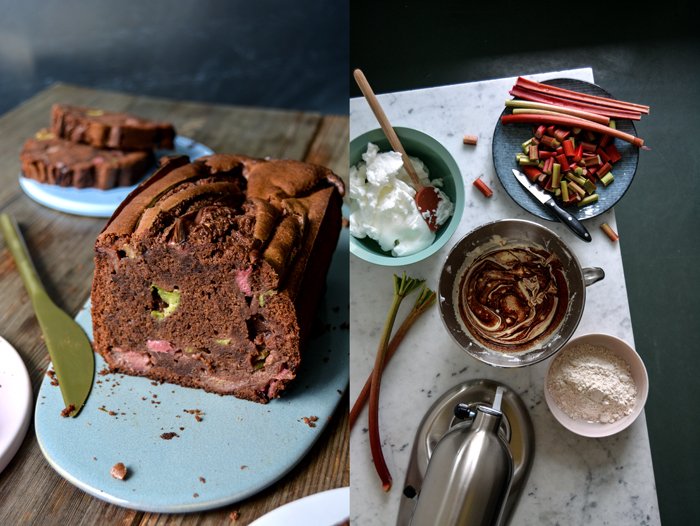
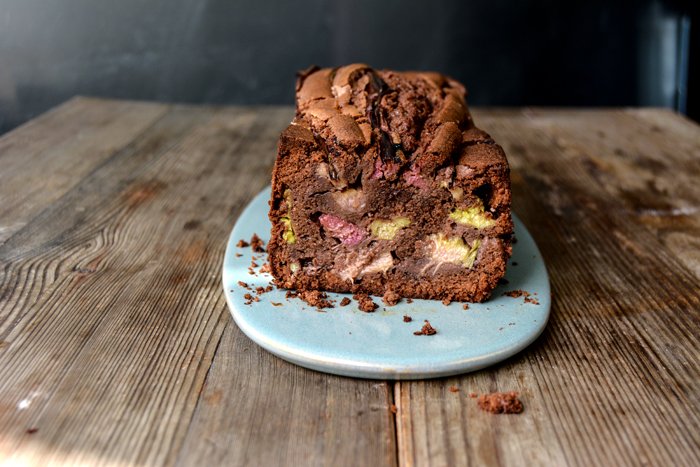
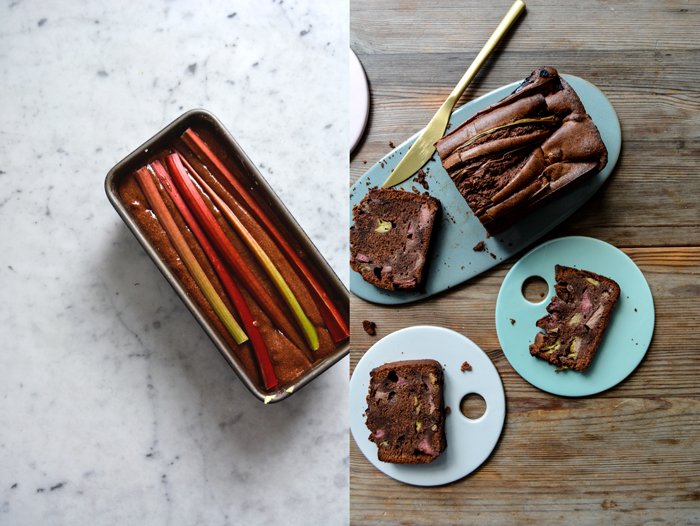

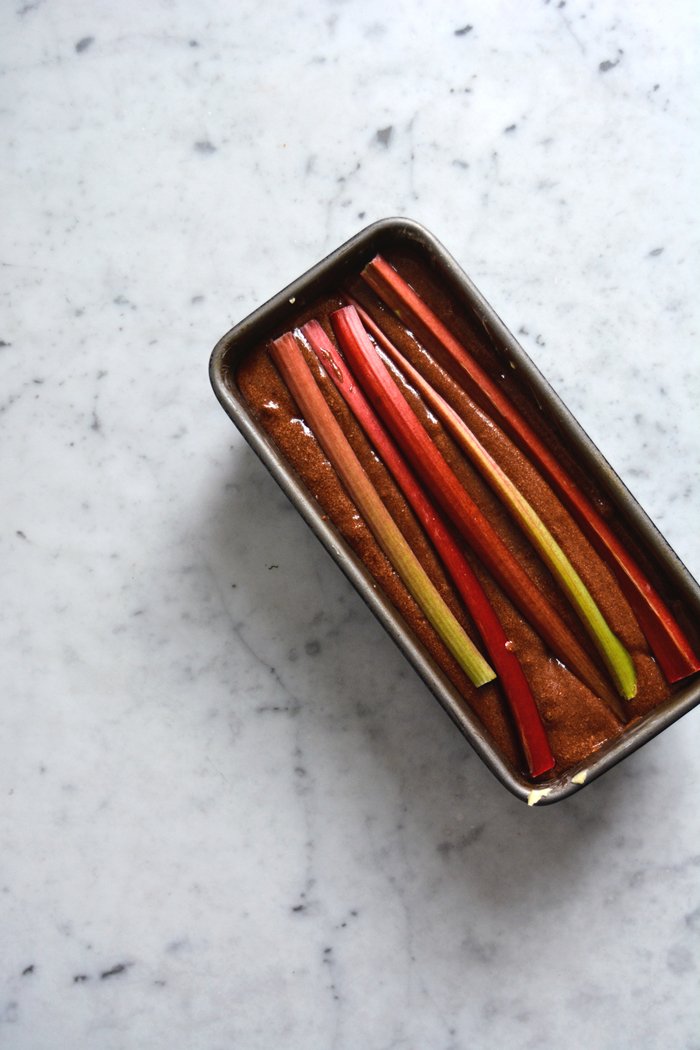


Crispy Pan-Roasted Coriander Potatoes with Chèvre and Lemon Thyme

Golden roasted potatoes eaten straight out of the pan are an unbeatable culinary delight. Spice it up with crushed coriander seeds, mild fresh chèvre, and aromatic lemon thyme and you'll have an easy summer lunch (or dinner) that won't disappoint you. It's a rustic side for barbecued sausage, steak or ribs, you could even serve it as a cold or warm salad. But don't forget to cook the potatoes a few hours, or preferably a day, in advance. To create crispy potatoes, they have to be cold and dry from the start.
I often enjoyed pan roasted potatoes with my mother when I visited her for a one-night sleep over while I still went to university. We would open a nice bottle of red wine, fry some onions and Tyrolean prosciutto, and mix in the crispiest potatoes. These were the perfect girls' nights, just us, chatting and cooking, and enjoying the simple treats of life, which my mother mastered to perfection!
If you're looking for more inspiration for roast potatoes, here are a few scrumptious recipes:
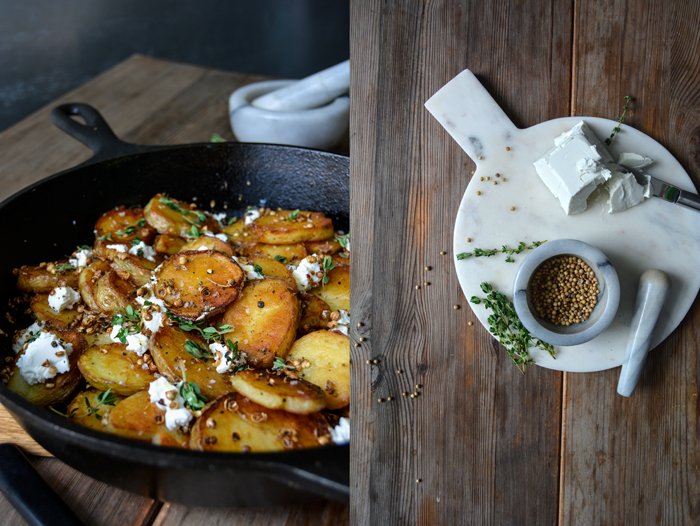

Crispy Pan-Roasted Coriander Potatoes with Chèvre and Lemon Thyme
Serves 2-3
olive oil
waxy potatoes, peeled, boiled, and rinsed, about 700g / 1 1/2 pounds
flaky sea salt
black peppercorns, crushed in a mortar
quality coriander seeds (preferably organic), lightly crushed in a mortar, 2 tablespoons
fresh chèvre, crumbled, 100-150g / 3 1/2-5 ounces
fresh lemon thyme leaves (or regular thyme and a little lemon zest) 2-3 tablespoons
Let the potatoes cool and dry on a wire rack for at least 1 hour or a day and cut them into thick slices. In a large, heavy pan, heat a generous splash of olive oil and roast the potatoes on medium-high for a few minutes on each side until golden brown. Cook them in batches and turn them one by one with a fork. Season with flaky sea salt and crushed pepper to taste and transfer to a plate. Cover them with a lid to keep them warm.
Heat a splash of olive oil in the pan used to roast the potatoes and cook the coriander seeds on medium heat for 1 minute (they shouldn’t get dark). Add the roasted potato slices to the pan, mix gently with the coriander, and sprinkle with crumbled chèvre and the lemon thyme. Season with salt and pepper to taste and enjoy warm.
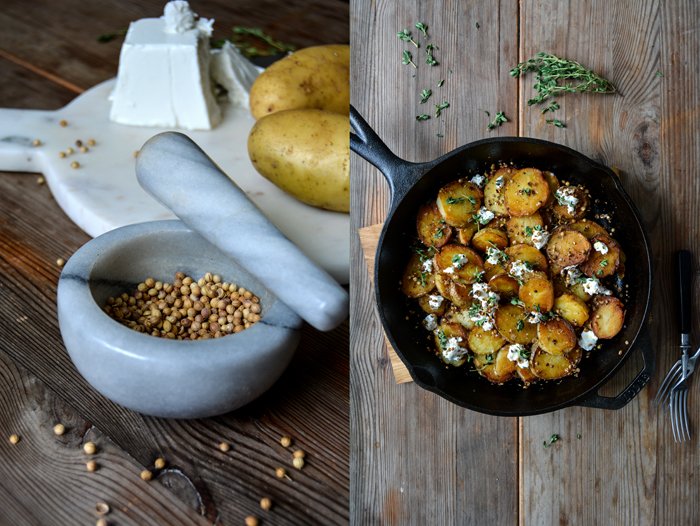


Hemsley + Hemsley's Cannellini Sponge Cake with Chocolate Avocado Frosting
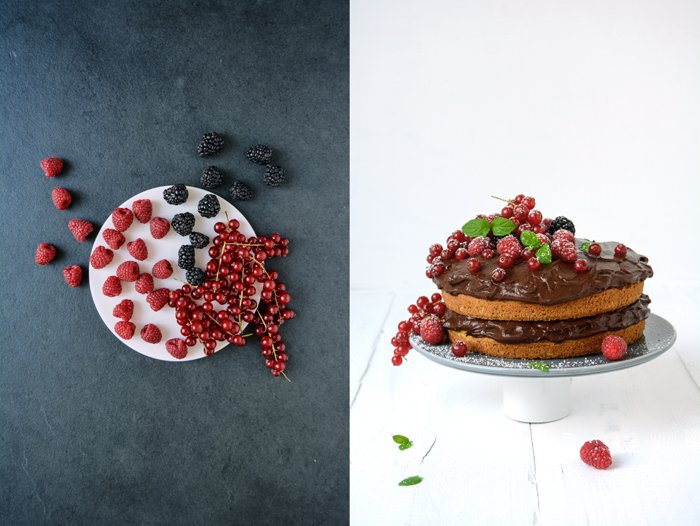
No flour and no butter - the Hemsley sisters did it again! The two gorgeous girls from London impressed me with a recipe that leaves out all the ingredients that I usually pull out of my pantry and fridge when I turn on the oven to bake a sweet treat.
There's a beautiful cake in the sister's new book Good + Simple that surprised and challenged my traditional idea of sweets and baking. When they published their last book I was in a similar situation, I gave their raw avocado lime cheesecake a try and I was more than a bit skeptical in the beginning. However, there was no need for any doubts, the Hemsley's taught me that you can make a cheesecake without cream cheese, using avocados instead. It has the same creamy texture, it tastes great, and it's healthy! But this time, Jasmine and Melissa went a step further, they made a sponge cake with canned cannellini beans and a little coconut flour. To my big surprise, the result looks like a sponge cake, feels like a sponge cake, and tastes like a sponge cake. It was a little like a science project that works out when you least expect it. I could not imagine how canned beans could turn into a spongy cake, layered with chocolate avocado frosting. I got used to the avocados from their last book, but the beans seemed a bit far fetched. I was wrong. It's kitchen magic, I don't know how, but the mashed legumes become a light cake (with the help of a few other ingredients).
I always believe that it's important to have an open mind in the kitchen, to exchange ideas with other great minds that love food just as much but maybe follow another diet, a different approach. Our culinary traditions can only evolve if we try out new recipes, ingredients, and combinations. I'm lucky, my own diet only follows my mood, I don't suffer from any allergies or food intolerance. You'll see a cakey nibble on my plate quite often during the week - and an even bigger piece on the weekend. My health doesn't mind my little sweet treats, but even I changed to white spelt flour (type 630) for all my baking recipes (sweet and savoury) a few years ago. I just prefer its nutritional value. So we all have to find out which kind of food makes us feel good, the body and the mind. The beans were a great reminder for me that there are many ways to enjoy the sweet side of life.
On my last trip to London, I visited Jasmine at the new Hemsley+Hemsley café at Selfridges in London. She and her sister told me about their latest project so enthusiastically when we last met in Berlin that I couldn't wait to see their new "baby". It's the perfect place to enjoy a little shopping break, to snack and feel good. If you happen to be in the capital and you're after the kind of food that gives you energy during a busy day and tastes delicious at the same time, follow the Hemsley's to their new kitchen.
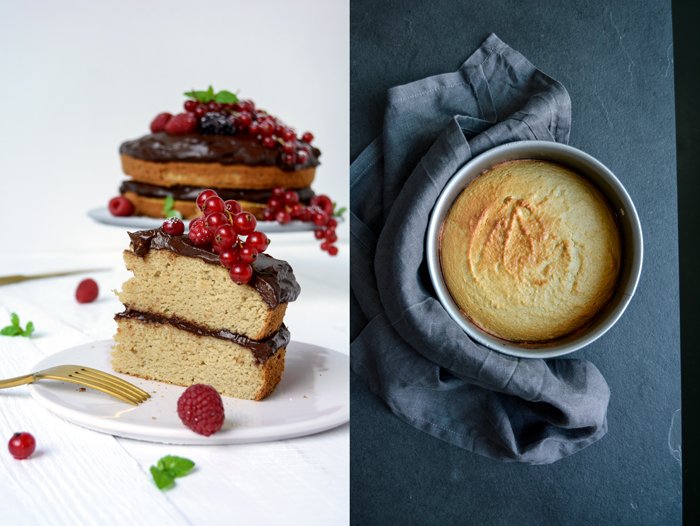

Cannellini Sponge Cake with Chocolate Avocado Frosting
I only made half the recipe and used an 18cm / 7" springform pan. I baked the sponge cake for 25 minutes.
Serves 6-8
For the sponge cake
coconut oil, melted, 125g / 1/2 cup, plus extra for greasing
cannellini beans, drained and rinsed, 3 cans (each 400g / 14 ounces)
medium eggs 9
vanilla extract 1 tablespoon (I used a pinch of fresh vanilla seeds, scraped out of the bean)
maple syrup 220ml / 3/4 cup plus 3 tablespoons
apple cider vinegar or lemon juice 5 teaspoons
coconut flour 90g / 3 1/4 ounces
baking soda 2 1/2 teaspoons
fine sea salt 1/4 teaspoon
fresh mixed berries 150g / 5 ounces, to decorate the cake
For the Chocolate Avocado Frosting
medium, ripe avocados 4
coconut oil, melted 5 tablespoons (about 75g / 2 1/2 ounces)
raw honey 8 tablespoons (to taste)
cocoa powder 10 tablespoons
vanilla extract 1 tablespoon
lemon juice 2 tablespoons
orange extract (not essence) 1/2 teaspoon (I used a little freshly grated orange zest)
a pinch of sea salt
Preheat the oven to 180°C/350°F (convection setting), then line the bases of two 25cm / 10" springform pans with baking parchment and grease the sides with butter or coconut oil. (I baked one cake after the other in the same pan and kept the dough in the fridge while the first one was baking.)
Blend all the ingredients for the frosting together in a food processor until smooth, adding a dash of cold water if needed. Adjusting the flavouring to taste, then transfer to a bowl and set aside in the fridge.
For the cake, add the cannellini beans to the cleaned food processor bowl along with the eggs, vanilla extract, and maple syrup and blend until smooth. Add the remaining cake ingredients, except the berries, and blend to combine.
Divide the cake batter between the prepared cake tins, spreading out evenly and smoothing the surface. Bake in the oven for 35 minutes until well risen and lightly golden on top. Check the cakes after 25 minutes and swap the tins between shelves, if necessary, as they will cook at different rates.
Remove from the oven, transfer to a wire rack and allow to cool completely in the springform pans before turning out.
While the cakes are cooling, gently wash the berries and dry them carefully using kitchen paper or leave to air dry; they must be thoroughly dry before adding to the cake.
Spread half the frosting on one of the cooled sponges, top with the other sponge and spread over the rest of the frosting. Store in the fridge and bring to room temperature to serve. Decorate with the fresh raspberries just before serving. (I sprinkled the berries with icing sugar and added a few mint leaves.)