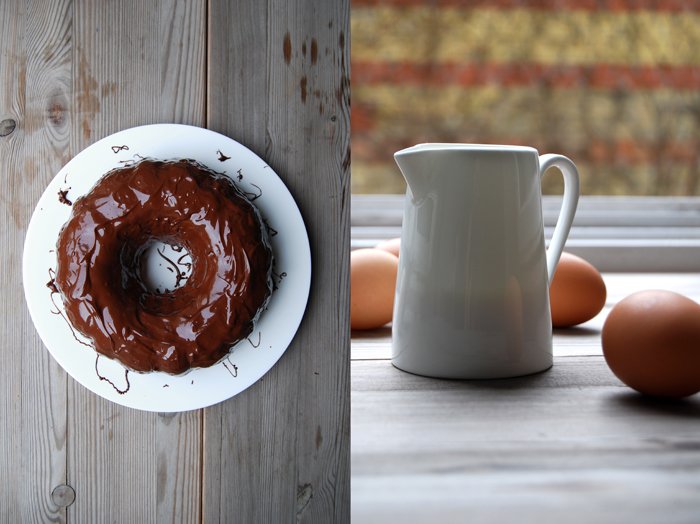
My favourite Chocolate Marble Cake
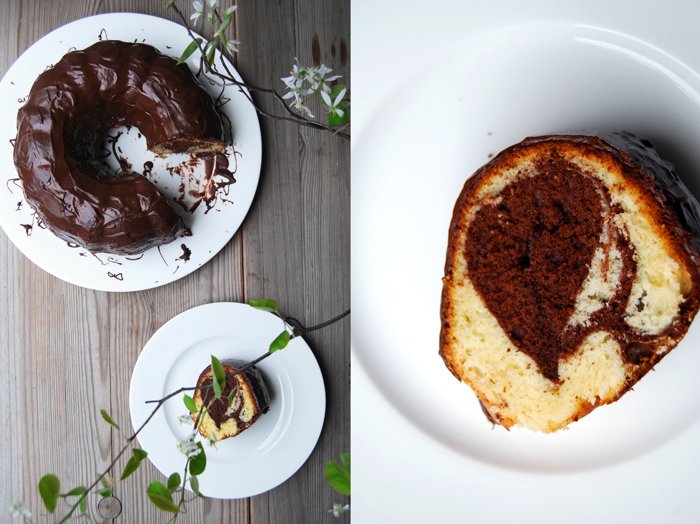
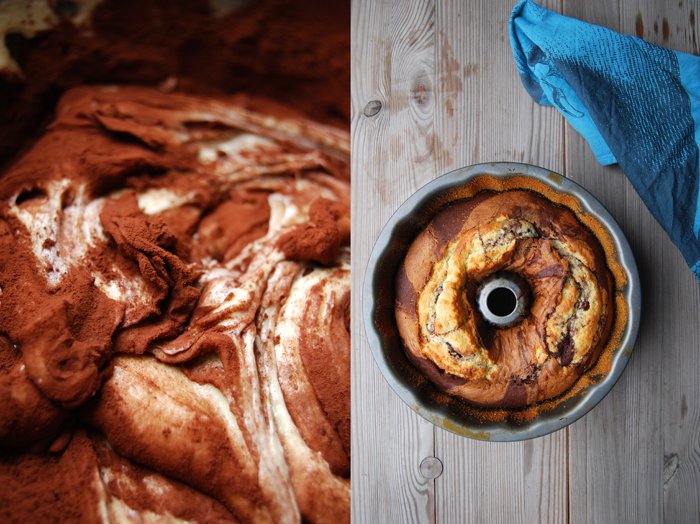
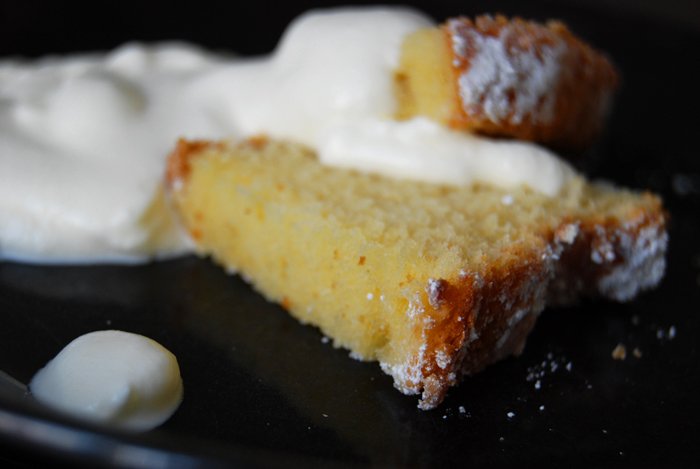
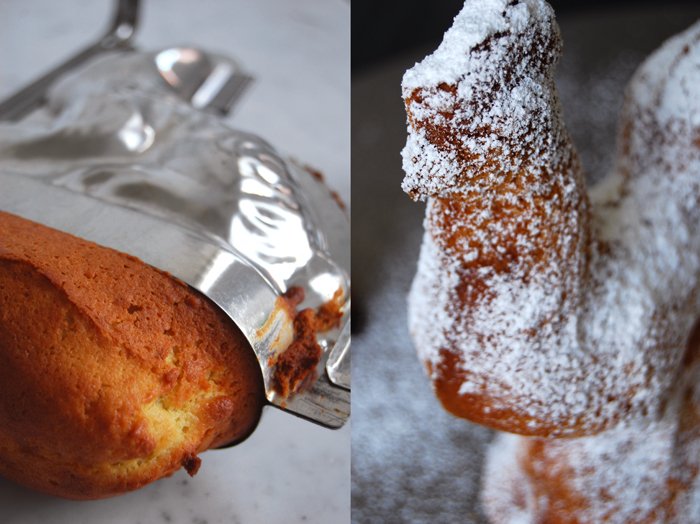
My favourite marble cake needs 6 eggs to turn into a bundt cake so fluffy and juicy, light and enjoyable that I just can't stop eating it. Most of the time I just sprinkle it with icing sugar but some days ask for more. When I'm in a chocolaty mood I cover it in a crunchy layer of bittersweet chocolate.
This cake is so simple but whenever I hold a slice of it in my hand and take the first bite I ask myself why I don't bake it more often. It's a typical childhood cake, a birthday party classic which had to be on every coffee table. It's also the cake my mother used to bake for my own special day. In the morning, I used to find it on my birthday table together with all my presents and it always had my name and age written on it, with colourful smarties pushed into the glossy chocolate. Two year's ago I baked it for the first time for our godchild's first birthday, with smarties of course to continue the tradition.

Chocolate Marble Cake
For a 23cm / 9″ bundt pan you need
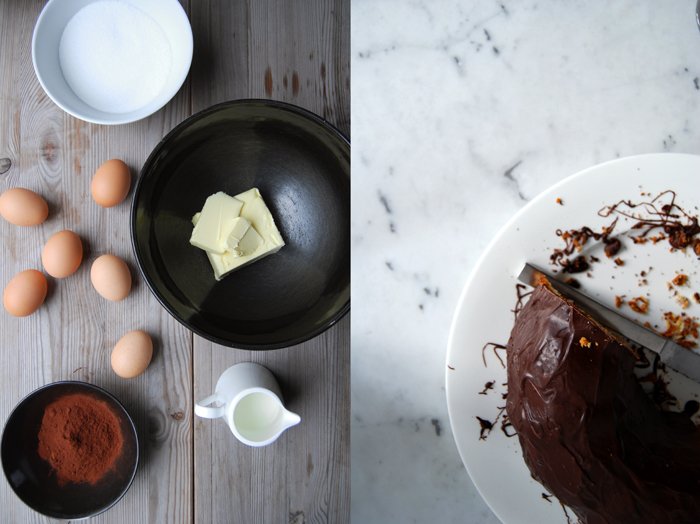
butter 200g / 7 ounces plus 1 tablespoon for the chocolate glaze
granulated sugar 250g / 9 ounces
a pinch of fresh vanilla
organic eggs, divided, 6
a pinch of salt
milk 100ml
plain flour, sieved, 300g / 10.5 ounces
baking powder 3 teaspoons
cocoa powder 30g /1 ounce
bittersweet chocolate 200g / 7 ounces, for the topping
dry breadcrumbs to sprinkle the pan
Set the oven to 180°C / 355°F (fan-assisted oven). Butter a bundt pan and sprinkle with bread crumbs.
Whisk the egg whites with the salt and 1 tablespoon of the sugar till stiff.
Combine the flour and baking powder in another bowl.
In a large bowl, mix the butter, sugar and vanilla till fluffy. Add the egg yolks and continue mixing till thick, creamy and light yellow. Add the milk and mix until well. Fold the egg whites and the flour with a wooden spoon gently into the butter and egg mixture, alternating, 1/3 at a time, combining well in between.
Scrape half of the dough into the bundt pan and stir the cocoa powder into the remaining batter. Dollop the dark batter on top of the light one and swirl with a small fork through the 2 batters, carefully, from top to bottom pulling slowly all the way around the pan. Don't over mix the different batters to keep the marble pattern.
Bake for 40 minutes or until golden and spongy. Check with a skewer, it should come out clean. Let the cake cool for 2-3 minutes before you turn it around onto a wire rack to cool completely.
Melt the chocolate and mix in 1 tablespoon of butter, let it cool for 2 minutes before you drizzle it over the cake. Spread it or leave it sprinkly, as you like.

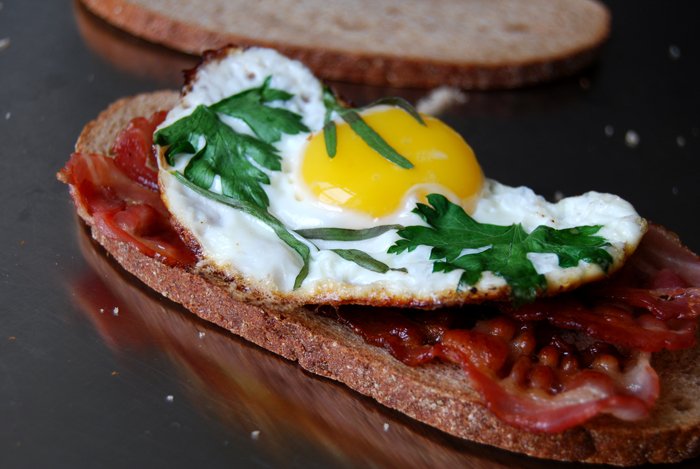
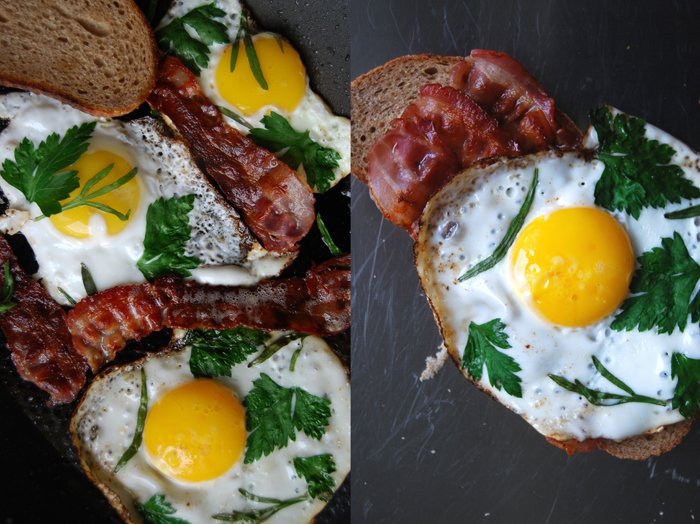
A Fried Egg and Bacon Sandwich with Tarragon and Parsley
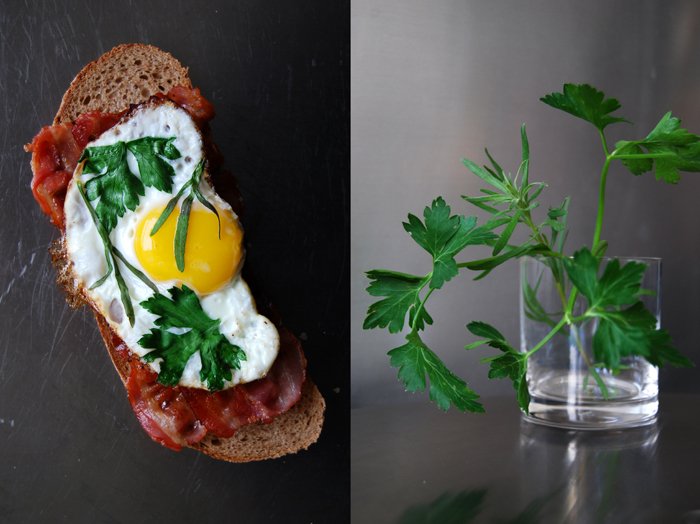
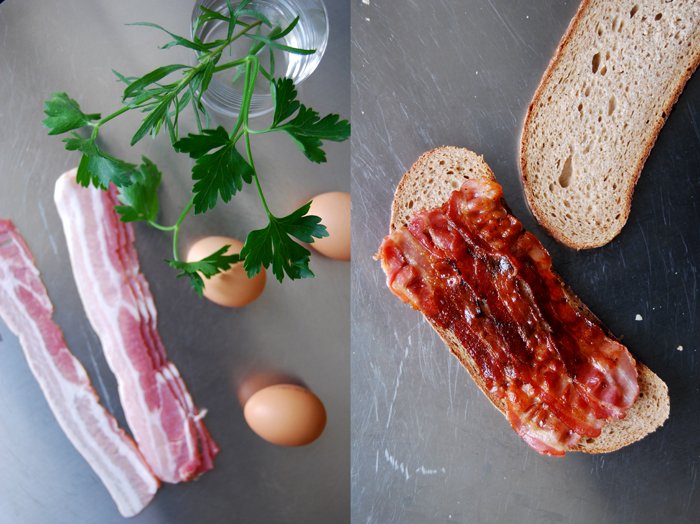
One morning we decided to "decorate" our fried eggs with fresh herbs and it became a morning classic in our kitchen. It looks really pretty and tastes even better. The variations are endless and change all the time depending on the herbs growing in our terracotta pots, and there are plenty at the moment! Usually the small plants don't survive the cold winter, the roots aren't really as protected as they should be. I tried to keep the herbs inside on my kitchen window sill during the cold season but they tend to suffer from bugs and mildew, so I gave up. I wish them the best of luck, protect them with some leaves and hope for the best. To my surprise, a fragile, skinny tarragon plant, an offshoot which I dug out of my mother's herb garden managed to bear the cold and frost and it's shining again in its recaptured bloom and beauty. I love its strong aroma which reminds me a bit of aniseed.
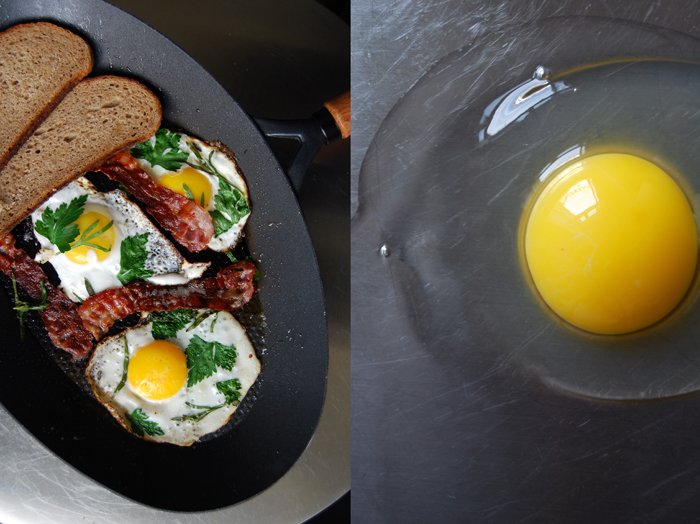
For my fried eggs, I picked a few of the tarragon's long leaves, about 6 slim ones for each egg, and some crunchy parsley, the Italian one with big flat leaves. The combination works well, I just went easy on the parsley, 2-3 leaves per egg were enough as it can easily be too overpowering. I fried the eggs in a little butter on medium heat in a non-stick pan, put the herbs gently on top of the liquid egg whites and yolks and covered the pan with a big lid until the whites turned solid. I kept the egg yolk soft as I wanted it to soak into the hearty bread when I cut it open. To finish off my sandwich, I fried 3 slices of bacon golden brown and crisp and put a few slices of my dark spelt bread into the pan as well. When you roast the bread in the fatty juices, just in the end for a minute or two, it becomes a bit crunchy and is infused with the meaty aroma. I didn't add any salt, just crushed black pepper, thanks to the strong bacon!

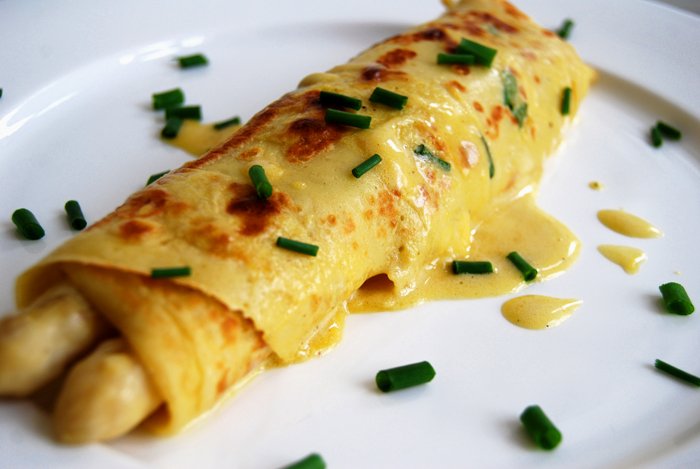
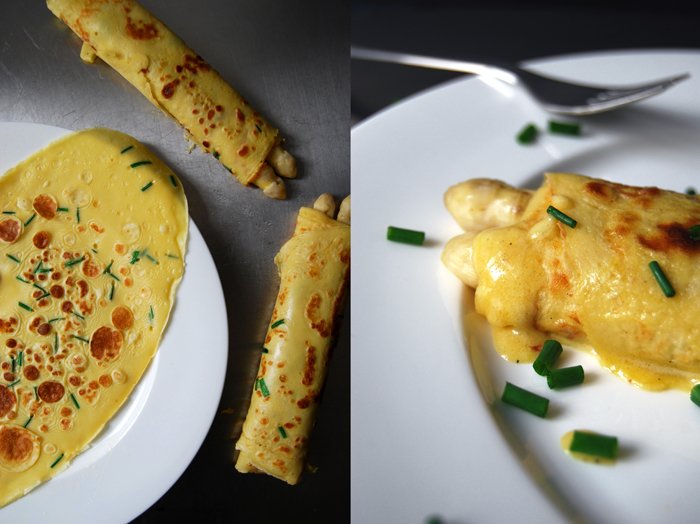
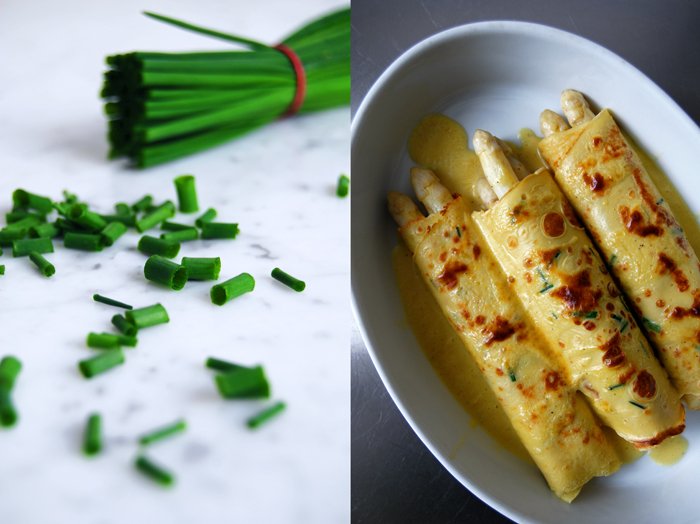
White Asparagus wrapped in Crêpes with Sauce Hollandaise
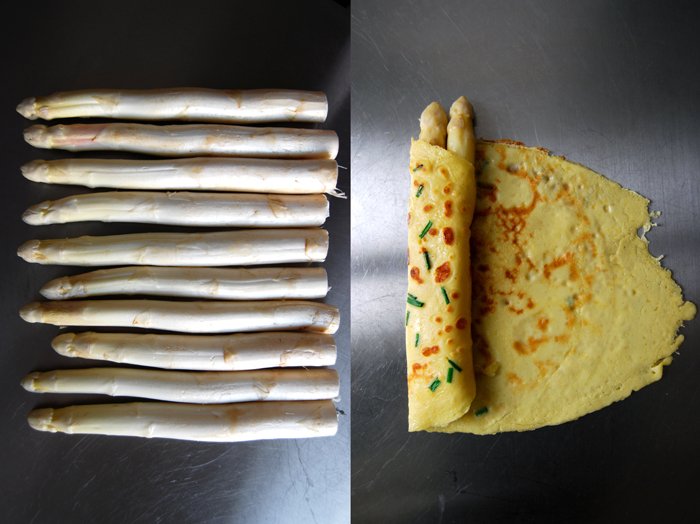
A bag full of white asparagus is laying on my kitchen top, so crunchy and fresh, that its juices start running as soon as I cut the bottoms off. Their short season which ends in late May or early June has just started. It's a delicate gem, also referred to as the royal vegetable, white gold or edible ivory. While green asparagus grows above the ground, the white shoots stay covered in soil and ripen in the dark which prevents photosynthesis, hence the white colour. This technique is called blanching in horticulture, it creates a delicate flavour and makes them tender and less bitter. Unlike their green relatives, white asparagus has to be peeled and also needs to cook a little longer, around 8 minutes to keep them al dente.
One of the most common recipes which puts the focus on the pure taste of the asparagus, is white asparagus served in brown butter with breadcrumbs and slices of cooked ham and new potatoes on the side. A very popular variation on this meal which is also my favourite, is to replace the butter with a sauce Hollandaise, homemade of course as it's not as complicated as one may fear. The taste of this sauce, buttery, eggy, enhanced with Dijon mustard and lemon brings the best out of this royal vegetable. There is some helpful information put together on Food52 for dressings which demand emulsification like sauce Hollandaise or aioli.
I wrapped my first white asparagus of the year in thin crêpes with chives and baked them with a thick and fluffy sauce Hollandaise under the grill, just for a few minutes until it had a golden bubbly crust.

White Asparagus wrapped in Crêpes with Sauce Hollandaise
For 4 people you need
white asparagus, peeled, the bottoms cut off, 1.5kg / 3 pounds
In a large pot, cook the asparagus in plenty of salted water for about 8 minutes till al dente.
For the crêpe
organic eggs 4
milk 400ml
plain flour, sieved, 200g / 7 ounces
salt 1 teaspoon
chives, chopped, 1 bunch
Whisk or mix the ingredients for the pancakes until well combined, stir in the chives at the end. Fry the crêpes thinly in a large non-stick pan in a little butter for 1-2 minutes. They should be golden on both sides.
For the sauce Hollandaise
butter melted 120g / 4.5 ounces
organic egg yolks 4water 4 tablespoons
freshly squeezed lemon juice 2 tablespoons
Dijon mustard 2 tablespoons
salt and black pepper
In a sauce pan, whisk the egg yolks with the water, lemon juice, mustard, salt and pepper for the sauce Hollandaise till fluffy. Put the pan on a low temperature, the pot should become warm but not hot. Whisk the melted butter into the egg mixtures, adding just a tablespoon at a time and whisk well in between. If the sauce becomes too hot, take it off the heat immediately or add a little more water. When its all combined continue whisking for 1-2 minutes, off the heat if it's already thick and creamy or on the heat, but mind the temperature. Season with salt and pepper and more mustard to taste.
For the crêpe roll
Roll 2-3 asparagus in each crêpe, put the wraps flat onto a large baking dish and pour the sauce over it. Bake under the grill for a couple minutes until the sauce starts bubbling and turns a golden brown. Serve immediately.
If you don't need all of the sauce for the asparagus you can keep it in the fridge until the next day and eat it with potatoes or mixed in an omelet, both are great with chopped chives!

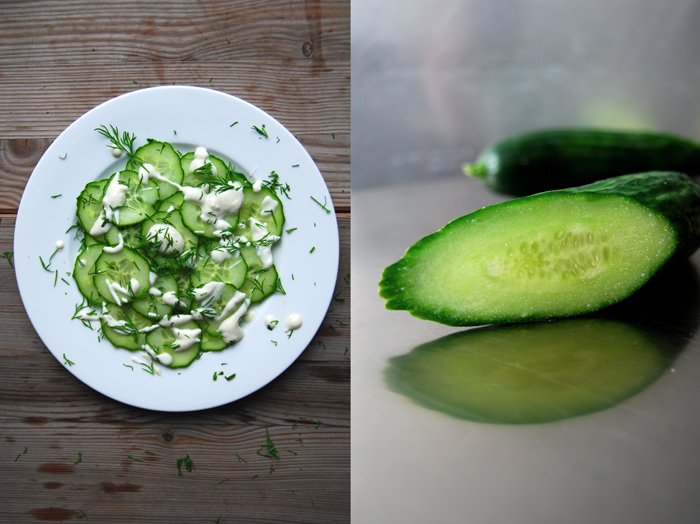
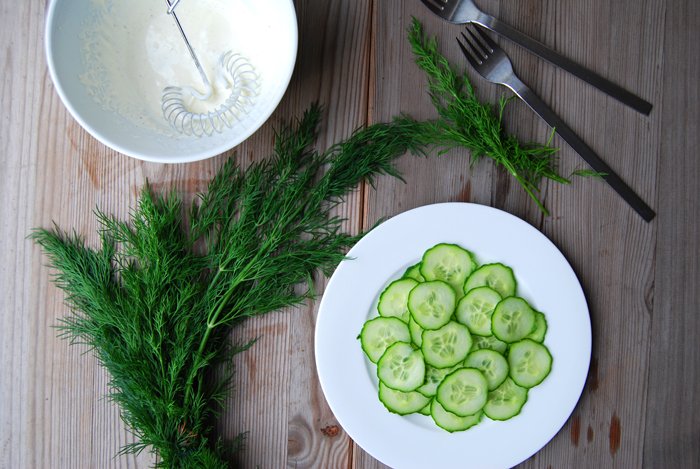
Cucumber Salad with Dill and Sour Cream Dressing
Lots of amazing food was gathered on my own and on my friend's and family's tables in the past couple days, we enjoyed some special culinary treats, had a great time, and of course ate lots of sweets, cakes and chocolate. No complaints but it's time for a break! I love to feast for days, especially together with the ones I love. Treating others and myself to good homemade food, spending time together at a long table, trying out and sharing new recipes, I need and appreciate this so much. It's like taking a break from the daily routine when time is tight and work is always waiting. These feasts caress my soul, I treasure these moments highly and most of the time they become my most beloved memories!
But each feast has its end, otherwise it wouldn't be so special. Therefore I gladly enjoy a light salad, simple and quick. It combines a lot I love about spring, juicy and tasty cucumber which is such a pleasure after months of watery winter cucumbers, fresh dill, strong and aromatic, and a smooth dressing with sour cream and lemon. For the two of us, I sliced 1 small cucumber very thinly and dolloped my milky dressing over it. I whisked 2 heaped tablespoons of sour cream with 1 tablespoon of olive oil and 2 tablespoons of heavy cream and added 1 tablespoon of freshly squeezed lemon juice, salt, pepper and a pinch of sugar. This is just a rough guideline, adjust the ingredients to your own taste, or add some more herbs like chives or parsley or some other vegetables like cherry tomatoes or lettuce. I was happy with my puristic combination, just cucumber, the dressing nicely balanced between sweet, sour and milky, and some freshly chopped dill sprinkled on top.


Eggnog Sponge Cake with Whipped Cream

Eggnog has a bit of an old fashioned reputation but let someone try a sip, even rather doubtful gourmets, and you will see a hint of appreciation on their faces.
It used to be a popular drink in bars, both of my grandmothers used to love it and even made their own in their kitchens. This was once a true party classic, in the 1950s and 60s! Today, people pour it over their ice cream or cake like my mother who always keeps a little bottle of it in her fridge for this reason. Some make it at home for Christmas but it feels like it lost its popularity. I find this unfortunate, I have quite a soft spot for it - eggnog is creamy, smooth, sweet and eggy. I like to drink it sometimes, as a digestif, preferably out of tiny old fashioned glasses with a short stem - 50s style to make the experience complete.
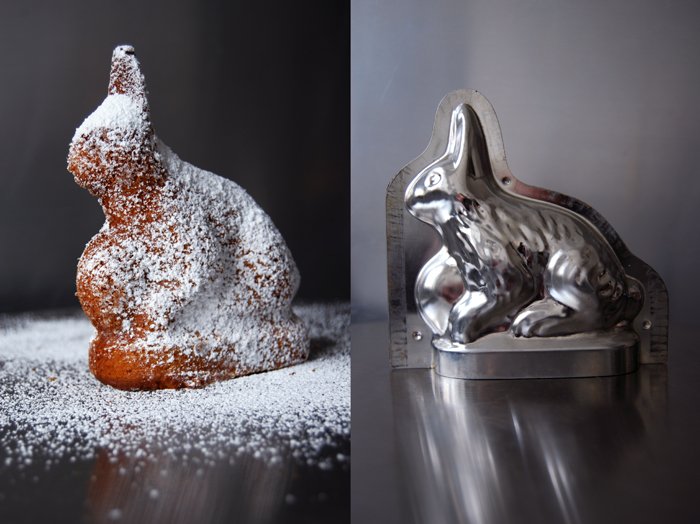
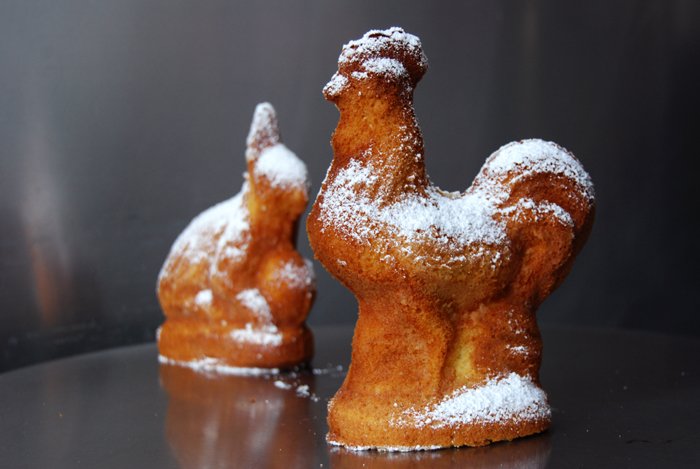
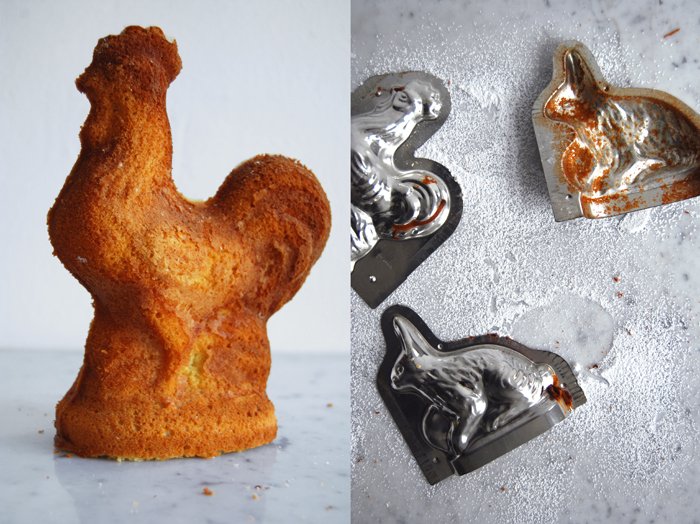
I believe that something that was so passionately enjoyed a few decades ago - and that tastes so good - is reason enough to be included in my today’s kitchen activities. I'm up for an easy Easter cake, a spongy cake made with lots of eggnog. A few days ago my aunt Ursula gave me two 3d-cake pans and wrote down one of her recipes for a juicy cake laced with the yellow liqueur that her own mother used to like so much. I doubled the recipe and baked it in lovely rabbit and chicken molds (but you can use a 20cm / 8″ cake pan).
I prepared some whipped cream with even more eggnog while the cakes were in the oven and noticed at one point that the cakes started to overflow. Luckily, my miscalculation didn't do the final cake any harm. It rose and dropped off the molds like a volcano and continued to bake on the tray but turned out as spongy and juicy as the cake in the molds.
This is a quick cake. After only 30 minutes in the oven, I was rewarded with a delicious eggnog-y teatime treat, best dipped into eggnog whipped cream and enjoyed with an extra shot of this special liqueur from the past, in an old fashioned glass of course. Cheers to our grandmothers!
Eggnog Sponge Cake with Whipped Cream
For a 20cm / 8″ cake pan you need
organic eggs 4
granulated sugar 140g / 3/4 cup
a pinch of fresh vanilla (scraped out of a vanilla pod)
vegetable oil (I use sunflower oil) 140ml / 2/3 cup
eggnog 140ml / 2/3 cup plus one shot for the whipped cream
plain flour 220g / 1 2/3 cups
baking powder 2 teaspoons
a pinch of salt
heavy cream 200ml / 3/4 cup plus 1 tablespoon
Set the oven to 170°C / 340°F (preferably convection setting) and butter the cake pan.
Beat the eggs together with the sugar and vanilla until fluffy. Slowly, add the oil and and eggnog and continue mixing. Combine the flour, salt and baking powder and mix quickly into the liquid mixture. Scrape the batter into the prepared pan and bake for 40 minutes or until golden brown. Check with a skewer, it should come out clean. In the 2 figure molds, the cake needed just 30 minutes. Let the cake cool for 5 minutes.
Whip the cream, stir in a shot of eggnog and serve with the cake.


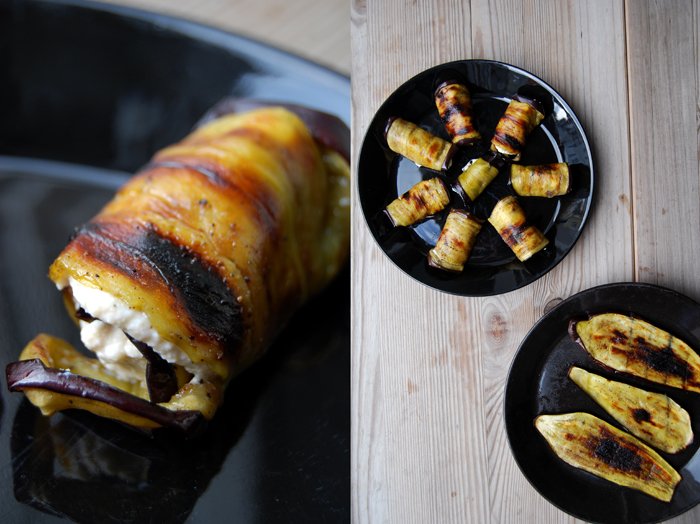
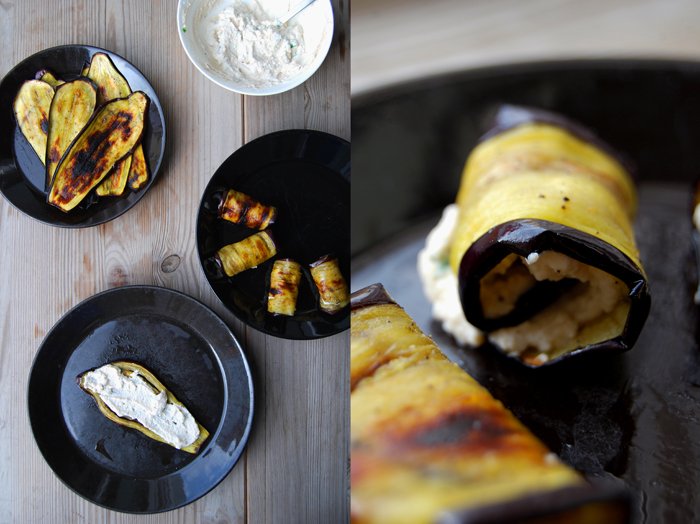
Grilled Aubergine Rolls filled with Ricotta and Basil
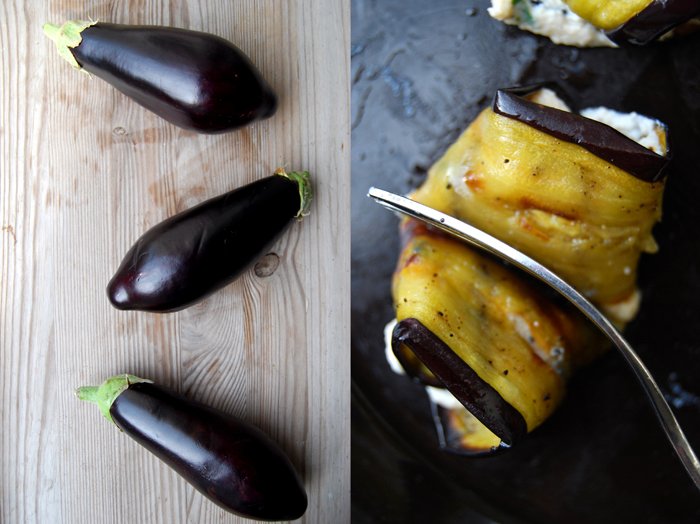
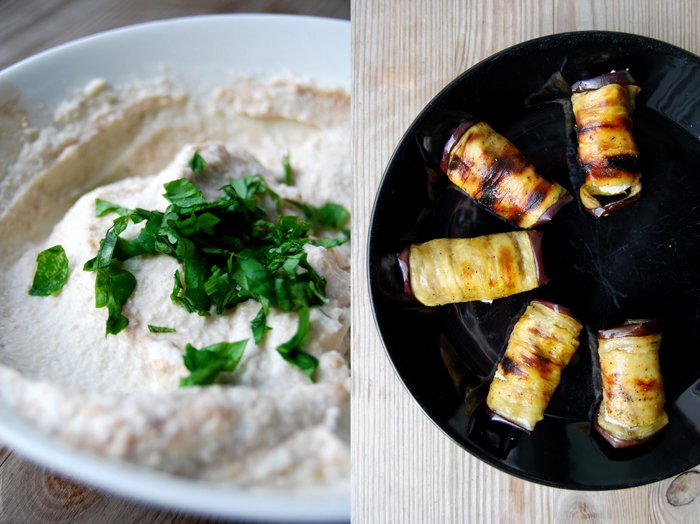
Imagine creamy, milky ricotta enhanced with sweet and thick balsamic vinegar, some fresh basil leaves stirred in and all this spread on grilled slices of aubergine, and you'll have a combination so smooth and velvety that it melts in your mouth! This to me is an absolute perfect match, maybe my favourite way to enjoy aubergine.
I like to make this as a starter for a dinner party, it's easy to prepare and my guests always love it, or as a luscious in between nibble. What's even better is to roll them for a relaxed dinner on a warm evening, with windows wide open, some ciabatta bread on the table and wine, cheese, thin slices of prosciutto or Mortadella di Bologna. I love it, it feels like a little holiday, for only a few hours but with the same effect as being in a restaurant in Italy. That's what I love about food, it's like music, it can put you in a different time, place and mood and it's all in your hands!
Grilled Aubergine Rolls filled with Ricotta, Balsamico Vinegar and Basil
As a starter for 4 you need
large aubergines (eggplants), cut into 1/2cm / 1/4" slices, 2
olive oil to brush the slices of aubergine, around 75ml, depending on the size of the aubergines
fresh ricotta 140g / 5 ounces
heavy cream 2 tablespoons
balsamic vinegar 2 tablespoons or more to taste
fresh basil leaves, cut into strips, around 10 or more to taste
salt and black pepper
Set your oven to grill (broiler).
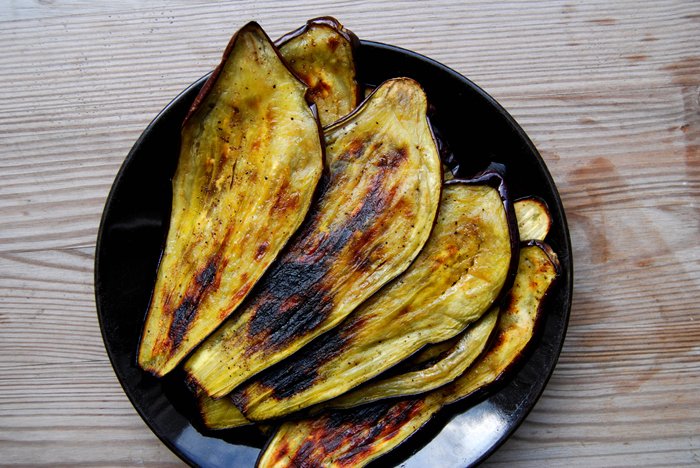
Brush the aubergines with olive oil on both sides and season with salt and pepper. Grill in the oven until golden brown and soft on both sides, they will darken partly but that's fine. Mine needed 7 minutes on one side and 5 minutes on the other but that depends on the oven. Set the aubergines aside and stack them, that will keep them moist and soft.
Whisk together the ricotta, cream and balsamic vinegar, season with salt and pepper to taste and stir in the basil. Spread a teaspoon of the ricotta cream on top of each slice of aubergine and roll lengthwise into a wrap.

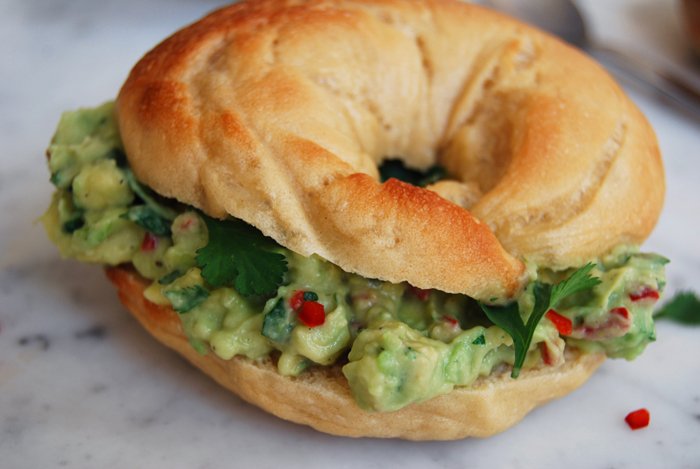
Guacamole Bagel with spicy Chili Peppers
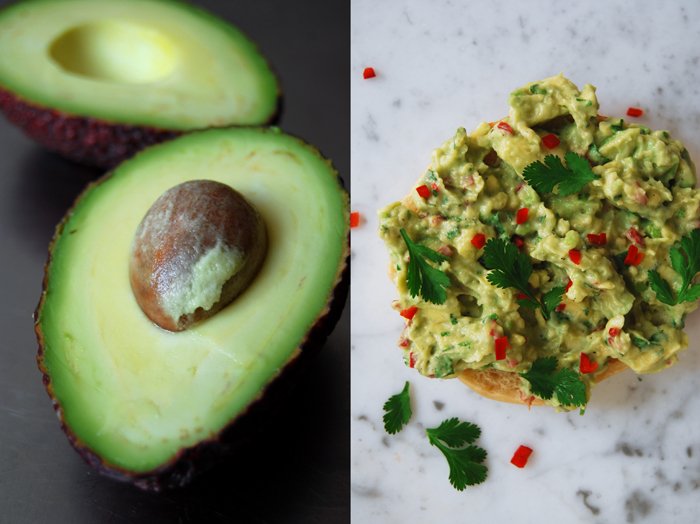
Whenever I make guacamole I have to make lots of it, I can eat it with a spoon! When an avocado is so smooth, ripe and buttery that you can scoop it out like an ice cream, it doesn't really need anything more. If only there wasn't this addictive Mexican dip which combines the fruit's oily richness with lemon juice, coriander, salt and pepper. There are endless variations on it, I always try out new versions, this time I added some sour cream and freshly chopped red chili pepper.
For this week's Sandwich Wednesday I had a bagel in mind. I had a couple of them in my freezer from the last batch I baked (I haven't forgotten that I still have to share the recipe, it will come soon!). For the guacamole, I chopped 2 ripe avocados roughly and mashed them with a fork, just a little as I wanted a lumpy texture. I mixed them with 2 tablespoons of sour cream, 1 tablespoon of lemon juice, salt and pepper and added 1 red chili pepper (without seeds) cut into tiny cubes and 2 tablespoons of roughly chopped coriander leaves. Spread on a juicy bagel or any other nice bun, it's divine!


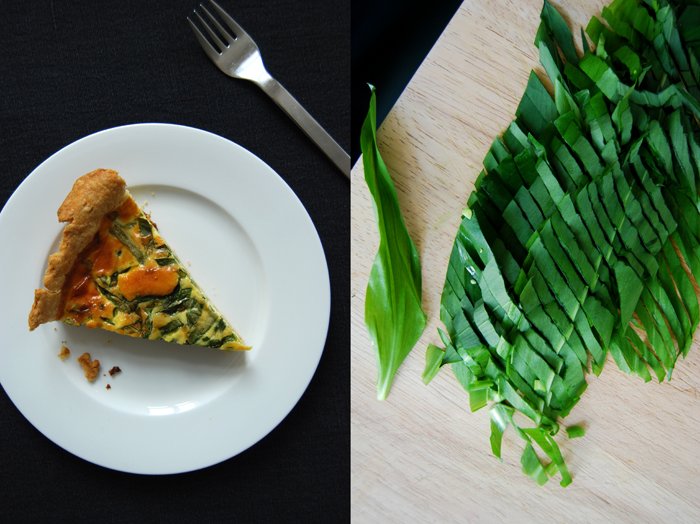
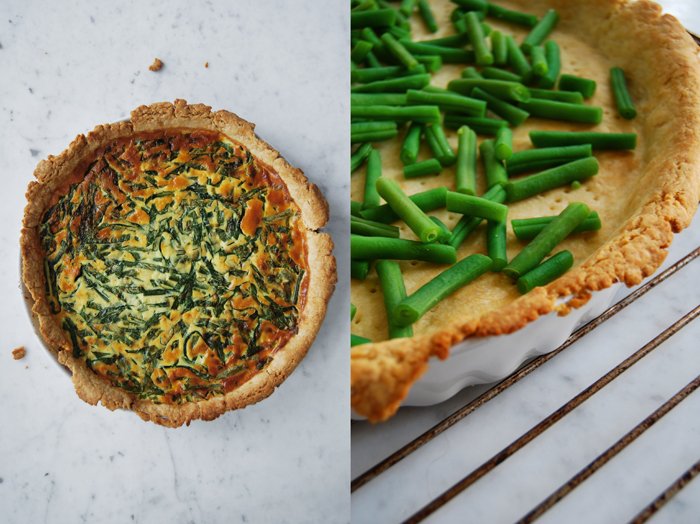
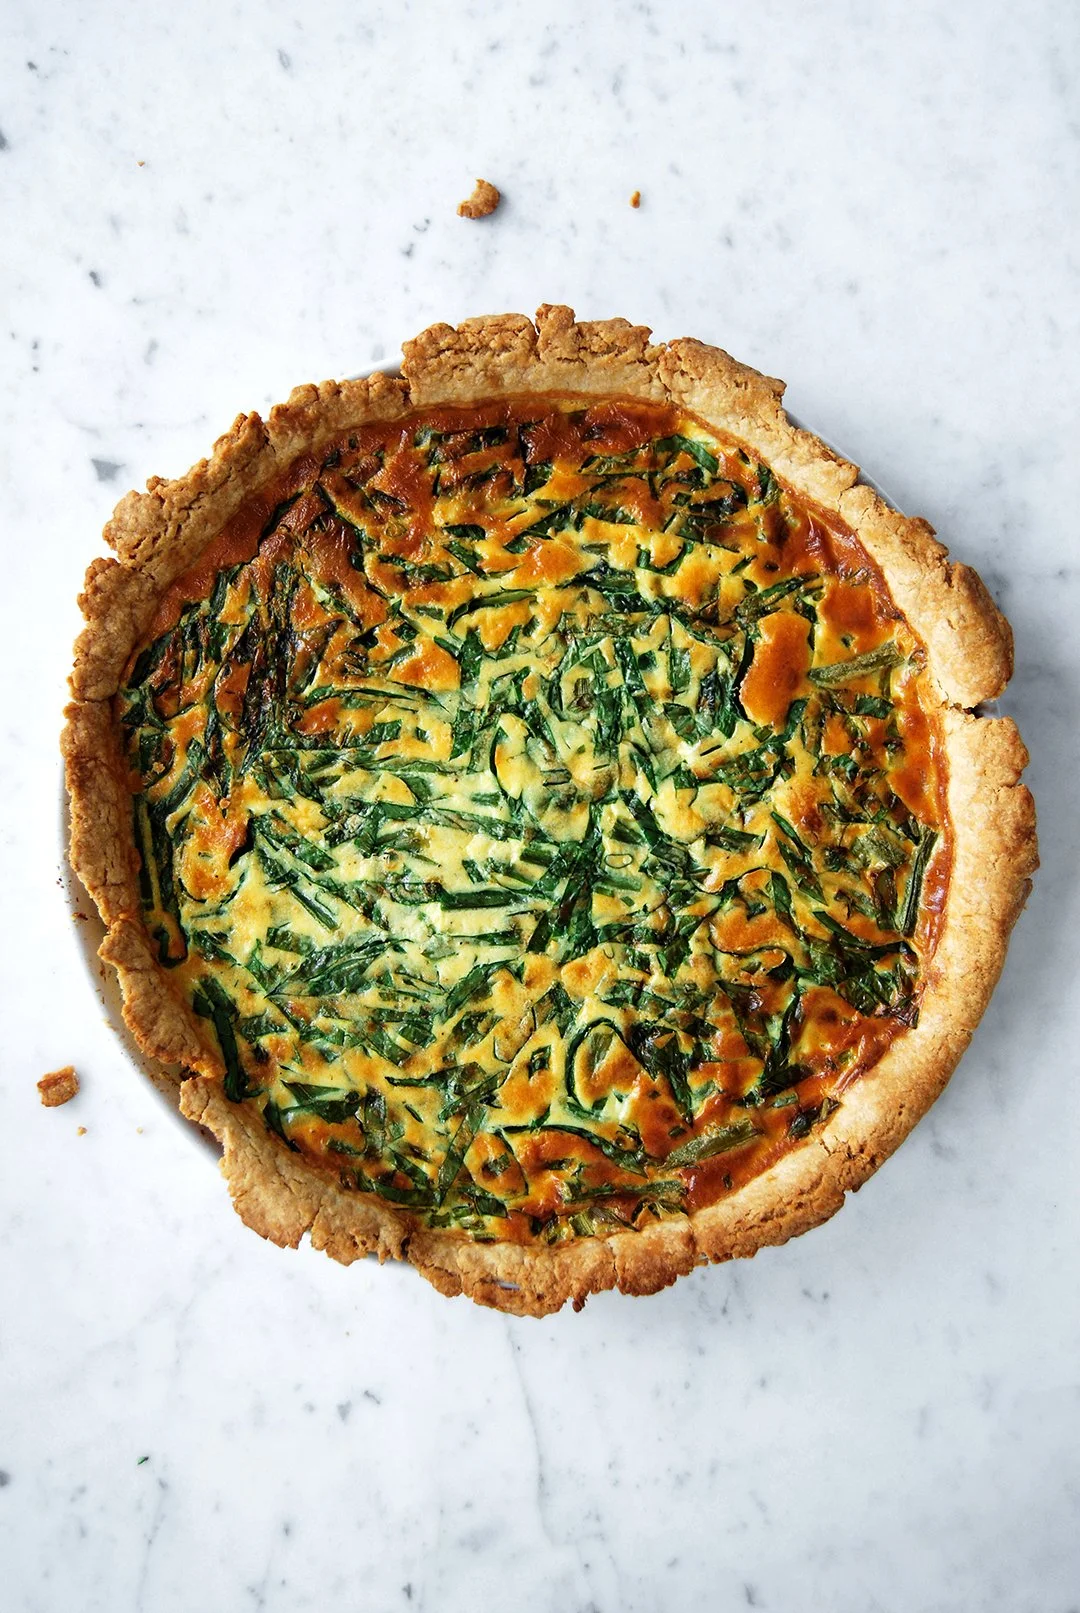
Bean and Ramp Quiche

Quiche is one of those dishes which makes me feel good, always, no matter what my day has been like. As soon as I see a quiche in my oven and smell its buttery aroma spread through the kitchen I have to smile. Maybe it's the butter, or the eggs or the fact that I can look forward to another tart on my plate! That's why I've already written about a couple of my quiche recipes, my classic quiche with leek, tomatoes and thyme, an Italian-style tart with fennel and parmesan and here is another one, packed with greens. I fill this savory tart with beans, ramp (wild garlic) and spring onions and it has a deliciously light spring feeling!
I've praised its short crust at length which is so crisp and buttery, to me it's just perfect. My quiches always have a thin layer of an eggy and creamy mixture to keep it light and to leave space for the vegetable filling. Some recipes focus on the creamy filling which can make a quiche too rich and heavy, at least for my taste. I want to be able to eat a piece of quiche with my fingers, a tart for a picnic!

Bean and Ramp Quiche
For one quiche you need a round (27cm / 10.5″) or oval baking dish or tart pan.
For the short crust base
flour 250g / 8.5 ounces (I use spelt flour type 630 but you can use any other plain flour)
butter, cold 125g / 4.5 ounces
organic egg 1
salt 1 teaspoon
Combine the flour with the salt. Cut the butter with a knife into the flour until there are just little pieces of butter left. Continue with your fingers and work the butter into the flour until combined (there shouldn’t be any lumps of butter left). Add the egg and continue mixing with the hooks of your mixer until you have a crumbly mixture. Form a disc, wrap in cling film and put in the freezer for 10 minutes.
For the filling
green beans 200g / 7 ounces
ramp (wild garlic), just the leaves, cut into slices, 30g / 1 ounce
spring onion, cut into slices, 1/2
organic eggs 3
heavy cream 125 ml
crème fraiche or sour cream 125ml
salt 1 teaspoon
ground black pepper
nutmeg, freshly grated, a generous amount
The quiche
Set the oven to 210°C / 410°F top/ bottom heat.
Blanche the beans in plenty of salted water for a couple minutes until al dente.
Mix the eggs with the heavy cream, crème fraiche, salt, pepper and nutmeg.
Roll out the dough between cling film and line your baking dish with the flat pastry. Prick it with a fork and blind-bake in the hot oven for 10 minutes. Take your baking dish out of the oven and set the temperature down to 180°C / 355°F.
Spread the beans, ramp and spring onions on top of the pre-baked pastry base and pour the liquid mixture over it. Put the quiche on a baking sheet in the oven and bake for about 45 minutes or until golden, the top should be firm. Let it cool for 10 minutes.

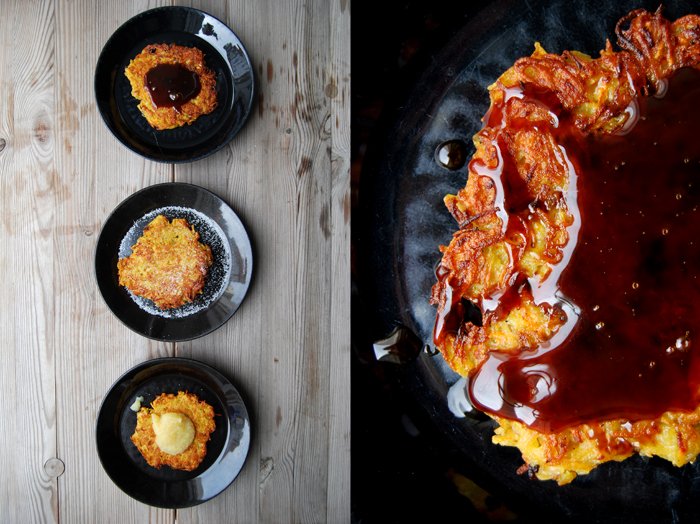
My Grandmother's Kartoffelpuffer

My grandmother's kitchen had a wooden bench on one side, with a table and three chairs in front of a window from which I could see her peaceful garden. I used to sit there while she cooked for me, busy with her pots and pans preparing my favourite dishes. She grew beautiful roses next to a meadow which was covered in daisies blooming under the branches of her big cherry tree. It was the most perfect cherry tree, with a swing that made me feel like I could touch the sky! I could sit and swing for hours, daydreaming or waiting for my granny's lunch. Whenever I visited her for a couple days she asked me for a list of things I would like to eat. I used to give her a long list, always too long to be able to eat all of my favourites but I loved this ritual!
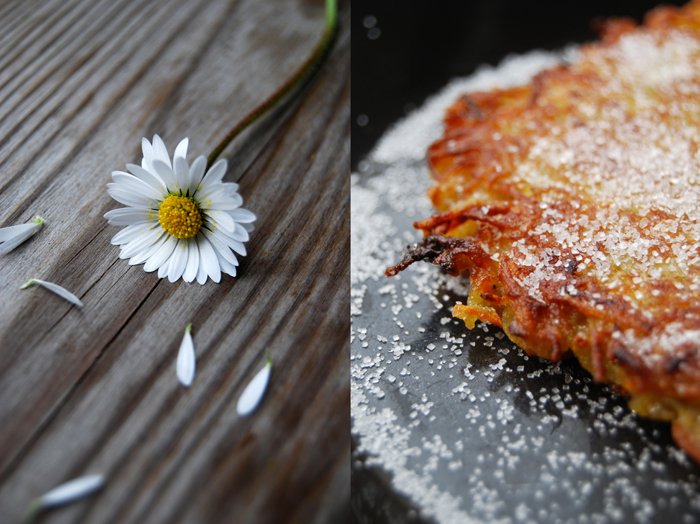
One of these lunches, my personal highlight that I always had to have at least once, was a fried cake made of grated potatoes, carrots, celery, onions, flour and eggs. It was crisp on the outside and juicy inside, similar to latke. Where I come from they are called Reibekuchen or Kartoffelpuffer meaning grated cake or potato cushions. We eat them with apple compote, sugar beet syrup or sugar which was my childhood favourite!

Kartoffelpuffer
For 3-4 people you need
potatoes, peeled and grated, 700g / 25 ounces
celeriac (celery root), peeled and grated, 150g / 5.5 ounces
carrots, peeled and grated, 200g / 7 ounces
large onions, peeled and grated, 2
plain flour 130g / 4.5 ounces
salt 2 heaping teaspoons
ground black pepper
vegetable oil for frying
granulated sugar for sprinkling
apple compote to serve
sugar beet syrup to serve
Squeeze the liquid out of the grated vegetables, dry them between kitchen role and mix with the other ingredients to a dough.
In a large heavy pan heat up the oil on highest temperature, the oil should cover the bottom about 1/2 cm / 1/4". When it's hot scoop about 3 tablespoons of the dough into the pan for each cake and even it out. I fry 3 cakes at a time. When they are golden brown, turn them around. They need around 2-3 minutes on each side, you might have to turn the temperature down a little. Take them out of the pan and put between kitchen role to soak the oil. Serve with sugar, apple compote or sugar beet syrup. If you prefer a savory version you can serve them with smoked salmon or my gravad lax.


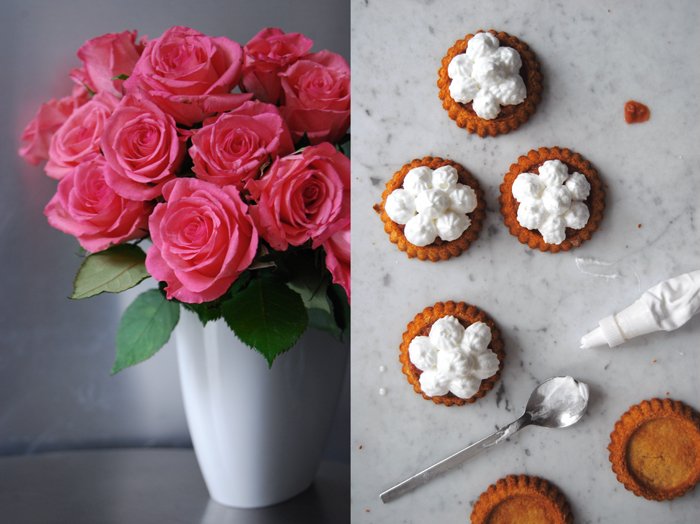
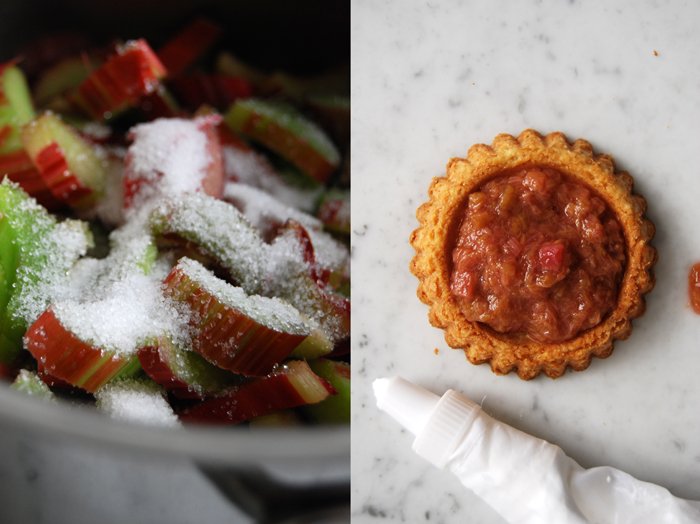
Rhubarb Meringue Tartlets
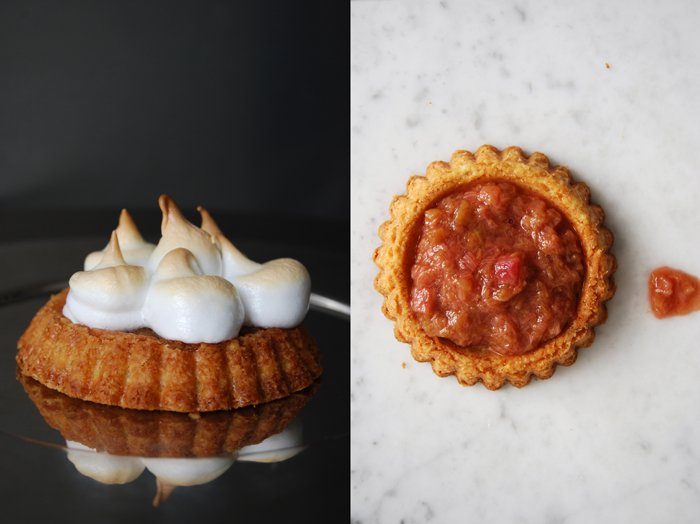
My long loved rhubarb crumble cake has been my favourite rhubarb cake so far, but these little meringue tartlets caused a change on my list. I can't say that I prefer them over my buttery cinnamon crumble (I made the apple version a couple months ago, the recipe is here) but they are definitely just as good!
Until I started taking the ingredients out, I wasn't even sure about the recipe. I wanted a crumbly short crust, strong enough to carry the juicy rhubarb compote and not as flaky as the one I make for my Tarte Tatin. I thought I would give it a try but expected that I would have to refine the recipe over the next few weeks before I would be rewarded with a satisfying result. I was wrong! The pastry was exactly what I wanted, buttery, crumbly with a strong structure, neither too fragile nor to compact. When the tartlets had cooled off, I topped them with a tablespoon of my thick rhubarb compote and some fluffy meringue. As I'm not very good at decorating cakes, I tried to keep them simple. Usually I try to avoid piping bags as they make me nervous but here I made an exception, I wanted them pretty! The result was worth it, a bit sweet, a bit sour, buttery but still light, and all of this in a cute little rhubarb meringue tartlet!
Rhubarb Meringue Tartlets
When the tartlets are finished and baked with the meringue, you should serve them within the next 15 minutes as that's when they are at their best (I had one the next day and it was still delicious but a bit softer). If you want to prepare them for guests, you can bake the tartlets and cook the compote beforehand (both should be cold either way). Then you just need to beat the egg whites, assemble the tartlets and bake them for 3 minutes in the oven.
You will need round 10cm / 4" tartlet pans.
For 10 tartlets you need
For the short crust
plain flour 250g / 9 ounces
granulated sugar 80g / 3 ounces
a pinch of salt
a pinch of vanilla
butter, cold, 160g / 5.5 ounces
organic egg yolks 2
Combine the flour with the salt, vanilla and sugar. Cut the butter with a knife into the flour until there are just little pieces of butter left. Continue with your fingers and work the butter into the flour until combined (there shouldn’t be any lumps of butter left). Add the egg yolks and continue mixing with the hooks of your mixer until you have a crumbly mixture. Form a thick disc, wrap in cling film and put in the freezer for 10 minutes.
Set your oven to 200°C / 390°F top / bottom heat. Butter the tartlet pans and dust with flour.
Roll out the dough about 3mm thick between cling film and cut out 10 12cm / 5" circles. Line your tartlet pans with the pastry and prick with a fork. Blind-bake in the hot oven for 9 minutes or until golden. Take them out, let them cool for a couple minutes before you flip them over and let the tartlets cool off completely.
For the compote
rhubarb, sliced thinly, 400g / 14 ounces
granulated sugar 3 tablespoons
ground cinnamon 1/4 teaspoon
water 2 tablespoons
In a sauce pan, heat all the ingredients for the compote on medium temperature, keep the lid closed. Cook for 10 minutes or until the rhubarb has become a thick compote and let it cool completely.
For the meringue
organic egg whites 4
granulated sugar 120g / 4.5 ounces
a pinch of salt
Set the oven to 220°C / 430°F top / bottom heat.
Beat the egg whites with the salt for 10 - 20 seconds until they start to stiffen. Add the sugar gradually and continue beating until stiff and glossy.
Put a tablespoon of the rhubarb compote on top of the tartlet, spread evenly. Fill the meringue mixture in a piping bag and decorate generously. Bake them on a baking sheet for 2-3 minutes until the tops of the meringue become golden. Let them cool for 1 minute, put them on plates with a spatula and serve immediately.


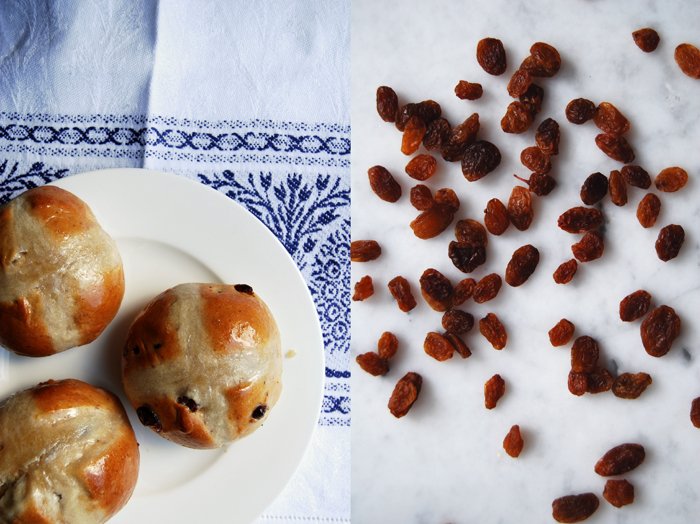
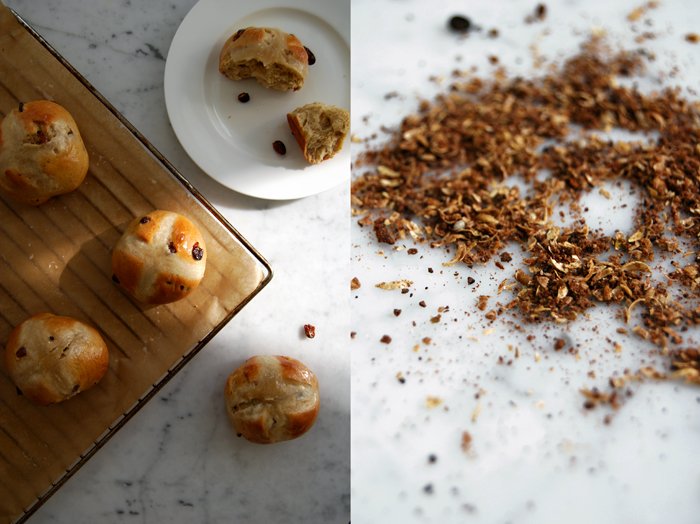
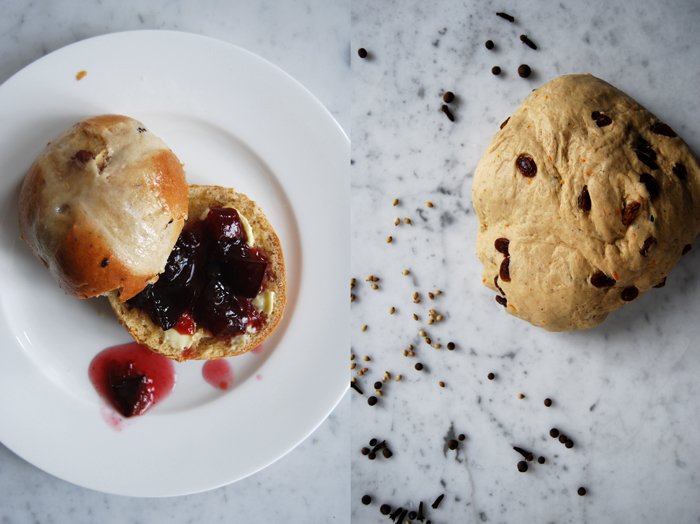
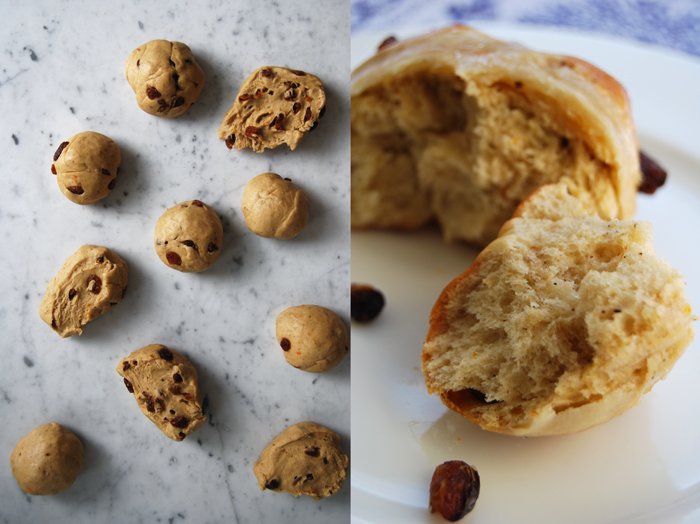
Spiced Hot Cross Buns with Orange Zest

My first Hot Cross Bun baking experience lies way back in the past and it wasn't very successful - one morning I managed to destroy two doughs in a row. The water I used was a bit too warm and knocked out the yeast. I was so desperate that I even baked the buns from the second batch of dough but it was hopeless. I could have used the buns as cannon balls, they were as hard as a rock and impossible to eat. I needed a few years to recover from this experience but now I'm totally at peace with them again.
Hot Cross Buns are traditional Easter buns but to me they are a great treat for a big weekend breakfast or brunch all year round. They are made with lots of aromatic spices such as cinnamon, coriander, allspice, nutmeg, ginger and cloves and I also add lots of orange zest and raisins. Spices ground in a mortar unfold their entire range of aromas, I find them stronger and without the artificial touch which industrial mixtures tend to have. These buns are complex in their taste and the texture is nice and fluffy. I love to tear them with my fingers when they are freshly out of the oven and spread some butter on them, or my homemade plum jam with lots of cinnamon. I even ate one bun with liver paté, both sweet and aromatic, they make a perfect match.
Traditionally, Hot Cross Buns were eaten during Lent, always marked with a cross standing for the Crucifixion. Besides the religious connections there are further meanings passed on, sharing a bun with someone else is supposed to ensure friendships and each bite should bring good health.
Hot Cross Buns
For 10 buns you need
For the dough
plain flour 500g / 1 pound
dry yeast, 1 package (for 500g / 1 pound of flour)
sugar 60g / 2 ounces
salt 1 teaspoon
ground cinnamon 2 1/2 teaspoons
2 1/2 heaping teaspoons of ground mixed spice, or a spice mixture made of:
coriander, ground in a mortar, 1/2 teaspoon
allspice, ground in a mortar, 7
cloves, ground in a mortar, 5
nutmeg, grated, 1/4 teaspoon
fresh ginger, grated, 1 teaspoon
zest of 1 orange
butter, melted, 60g / 2 ounces
milk, lukewarm, 190ml
organic egg 1
raisins, soaked in warm water for 4 minutes, 100g / 3.5 ounces
For the cross paste
plain flour 4 tablespoons
milk 3-4 tablespoons
vegetable oil 2 teaspoons
For the glaze
milk 5 tablespoons
icing sugar 5 tablespoons
For the dough, combine the dry ingredients (including spices and orange zest). Mix the hot melted butter with the cold milk and the egg, this way the liquid mixture will have the right lukewarm temperature (check with a finger). Mix the dry and the liquid mixture with your dough hooks for 5 minutes until well combined. Continue kneading with your hands for a few minutes until you have an elastic dough ball. Mix the raisins into the dough and put it back into the bowl, cover with a tea towel. Let the dough rise in a 35°C / 95°F warm oven for 70 minutes. This works really well but make sure that your oven is set to top/ bottom heat and not to fan.
Take the dough out, punch it down and knead for 1 minute. Divide into 10 pieces and roll into balls. Put them on a baking sheet lined with parchment paper and let them rise for 30 minutes, covered with a tea towel, in a warm place.
Set your oven to 200°C / 390°F.
For the cross paste, mix the flour, milk and oil with a spoon. For the glaze, cook the icing sugar together with the milk in a sauce pan for 5 minutes on medium heat until bubbly and syrupy.
Cut a cross into the surface of each bun, wet your fingers and form slim rolls with the cross paste mixture. Lay the rolls into the crossed slits on top of each bun, wet your fingers in between. Bake the buns for 12 minutes or until golden brown. Glaze with the sweet syrup immediately. If the glaze is too thick, add a little water before you brush the tops of the buns.


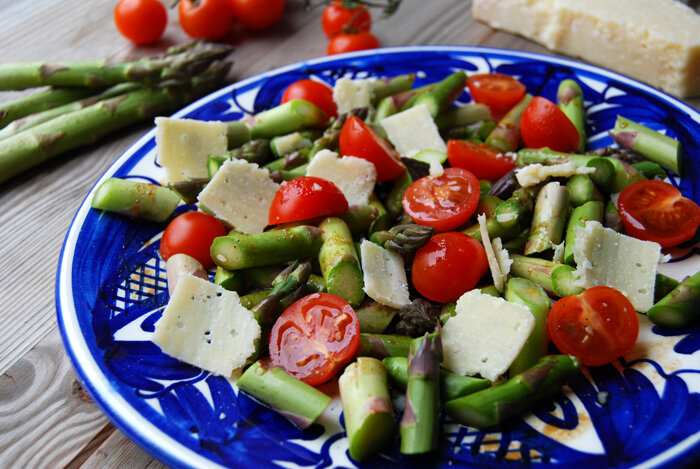
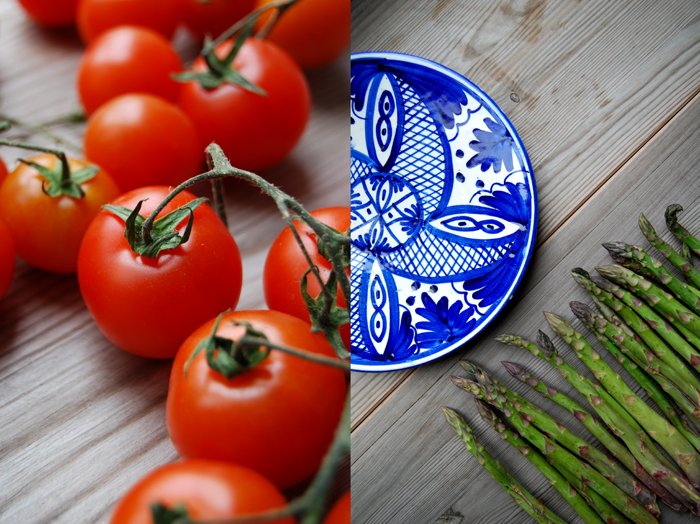
Raw Asparagus Salad with Cherry Tomatoes and Parmesan
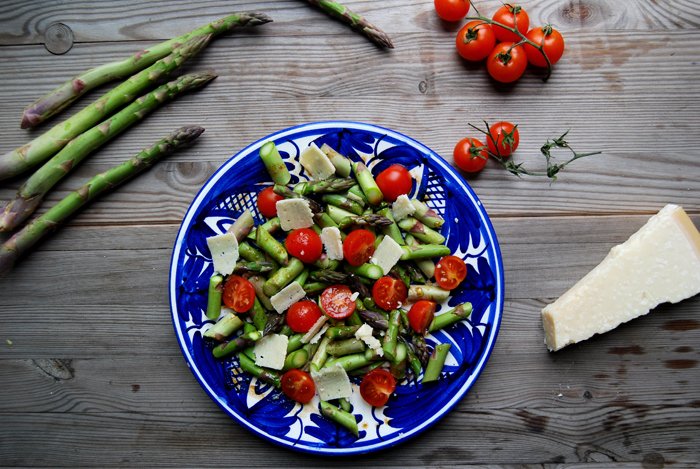
This is the best (and quickest) spring salad I've had so far this year, raw green asparagus with cherry tomatoes, thin slices of young parmesan and a light olive oil and Balsamico vinegar dressing. It combines the best of the season, crunchy, fresh and milky! It was the first time that I ever tried raw asparagus in my kitchen and I was impressed by how good it tastes. I didn't peel the stems, I just cut the bottoms off and before I started preparing the salad I cut a small piece of asparagus to find out how its texture would feel and taste in my mouth. I expected it to be a bit hard and woody but experienced quite the contrary. The outside felt a bit crunchy but the inside was almost tender. After it passed the test I could continue with the preparations for my first raw asparagus salad!
As a side dish or starter for 4, cut the woody bottom part (around 2 cm / 1") off of 500g / 1 pound of medium sized green asparagus and rinse the stems. Cut 16 cherry tomatoes in half and mix with the asparagus. For the dressing, whisk 3 tablespoons of olive oil with 1 tablespoon of dark Balsamico and 1 tablespoon of white Balsamico vinegar. Season with salt and pepper to taste and sprinkle over the salad. Slice 70g / 2.5 ounces of young Parmesan thinly and arrange on top of the salad.


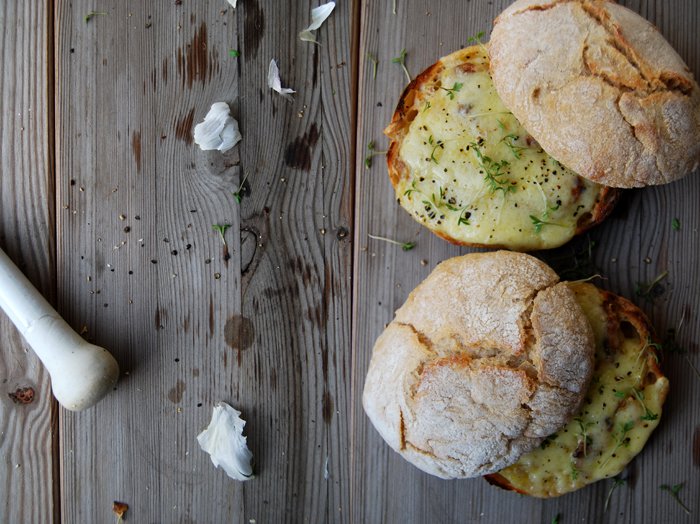
Roast Garlic and Gruyère Sandwich

Garlic roasted in its skin is one of these things I can never have (or make) enough of. No matter how many of these little cloves I throw into the hot oven, I always feel like I could have made more. They cook in their delicate peel like in a little parchment pouch, steaming, softening and unfolding all of their wonderful flavours. It tastes less spicy than raw garlic but yet so aromatic, almost sweet and the texture is smooth, a bit oily. It's a great spread on bread!
Garlic is considered a natural antibiotic which has lots of positive effects on the body. It strengthens the immune system, stops free radicals and slows down the aging process. A tiny bulb that does a lot of good for our body! I strongly believe in the healing and strengthening powers of natural and good quality food. This is one of the reasons why I buy organic food as much as possible. I want natural food which is kept natural, no GMOs, no pesticides. Food in harmony with nature and not fighting against nature. A few years ago I started to drink organic green tea with freshly squeezed lemon juice every morning, since then I haven't had a single cold. It’s my natural booster for my immune system.
There must be something in garlic that my body loves and when it comes to roast garlic I feel like I could eat it with a spoon, in strong doses like in this sandwich made with 14 cloves of garlic for just 2 buns! I baked medium sized cloves of garlic in their skin in a 210°C / 410°F hot oven for about 12 minutes until golden and soft (you can cover them with aluminum foil if they start to get too dark). They were so soft that I could mash them with a fork, I just added some salt and spread the paste on the buns. I put a couple slices of Swiss Gruyère cheese on top (120g / 4.5 ounces for 4 halfs) and let them melt under the grill for 1-2 minutes until golden brown. I finished my sandwich off with crushed black pepper and some watercress sprinkled on top.
An oily and dense Ciabatta bread would have been good too but when I saw the Swiss Buns at the bakery which have a similar texture to the Italian bread I thought they would match the Gruyère cheese perfectly, it became a delicious and healthy Swiss sandwich!


Ricotta stuffed Zucchini in White Wine Sauce
When we have friends over for dinner, my mood always decides what treats I bring to the table. There are two options, I either feel like a sumptuous meal with several courses which might mean cooking for one or two days and which definitely requires good organisation before and on the night and most importantly enough time to enjoy all the preparations. The other approach is to take it easy and choose recipes which don't need a rigid plan. I just fill the table with plates full of food before or as our friends arrive and we all enjoy the night together. Eating, talking and laughing, drinking some wine of course, savoring and emptying the plates for hours. This was my choice when I had a dinner for 10 ahead of me a few days ago!
Some of our friends from Malta just moved to Berlin a few months ago. I know how much Maltese love and miss their home and food when they live abroad so I decided to make a traditional Maltese recipe, zucchini stuffed with lemon ricotta. I would have loved to get the small round courgette (Qarabaghliin Maltese) which would have been perfect for this recipe as you can close the stuffed fruit from the top. I worried that the ricotta would run down the sides of my long zucchini when I closed them but it worked fine. I cooked them for an hour in white wine together with the fried pulp of the fruits and some onions. Just a little of the creamy cheese went into the sauce and added some nice creaminess.
In the late afternoon, I cooked the zucchinis and left them al dente. I didn't want them to turn soggy as I had to warm them up again before our guests arrived. I filled my dining table with three different kinds of quiche which are very easy to prepare in advance and I can't really say if I prefer them warm or cold. Two loaves of homemade bread and a big batch of my raspberry chocolate brownies were on my list as well, both are great nibbles for a long night. When we all gathered around the table and I brought the dish with the steaming zucchini I didn't know that the night would go on for so long - our last guests left at 5 in the morning or so I was told, I fell asleep on the sofa at 4!
Zucchini stuffed with Lemon Basil Ricotta in White Wine Sauce
For 2 hungry people or for 4 when you have starters, you need
zucchini / courgette, cut in half (lengthwise) 2 (around 500g / 1 pound)
ricotta 200g / 7 ounces
Parmesan, grated, 20g / 1 ounce
organic eggs 2
basil, chopped roughly, 10 large leaves
lemon zest 1 teaspoon
salt 1/2 teaspoon
crushed black peppercorns
medium sized onion, chopped finely, 1
garlic, cut in half, 2 cloves
fresh parsley 3 sprigs
white wine 1 glass
tomato paste 1 tablespoon
olive oil for frying
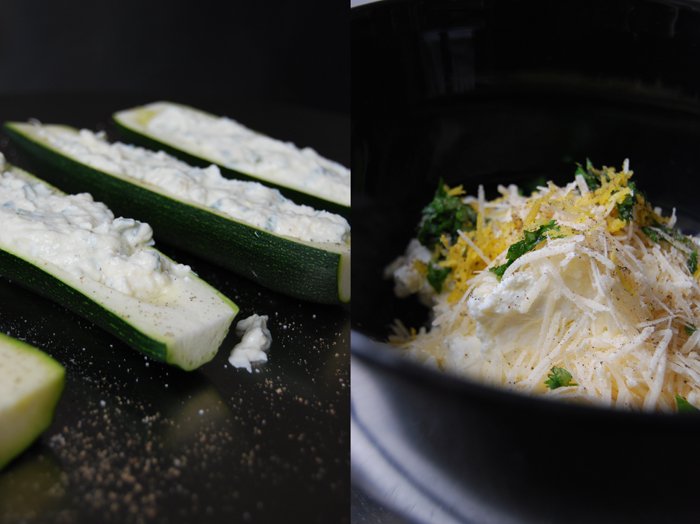
Whisk the ricotta together with the parmesan, eggs, basil, lemon zest, salt and pepper.
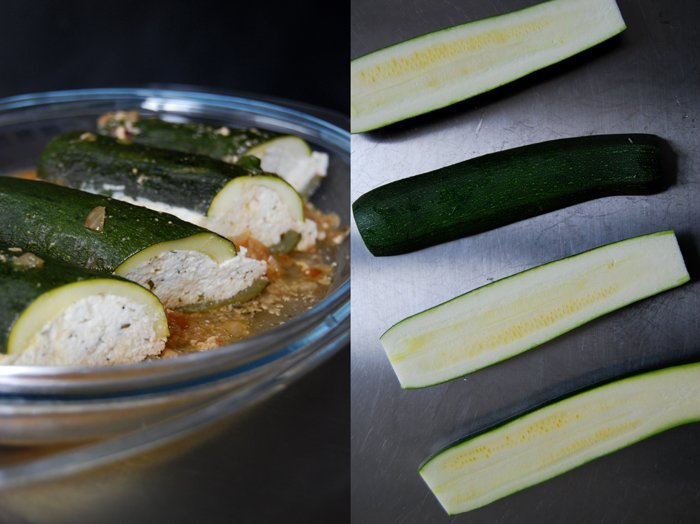
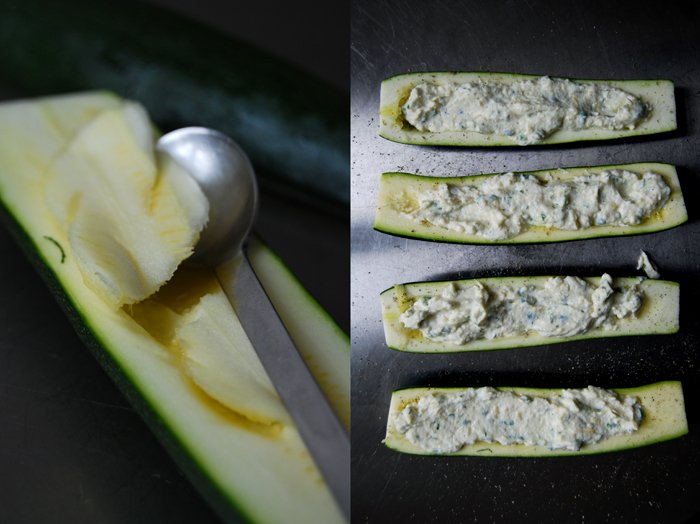
Scrape the pulp out of the zucchini with a small spoon and set aside. Season the inside of the zucchini with a little salt and pepper and fill both sides with the ricotta mixture. Close them just before you put them into the casserole.
In a large pot or casserole with a lid (big enough for the zucchinis), fry the onions in a little oil till golden and soft on medium heat. Add the garlic and the pulp and fry for 2-3 minutes, deglaze with some white wine and add the sprigs of parsley. Put the stuffed zucchini on top of the onions, add some more wine (1-2cm / 1/2-1" of the bottom should be covered), close with a lid and cook for 1 hour on low - medium heat. Check after 2o minutes, you may have to add some more wine, the bottom should remain covered.
When the zucchinis are soft at the bottom and al dente at the top, take them out with 2 spatulas, carefully, and set them aside. Take out the parsley, add the tomato paste to the sauce and season with salt and pepper to taste. Serve the zucchini together with the sauce.
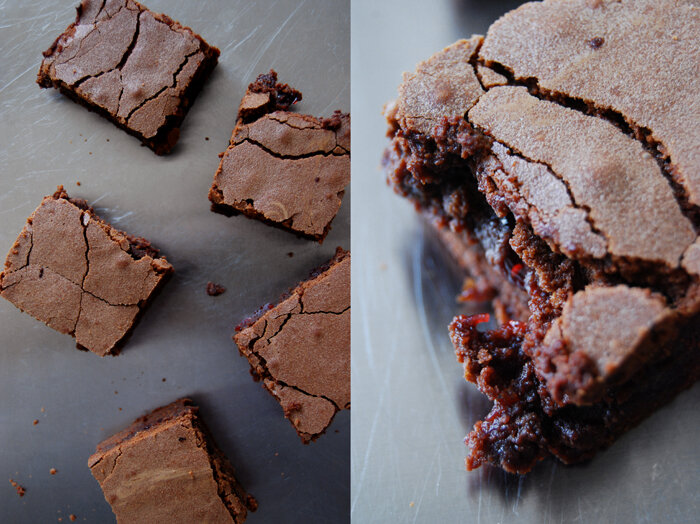
Fudgy Raspberry Chocolate Brownies

The first bite of these chocolate brownies changed my opinion about this cakey treat completely. After a few rather dry, too heavy or painfully sweet experiences with brownies I already felt like giving up on them. I never felt inspired and motivated to give them a try in my own kitchen but this recipe changed everything! They are fudgy, dense, chocolaty and juicy and a thin layer of sweet raspberry jam even adds a hint of fruitiness. You can't really ask for more when you pull a chocolate cake out of your oven!
It's important to use good quality chocolate, bittersweet, the kind you like to eat without putting it in a cake. Mine is 50% cocoa, I tried stronger ones but this works best for me. Sometimes I make the recipe without the jam layer which doesn't effect the brownie's fudginess, they just have to bake shorter as the fruit keeps the dough soggy for a bit longer. When I want chocolate, pure and intense than that's my choice! I like both, so much that I always make a big tray right away, even if there's just the two of us. I also like to make them for easy dinner parties, a sweet finger food dessert, no plates, just napkins and everybody gets a big brownie in their hands.
This recipe comes from my boyfriend by the way. One day he went into the kitchen, came up with this recipe and baked these wonderful brownies. I don't remember why or how, I don't ask questions, I just enjoy them!
Raspberry Chocolate Brownies
For a 28,5 x 23,5 cm / 11 x 9 " baking dish making 24 brownies you need
butter 350g / 12.5 ounces
bittersweet chocolate 350g / 12.5 ounces
a pinch of fresh vanilla
organic eggs 6
granulated sugar 320g /11.5 ounces
plain flour 250g / 9 ounces
salt 1 teaspoon
raspberry jam, whisked with a fork, 100ml
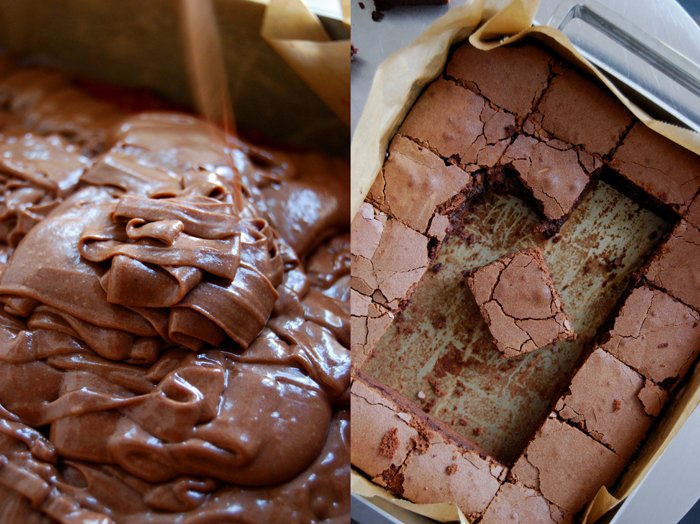
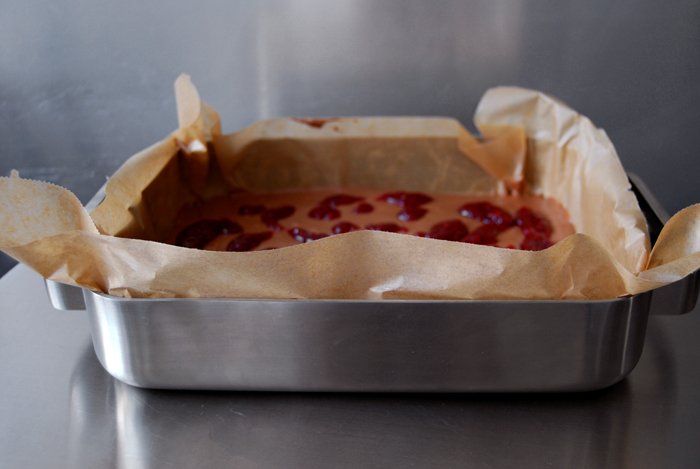
Set the oven to 175°C / 350°F (fan-assisted oven) and line a 28,5 x 23,5 cm / 11 x 9" baking dish with parchment paper. (It must be roughly this size).
Melt the butter together with the chocolate and vanilla in a sauce pan. Set aside and let cool for a couple minutes. Beat the eggs together with the sugar till fluffy and add to the chocolate mixture. In a large bowl, combine the flour and salt, add the liquid mixture and mix with your mixer until everything is combined. Pour half of the dough into the baking dish, even it out and spread the jam on top, carefully so that the layers stay separate. Add the rest of the dough and spread evenly.
Bake in the oven for 55 minutes. The top will be a pale brown and speckled. When you push in the middle you should feel a soft but spongy resistance. Let it cool for 10 minutes before you cut it into small squares.
If you make the brownies without the jam layer, check them after 30 minutes. It should look and feel as described above.


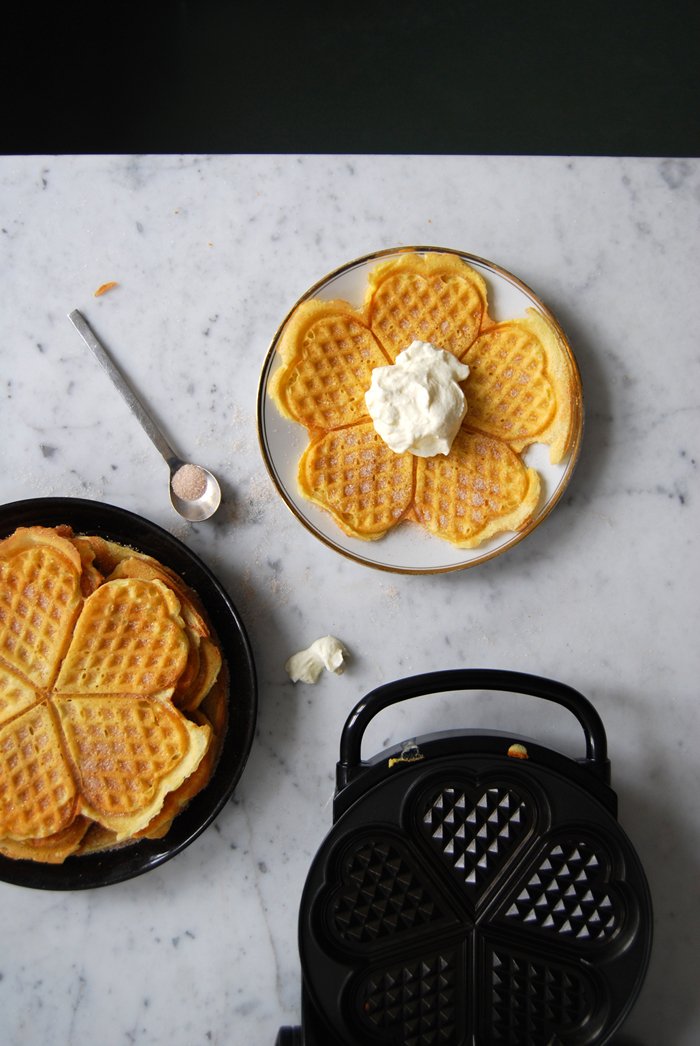
The Family Waffles and Prokofiev's Peter and the Wolf
I used to have cosy tea time ceremonies with my mother and my sister on the weekends, just the three of us. We lit candles, got comfy in between piles of cushions and listened to music. I always wanted to play either Prokofiev's Peter and the Wolf or Ravel's Bolero, both dramatic and mesmerising. It fascinated me as a child, especially Prokofiev's musical fairy tale, just a narrator telling the exciting story and an orchestra interpreting the characters and scenes. It made me feel like I was right in the story, I could see Peter following the cat through the grass and then, the scene when the duck escapes through the garden gate which little Peter had left open! He shouldn't have because of the wolf (his grandfather had told him a million times) and as one can imagine, it doesn't look so good for the duck. I don't want to reveal the end of the story, I still love listening to it!
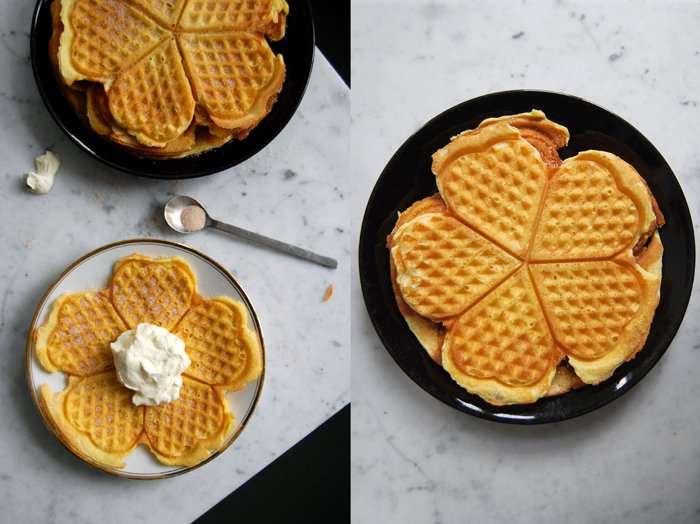
When we had our girly afternoons, we either baked a cake or made waffles, my grandmother's waffles who passed her much-loved recipe on to my mother and her siblings before the grandchildren started baking them as well. I'm one of them, still enjoying them as much as my family does. I never made any other waffle recipe myself but I've obviously had others. I'm biased, I know, never as good as my granny's! Hers are light and fluffy, not too sweet as the dough is made with only a pinch of sugar. She used to sprinkle the sugar on top of the waffles after they were baked, still warm out of the waffle maker, which is how I make them too, sometimes with some cinnamon mixed in.
When I thought of my grandmother, I remembered her gold rimmed plates which I don't use very often. I ate my waffles like I always do, sandwiched with whipped cream in between and I played Peter and the Wolf, all the sweet memories came back and with them a happy and thankful feeling!
This recipe has been featured by Food52!
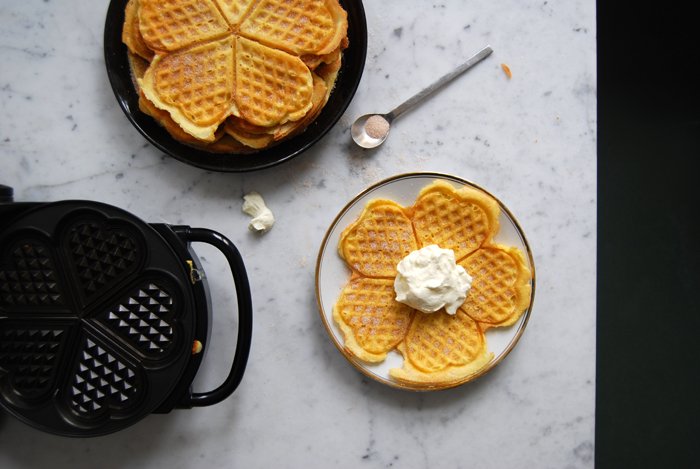
Waffles with Cinnamon Sugar and Whipped Cream
For the 8 waffles you need
butter 50g / 2 ounces
milk 175ml (if you use a Belgium style waffle maker you need only 150ml of milk)
organic eggs 3
a pinch of salt
granulated sugar 1 teaspoon
plain flour 100g / 3.5 ounces
baking powder 1/2 teaspoon
a pinch of fresh vanilla
For the topping
granulated sugar 70g / 2.5 ounces plus 1 tablespoon for the whipped cream
ground cinnamon 1/2 teaspoon
whipping cream 200ml
Warm up your waffle maker.
Combine the sugar and cinnamon to sprinkle on the waffles and whip the cream together with a tablespoon of sugar.
Melt the butter and mix with the milk. Combine the flour and baking powder. Beat the egg whites with a pinch of salt till stiff. Mix the egg yolks with the sugar and vanilla till fluffy and add the milk and flour, mix well. With a spoon, fold the stiff egg whites gently into the dough until well combined.
Pour a ladle of the dough onto the waffle maker and bake until golden brown. Sprinkle with the cinnamon sugar while the waffles are still warm and served with whipped cream.


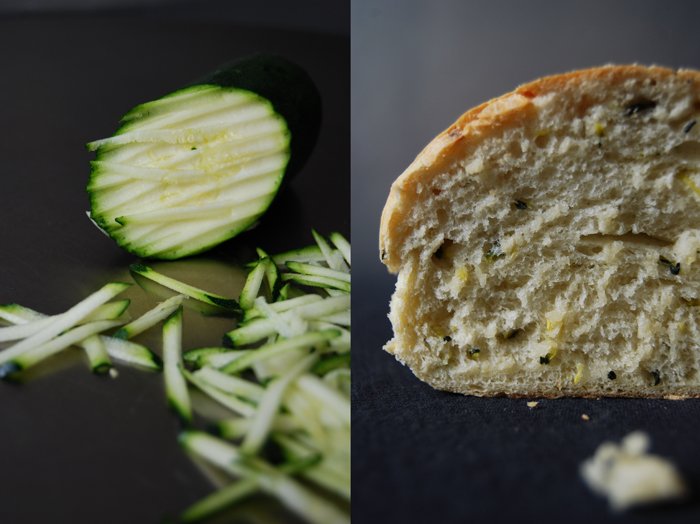
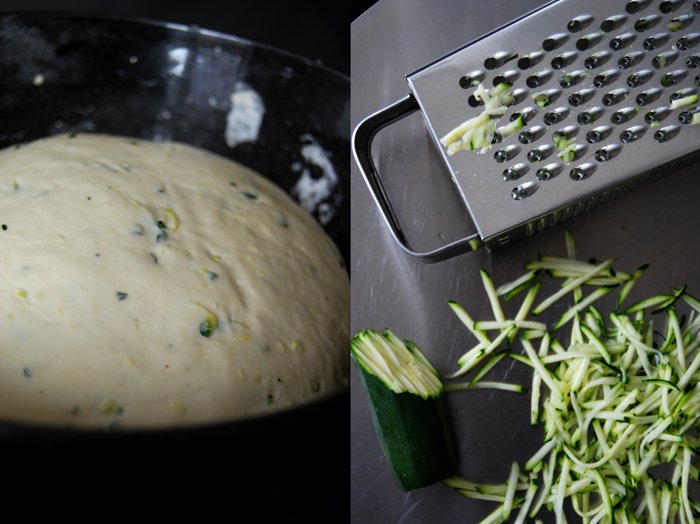
Savory Zucchini Bread
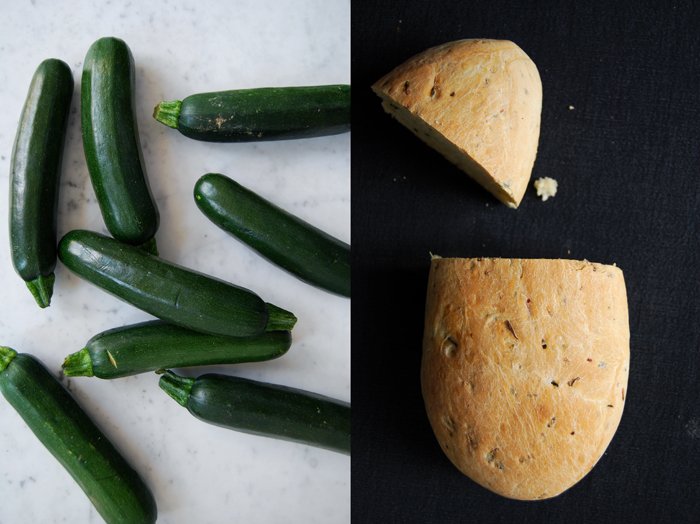
I've wanted to learn how to bake sourdough bread for years, the only problem is that I bake and love so many of my yeast bread recipes that, so far I've never approached this adventure. Dry or fresh yeast allows me to make a fresh and warm bread within a couple hours where as sourdough demands days of preparation. Most of the time, my baking isn't really planned far ahead, my mood decides what I will put in the oven. With the right ingredients a yeast bread is wonderfully juicy and spongy but I have to admit that it never creates a crust comparable to the more time-consuming alternative which also has the advantage that you can keep it for days. This is impossible with yeast bread, but to be honest that has never been an issue as all the fresh bread coming out of my kitchen doesn't survive for more than a day or two!
I know that one day sooner or later I will give the sourdough a try, but till then there is still a lot of bread to bake. One option, which is as juicy as my olive bread, is a loaf made with grated zucchini (courgette) which makes the texture so soft and spongy that it doesn't need more than some olive oil or butter spread on top. I served it with ramp (yes, again) butter when we had some friends over and I liked that a lot as well, it made it a bit garlicky.
It's really quick to bake, it only needs 20 minutes in the oven!
Savory Zuchini Bread
For 2 loaves of bread you need
plain flour 500g / 1 pound
dry yeast 1 package (for 500g / 1 pound of flour)
salt 1 heaping teaspoon plus 1/2 teaspoon for the zucchini
zucchini, grated 200g / 7 ounces
water, lukewarm, 225ml
olive oil for brushing
Put the grated zucchini in a sieve over a bowl, add 1/2 teaspoon of salt and mix with your fingers. Set aside for 15 minutes, rinse under cold water for a few seconds and squeeze the water out with your hands. Spread the zucchini on a tea towel and push another towel on top to dry. Scrape off the towel and set aside.
Combine the dry ingredients, add the zucchini and water and mix with your dough hooks for 5 minutes until well combined. Continue kneading with your hands for a few minutes until you have an elastic dough ball. Put the dough back into the bowl and cover with a tea towel. Let the dough rise in a 35°C / 95°F warm oven for 45 minutes. This works really well but make sure that your oven is set to top/ bottom heat and not to fan.
Take the dough out, punch it down and knead for 1 minute. Form 2 long loaves and put on a baking sheet lined with parchment paper. Cover with a tea towel and let them rise for 30 minutes in the warm oven.
Set your oven to 220°C / 430°F.
Brush the loaves with a thin layer of olive oil and bake for 18 minutes or until cooked through. If you’re not sure if it’s done turn the bread around and knock on its underside, it should sound hollow. Let it cool for a couple minutes before you enjoy the first slice of your freshly baked bread.


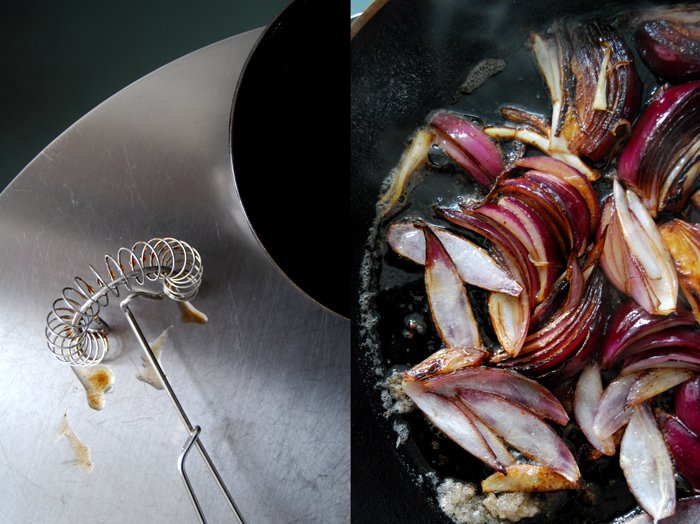
Radicchio with Caramelised Red Onions and Lemon Thyme

In the past few days I've had caramelised onions on my mind, sweet and syrupy, preferably the red ones or shallots which taste softer and reveal an intense natural sweetness when they are cooked. There is a big bowl in my kitchen which is always filled with onions. I like to have the whole range at hand, red, yellow, white, big and small, but most of the time I use the spicy yellow bulbs, mine are medium sized and organic, they bring tears to my eyes as soon as the knife touches the peel. They are great too cook with but painful to prepare! A few shallots are in the bowl as well and red onions of course which I love to use for pies or in salads, which rarely happens as I'm not too fond of raw onions.
I have a beautiful head of radicchio in my fridge just waiting to be used, the big leaves falling over its sides like a ball gown, almost too perfect to destroy! But I must, I want to combine its bitterness with the sweetness of caramelised red onions and some lemon thyme. The radicchio is uncooked but the onions caramelise in sugary butter, softening over less than 15 minutes before I deglaze their juices with dark Balsamico vinegar. The result is delicious, a salad of bitter sweet flavours glazed in a thick sweet and sour dressing!

A Salad of Radicchio, Caramelised Red Onions and Lemon Thyme
For a side dish for 2 you need
radicchio, torn into bite sized pieces, 4 big leaves
medium sized red onions, each cut into 8 pieces (lengthwise), 2
butter 3 tablespoons
sugar 2 tablespoons
balsamic vinegar 2 tablespoons
olive oil 4 tablespoons
lemon thyme, 10 young and soft sprigs chopped roughly or just the leaves
salt and black pepper
In a large pan, heat up 1 tablespoon of oil together with the butter and sugar on medium temperature. As soon as the butter starts to sizzle add the onions, stir once in a while. Let the onions soften over 10 minutes, they can become a bit dark but shouldn't burn as that would make them bitter. When the onions are soft, caramelised and have turned a dark red, season with salt and pepper and take them out keeping their caramel juices in the pan. Deglaze the bits and pieces left in the pan with the Balsamico, put on medium heat for a few seconds and mix it so that just a little of the vinegar evaporates. Take it off the heat, pour the liquid into a bowl, whisk with 3 tablespoons of olive oil and season with salt and pepper to taste.
On large plates, arrange the radicchio with the caramelised onions on top, carefully as they are very soft, sprinkle with some salt and pepper and add the thyme. Drizzle the thick dressing over the leaves, it's so strong that a few drops are enough to spread the sweet flavours.

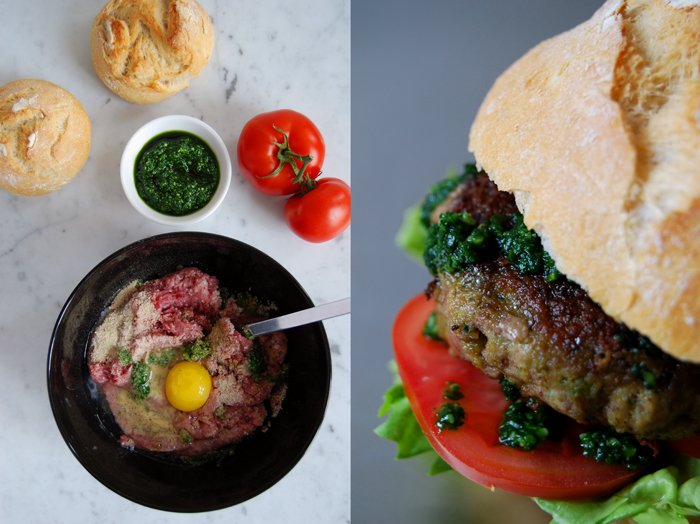
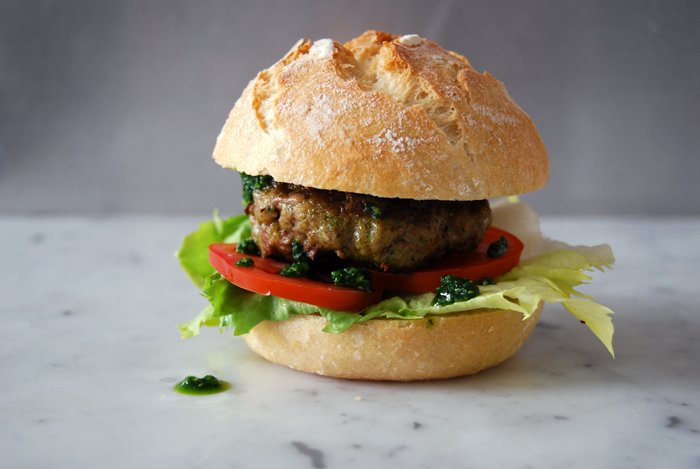
A juicy Lamb Burger with Ramp Pesto
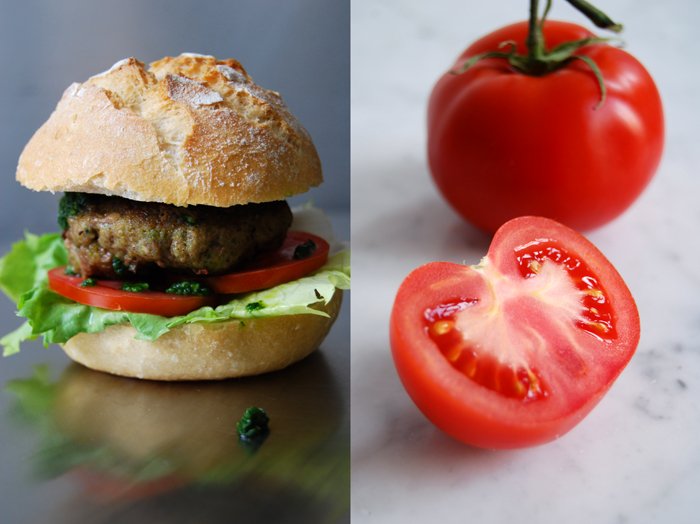
Yesterday I mentioned that nothing can escape my appetite for ramp, not even a burger! At first, my plan was to add just a few spices and leave the focus on the strong lamb meat. A juicy hamburger with tomato and lettuce, simple and pure, that was my idea, but when I saw the bowl with yesterday's ramp pesto on my kitchen top I remembered a beef burger I had made two weeks ago with pesto mixed into the burger mixture and it was so good that I couldn't resist! I had to make it again and added it to the lamb meat. The pesto doesn't only add its flavours but it also effects the texture and makes the burger very, very juicy.
Usually, for my sandwiches on Wednesdays I measure the amounts for a quick lunch for 2, but I knew that this would have to be a proper dinner. It's so good that you can't stop after one burger! So I got 600g / 21 ounces of minced lamb meat and mixed it with 1 egg, 40g / 1.5 ounces of bread crumbs, 2 teaspoons of salt and ground black pepper. I stirred in 3 tablespoons of my ramp pesto (you can find the recipe here), but you could use any other pesto which matches the taste of the meat. When I made the beef burger I only added 2 tablespoons of the pesto as the meat isn't as strong as lamb so I put in an extra one. To keep the meat juicy while its frying I form thick burgers. We had 6 which I fried in 2 tablespoons of butter and some olive oil, on high temperature which I turned down to medium immediately after I put the burgers in the pan. After a couple minutes on each side they turned a crisp brown, but still juicy inside.
We put the burgers in some crunchy buns together with thin slices of tomato, a leaf of green lettuce and sprinkled them with some more pesto - and then we ate them all!


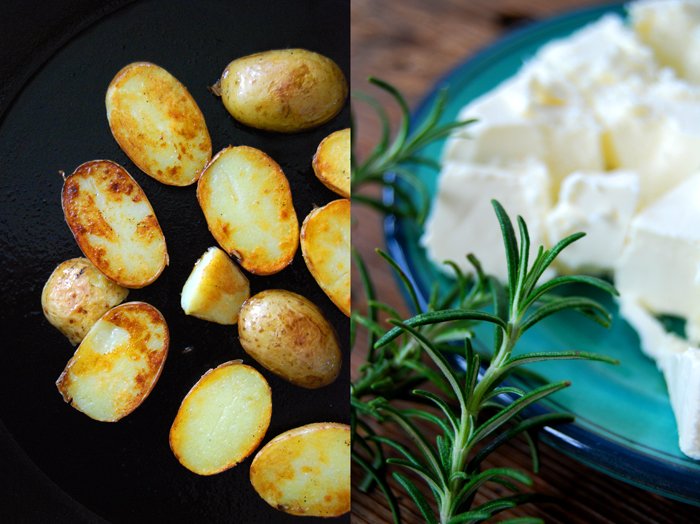
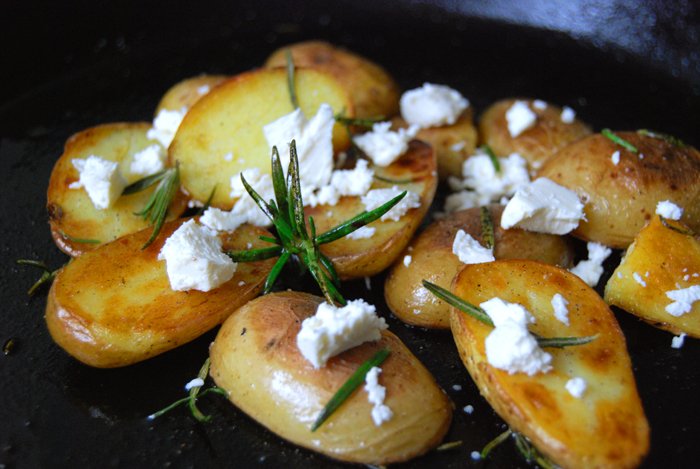
Crisp Golden Rosemary Potatoes with Feta Cheese
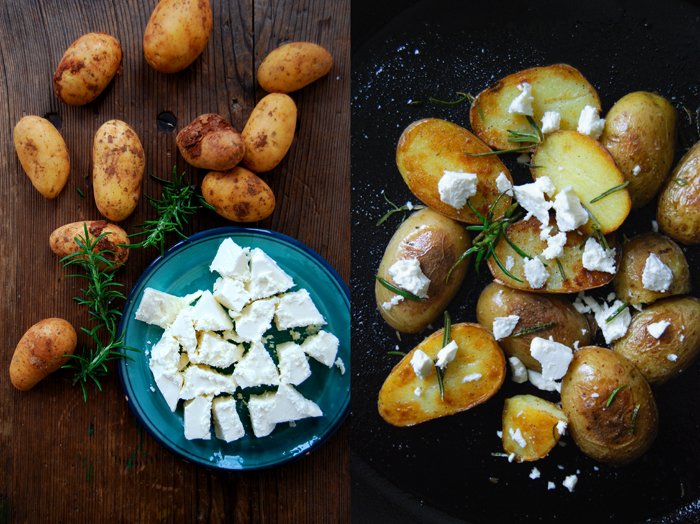
Some days call for a quick lunch or dinner and potatoes are often my solution - apart from pasta, of course. Mashed, fried, baked or in salads, preparations never take too long to create a satisfying meal which won't leave me hungry. Sometimes when I know that stressful days are ahead, I put a big pot of potatoes on the cooker, enough to be turned into a few delicious meals in the following days. This is perfect when there are fried potatoes on my cooking plan as they should always cool and dry after cooking before you throw them into the hot pan, that way they turn nice and crisp and won't become mushy. My favourites are the classic version with bacon and onions or a bit lighter and Mediterranean, golden fried potatoes with rosemary. I could leave it at that, good potatoes fried in olive oil with some herbs, sea salt and pepper don't really ask for more but I'm in the mood for cheese at the moment. I could throw it into anything, like last week's rocket salad with goat cheese, my Bavarian Obatzda sandwich with camembert or the gnocchi with blue cheese sauce.
So my potatoes get a cheesy add-on as well, in the form of Greek Feta cheese. I cut 500g / 1 pound of small cooked and cold potatoes in half and fry them in olive oil on medium heat until golden on all sides. For the last 2-3 minutes I add the needles of 3 small sprigs of rosemary, they become bitter when fried too long. When the potatoes are nice and crisp I season them with crushed black pepper and coarse sea salt and crumble 150g / 5.5 ounces of Feta cheese on top. A ripe goat cheese would work as well, or an aromatic French cheese like Comté grated and melted on the hot potatoes, so many options!