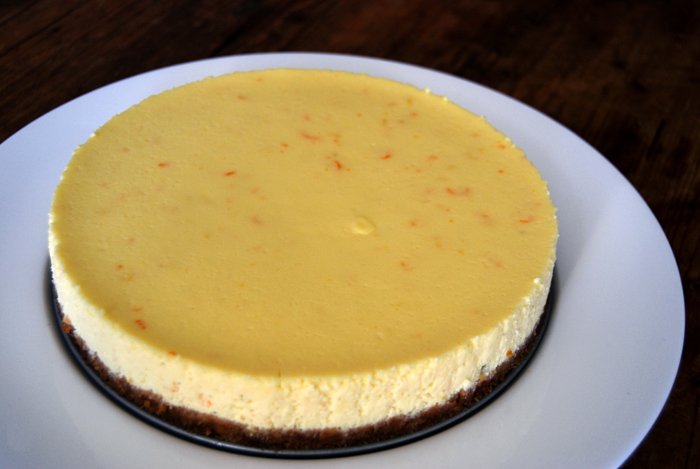
Orange Cheesecake

The first time I had New York cheesecake is quite a while ago - it was love at first sight! When I was fourteen I traveled to New York and Canada with a friend of mine and her family. As soon as I took my first bite I was hooked and during the following three weeks of our holiday I don't believe I left out a single chance to get a piece of cheesecake, every day, at every restaurant we went to. I became a true cheesecake specialist!
Now, when I bake my own, I'm always reminded of that trip and the excitements of being a traveling teenager. Over the years I tried out many cheesecake recipes and developed my own favourite with orange zest and juice and cream cheese mixed with ricotta. It is still as rich and moist as the traditional version, the citrus flavour just adds a fresh, fruity specialness and gives it a lighter feeling.
Orange Cheesecake
For a 20.5cm / 8" springform pan you need
digestive cookies, crushed very finely, 210g / 7.5 ounces
butter, melted, 70g / 2.5 ounces
cream cheese, at room temperature, 450g / 16 ounces
ricotta, at room temperature, 100g / 3.5 ounces
granulated sugar 100g / 3.5 ounces
vanilla sugar 1 teaspoon
organic eggs 3
cornstarch 1 teaspoon
zest of 1 orange
orange juice 1 tablespoon
zest of 1 large lemon
juice of 1 lemon (4 tablespoons)
a pinch of salt
Mix the crushed cookies with the melted butter until crumbly and combined and press into your springform pan. Put in the freezer for 15 minutes.
Set the oven to 165°C / 330°F and put a deep roasting tin in the oven on the lowest position. Boil water in a kettle.
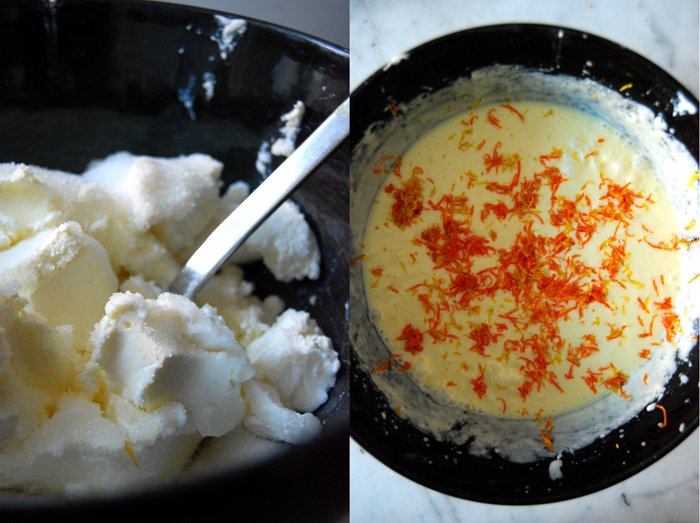
Mix the cream cheese, ricotta, sugar, vanilla sugar, salt and eggs and beat until smooth. Add the cornstarch, lemon and orange zest and juice and continue mixing.
Take the baking pan out of the freezer and wrap in aluminium foil twice so that the bottom and sides are well covered to protect the cheesecake from the water. Pour the cheesecake mixture on top of the hardened crumbs and place carefully into the tin in the oven. Fill the roasting tin with the boiling water from your kettle. The water should come half way up the wrapped springform pan. Bake for 50 minutes, switch off the oven and leave the cake in the oven to cool. After around an hour you can take your cheesecake out and chill in the fridge for a couple hours.

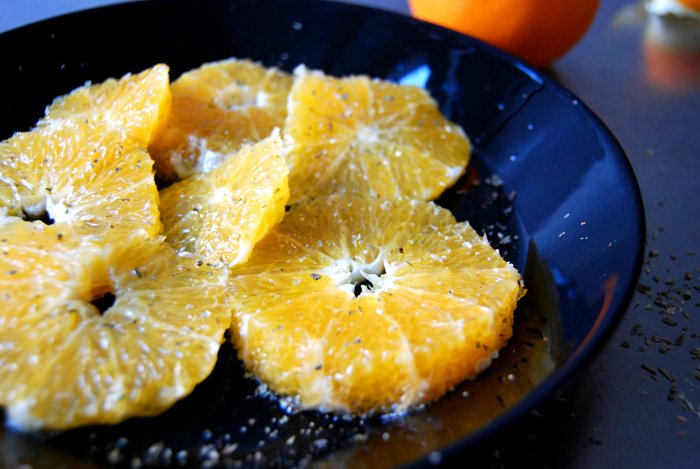
A Sicilian Salad with Oranges, Oregano and Olive Oil
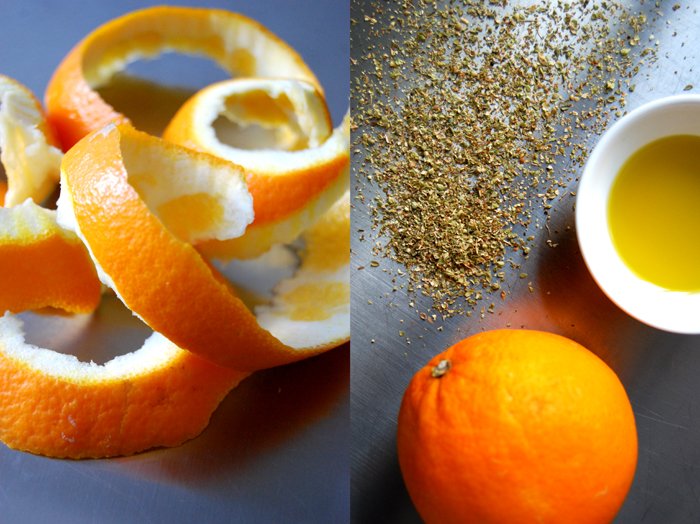
My friends and family live all over the world. On the big festive days of the year, we spend quite a bit of time on Skype to share the special moments. We talk and laugh and - very often - show each other what we cook for our festive meals. Yesterday, my boyfriend's mother Jenny, presented a beautiful piece of ham that she had just pulled out of her oven. It looked so tempting! She also told me about the orange tree in her garden in Malta which is sagging with oranges and held a huge box of oranges for me to see. I knew what I would have for lunch today: my Sicilian salad with oranges, oregano and very good olive oil!
I know this combination sounds a bit extraordinary. It is another one of my Sicilian discoveries which I had for breakfast at a little farm in Noto two years ago. They used the oregano which grew on their farm and it was the best oregano I ever had in my life. It was unbelievably good! I never thought there could be such big differences in the taste of oregano.
This salad makes a perfect snack after the last Christmas days of culinary richness - refreshing, light and comfortable. All you need to do is to peel two oranges (including the softer inner skin) and cut them in thick slices. Drizzle some good olive oil on top and sprinkle with dried or fresh oregano and a bit of salt.

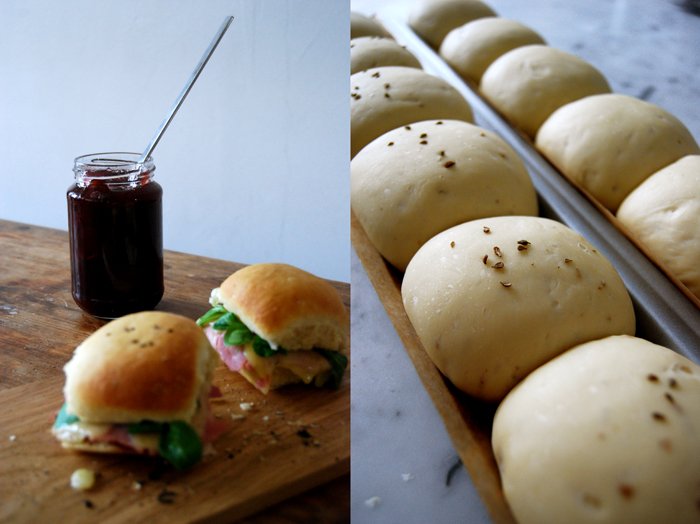
A Mountain Bun

When I was a child we used to go to the Italian Dolomite Alps. Every year, in December, we stayed in a beautiful village in the Alta Badia region called Corvara. I loved being there as it looked like a wintery fairy tale (I always had a weak spot for places like this). Old wooden houses, trees packed with thick snow and the most amazing Tyrolean food - my childhood heaven. Yesterday I thought about how much I would love to be in the mountains again, in a wooden hut with an open fire and lots of snow outside. I would sit at a rustic old wooden table and eat rustic food.
Although I will not be visiting Corvara this winter, at least I have the wooden table and the hearty food. Therefore, my Wednesday Sandwich has to be a mountain sandwich - kind of - rich, with ham and cheese, homemade plum chutney and ground pepper. This morning, I baked my own buns with coriander and aniseed and I got some nice ham and cheese. I made a plum chutney with lots of spices a couple months ago which is great together with cold cuts and mountain cheese. You could also use any other chutney or even plum butter, you just need something that adds a bit of fruity sweetness to this sandwich.

A Mountain Bun
For 2 sandwiches you need
2 buns, or 4 thick slices of bread
slices of ham, 6
thin slices of aromatic mountain cheese, like Swiss Appenzeller
plum chutney
a few leaves of lettuce (I used field salad as I had some left)
crushed peppercorns
Set your oven to grill (highest temperature).
Cut the bun in half, spread the chutney thinly on one half and put a slice of ham on top. Cover with 3 slices of cheese and put in the oven until the cheese starts to melt. Take the bun out, sprinkle with pepper, add some lettuce and put the other half of your bun on top.
I know it's a bit of work, but baking your own bread or buns is definitely worth the effort and I'm sure you will agree after your first bite of the warm and fluffy buns. I prepared mine last night and let the dough rise overnight. Then you just have to put the buns into shape the next morning, let them rise for 40 minutes and bake them. If you want them plain just leave out the coriander and aniseed, they are still delicious!
For the Mountain Buns
This recipe makes 12 fabulous buns or milk rolls
plain four 550g / 1.1 pound
dry yeast 1 package (for 500g / 1 pound of flour)
milk, lukewarm, 300ml
butter, melted, 50g / 2 ounces
organic egg 1
sugar 1 teaspoon
salt 1 1/2 teaspoon
coriander, crushed, 1 teaspoon
aniseed, for the topping, 1 teaspoon
Combine the flour with the yeast, coriander, sugar and salt. Mix the milk with the melted butter and the egg. Mind the temperature as the mixture should be lukewarm. Pour the liquid mixture into the flour and start mixing with your dough hooks for around 10 minutes until you have an elastic dough ball. Put the dough on a floured working surface and continue kneading with your hands for a couple minutes.
When I prepare the dough in the evening I place it in a clean, buttered and covered bowl in the fridge and let it rise overnight. You will have to take it out of the fridge 30 minutes before you can continue with the next steps.
In case I want to bake my buns the same day, I put the dough in a clean and buttered bowl, cover it with a tea towel and let it rise in the 35°C / 95°F warm oven for 60 minutes. This works really well but make sure that your oven is set to top/ bottom heat and not to fan.
Set your oven to 220°C / 430°F and prepare a baking sheet with parchment paper.
When the dough is bigger and puffy punch it down and knead for 1-2 minutes. Cut into 12 pieces and roll them in your hands into a round shape. Place the buns on your baking sheet, sprinkle with anisseed and give them another 40 minutes in a warm place to rise again (covered with a tea towel).
Bake the buns for 6 minutes, take the temperature down to 200°C / 390°F and bake them for another 7-10 minutes or until golden brown. Let them cool for a couple minutes.

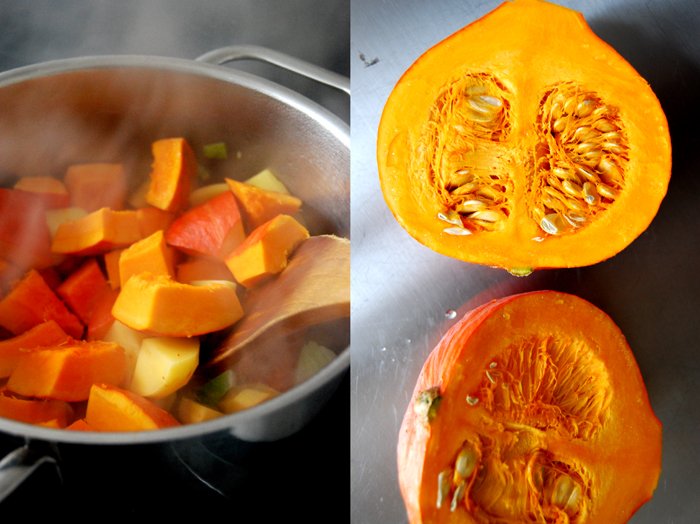
Spicy Pumpkin Soup with Bittersweet Chocolate

It's cold outside and I see a bright orange pumpkin right in front of me telling me what I need - a warming pumpkin soup. I have played around with many pumpkin variations in the past, with bacon, curry mixtures, roasted onions and I also love my puristic version with pumpkin seed oil and pumpkin seeds. Over the years my pumpkin soups became more spicy. I tend to feel cold all the time in Winter and nothing beats a hot and spicy soup to warm up your body from the inside.
Today I want my soup really hot and I also feel like adding some bittersweet chocolate on top (I love the combination of bitter, sweet and spicy!). I mix the soup in a blender which gives it a smooth and velvety texture. Together with the chili and bittersweet chocolate sprinkles on top, it makes quite a sensual meal!
This recipe has been featured on Food52 Halfway To Dinner!

Pumpkin Soup with Chili and Bittersweet Chocolate
For 4 people you need
For the soup
pumpkin (squash), without the seeds and fibres, cut into cubes, 600g / 1.5 pounds (I like to use Hokkaido squash with skin, or peeled butternut or Musquée de Provence)
medium sized potato, cut into cubes, 1
medium sized leek, sliced thinly, 1/3
medium sized carrots, cut into small cubes, 2
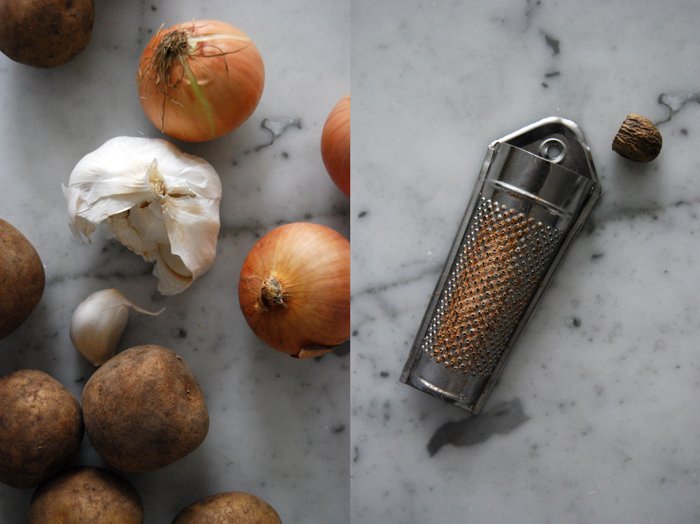
medium sized onion, chopped, 1
garlic, quartered, 1 clove
bay leaf 1
small dried chili peppers 2
a pinch of mace or nutmeg
salt and pepper
olive oil
water around 1l / 2 pints
For the topping
fresh red hot chili pepper, chopped finely, 1
bittersweet chocolate, grated, 4 heaped teaspoons plus more to taste
In a large pot, heat a splash of olive oil and cook the onion for a few minutes until golden and soft. Add the garlic, leek and carrots and cook for 2 minutes, stirring constantly. Add the pumpkin and potato, cook for 2 minutes and cover with water. Add the bay leaf and the dried chili peppers and season with mace (or nutmeg), salt and pepper. Bring to the boil and cook for about 30 minutes (without a lid) or until the pumpkin is soft.
Take the pot off the heat and remove the bay leaf and dried chili peppers. Purée the soup with a stick mixer or in a blender until smooth, season with salt and pepper to taste. Divide the soup between the plates and sprinkle with the fresh chili pepper and chocolate.

Couscous with Orange, Ginger and 6 Spices
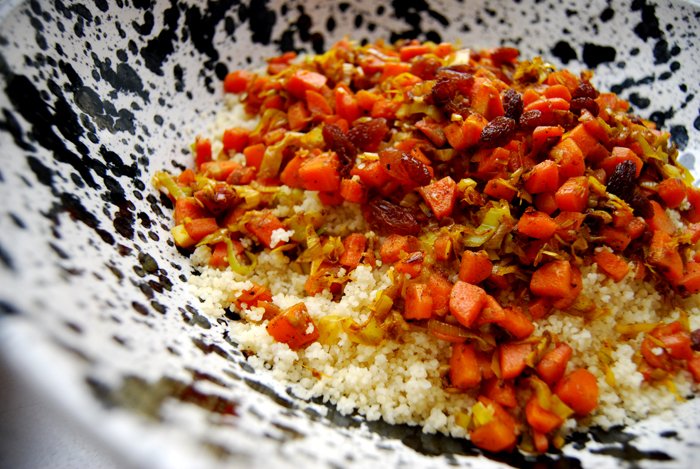
Two days ago I filmed a live session at a recording studio. As there were five of us and we had to work till late, I wanted to prepare something nice for us to eat, and to feed our energetic mood.
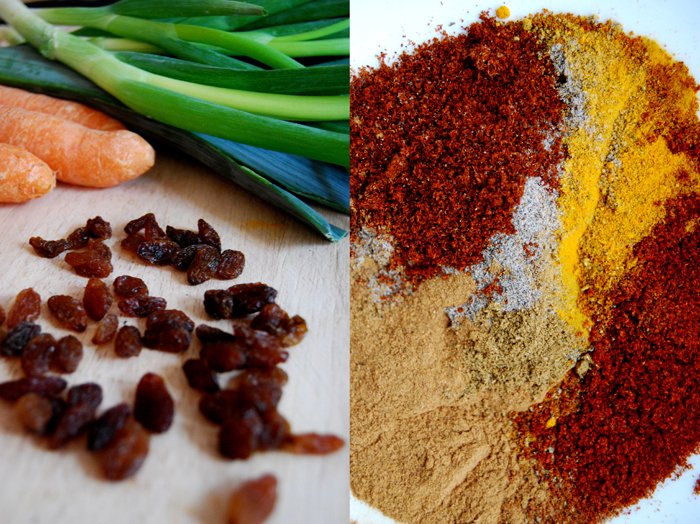
I didn't have much time to prepare, so a box of couscous caught my attention (5 minutes and it's done!). My mother had just sent it to me a couple days before because, I think, something that has to sit rather than cook for just a few minutes didn't quite satisfy her idea of cooking. I had half an hour to enhance it a bit so I decided to mix it with slices of leek and carrot and to add some strong exotic flavors - a homemade curry mixture with orange zest, ginger, turmeric, black pepper, cumin, cardamom, cayenne pepper and cinnamon. I mixed in some raisins to add some sweetness to the fruity spiciness of the curry mixture. Quick and easy - perfect food to wake you up (exactly what we needed at 11pm)!
A Couscous with Orange, Ginger and 6 Spices
For 6 people you need
couscous 360g / 12.5 ounces
water 540ml (mixed with 1 teaspoon of salt)
1/2 a medium sized leek, thinly sliced
spring onion, thinly sliced, 2
carrots, cut in small cubes, 4
raisins, a handful
olive oil, 3 tablespoons plus more for frying
butter, 2 tablespoons
sour cream, 3 tablespoons
For the spice mixture
ginger, grated, 2 teaspoons
zest of an orange, 2 teaspoons
turmeric, ground, 1 teaspoon
black peppercorns, ground, 1 teaspoon
cinnamon, ground, 1 teaspoon
cardamom, ground, 1 teaspoon
cayenne pepper, ground, 1 teaspoon
cumin, ground, 1 teaspoon
Let the raisins soak in a cup of hot water.
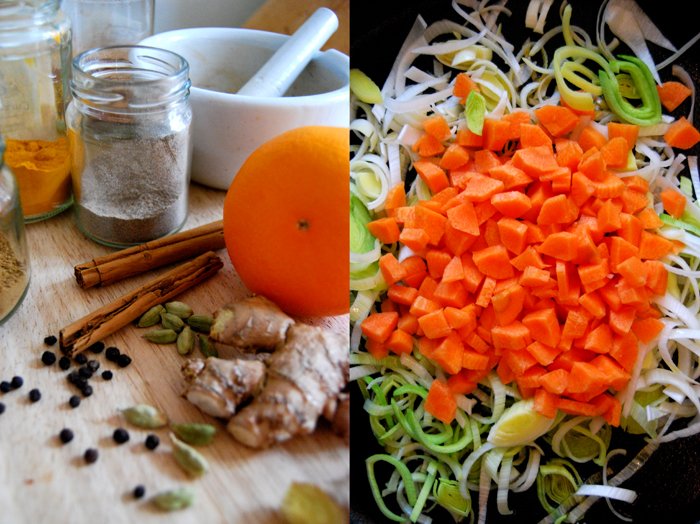
Bring the salted water to the boil. Take the pot off the heat. Add 3 tablespoons of olive oil to the water, add the couscous and mix immediately, cover with a lid (but leave the pot off the heat). Let it sit for 5 minutes. Add the butter, mix and separate the grains with a fork.
Mix all your spices for the spice mixture (including the ginger and orange zest) and grind in a mortar. Warm some olive oil in a large pan and add the leek, spring onions and the carrots. Push the vegetables to the side after a couple minutes, pour some more oil in the middle of the pan and fry 3 teaspoons of your curry mixture for a minute on medium heat. Mix everything together and fry for another 1o minutes (keep in mind that the carrots shouldn't become too soft). Season with salt.
Mix the couscous and the fried vegetables in a big bowl, add the sour cream and more of your curry mixture until you find the right balance of spiciness (I added another 3 teaspoons of the spices at that point, so 6 teaspoons in all). When you are happy with the result, take the raisins out of the water and sprinkle on top of your couscous.

My Pastrami, Turnip and Winter Purslane Sandwich

It's Wednesday again, time for another sandwich!
At the moment I am really hooked on roots so my sandwich today can't do without them. My choice is a German turnip called "Teltower Rübchen". It tastes similar to horseradish, just a bit softer. I also have some winter purslane (sometimes known as miner's lettuce), its flavor is quite mild and sits well with the turnip. I must admit that I chose the winter purslane because it looks really cute. The centre piece of this sandwich is Pastrami but I wouldn't dare calling it a "Pastrami Sandwich" as, traditionally, this sandwich is literally piled up with slices of meat which is too much for me. This is lighter, on ciabatta bread, with a bit of olive oil, crushed pepper - delicious.

A Sandwich with Pastrami, Turnip and Winter Purslane
For 2 people you need
a small loaf of ciabatta
Pastrami, 6-8 slices
Teltower Rübchen, thinly sliced (or horseradish, grated)
winter purslane, a handful (or rucola/ rocket, a few leaves)
olive oil
crushed peppercorns
Cut your bread and slice it in half. Drizzle some olive oil on the inside, line with the pastrami and put either the turnip slices or a bit of grated horseradish on top. Garnish with a few leaves of winter purslane or rucola and enjoy a big bite!

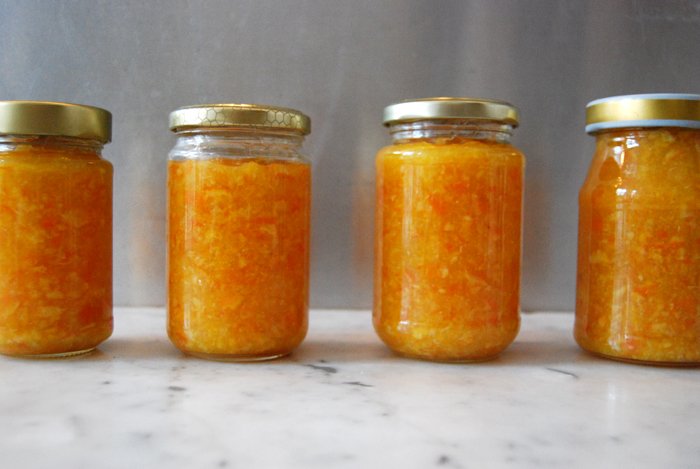
Sicilian Memories with my Tangerine Jam
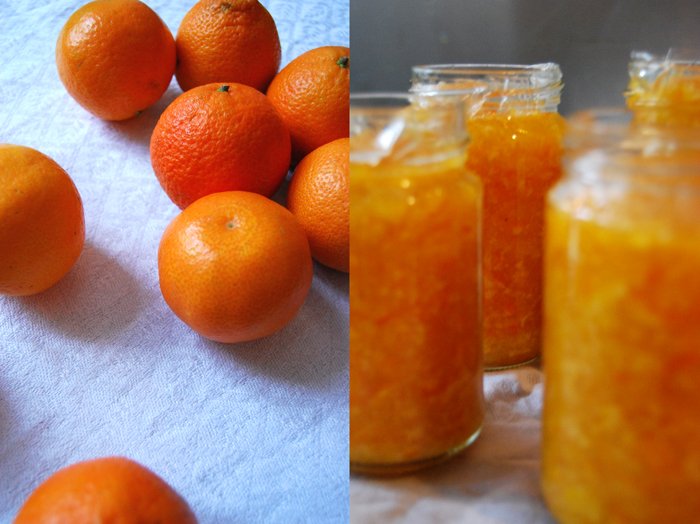
Last year I went to Sicily for the first time in my life. We stayed at a beautiful farm close to Noto located in soft hills between lemon, orange and tangerine trees. Every morning we got the most delicious breakfast served under pine trees with the old city of Noto in the distance. Freshly baked cakes, fruit, white bread fried in olive oil together with oregano (from the farm as well, the best oregano in the world!), it was heaven!
One of my many breakfast discoveries was a jam which looked like the golden sun and tasted so sweet and refreshing, with a hint of sourness and bitterness. Just divine! This jam was made of tangerines and I think I must have emptied jars of it during our holiday. As soon as I got home and tangerines were available I made my own! This year, I have to refill my pantry with my Sicilian jam.
Sicilian Tangerine Jam
For 4 medium sized jam jars you need
organic tangerines, rinsed, 1200g / 2 1/2 pounds
sugar 600g / 1 1/4 pounds
juice and seeds of 2 lemons
spirit to sterilise the rims of the jars
Sterilise the 4 jam jars in boiling water for 5 minutes.
Fill a large pan with water and bring to the boil. Put the tangerines in the water and let them boil for 20 minutes. Take the tangerines out and keep some of the water.
Quarter the cooked tangerines (don't peel them, you use the whole tangerine!), take out their seeds and put them aside. Cut the lemons in half and keep their seeds as well. Heat up some of the tangerine cooking water in a small pan (it should come up to 2cm / 3/4"), add the lemon and tangerine seeds and let them cook for 5 minutes.
Shred the quartered tangerines in a food processor for a few seconds. Put them in a large pan, add the sugar, the lemon juice and the water used to boil the seeds. Bring to the boil gently (the sugar has to dissolve first) and boil everything for 18-20 minutes.
Dip the rim of your jars in the spirit and wash out the lids of the jars with the alcohol as well. Fill your jars with the jam and close well immediately.
Let the jars cool off and enjoy their amazing color - and the taste after a day or two as the jam has to sit a bit!


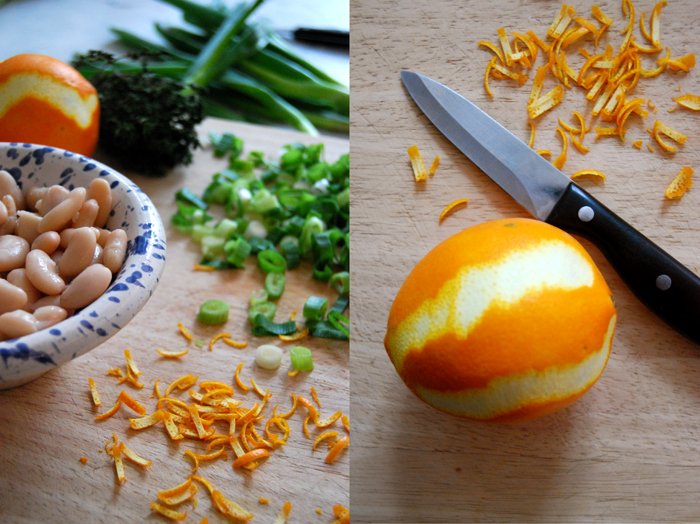
A Salad with White Beans, Orange and Thyme

This salad is quite extraordinary in its combination but quick and easy to prepare. The first time I made it, I used dry beans which involved pre-soaking and cooking but I use tinned beans when I need a quick lunch like today. White beans are great to combine with other strong flavours and in this salad they still manage to stand out next to the strong tastes of orange peel, thyme and spring onions. They create a perfect match.
For a lunch for two people you just need a big tin of white beans (rinsed), 1 orange, 4 spring onions, a sprig of thyme and salt and pepper. Maybe a few slices of bread to go with it and your lunch will be ready in a few minutes.
Cut fine strips of orange peel (I chop up four strips of peel, each 1x6cm / 1/2"x2 1/4") and cut the spring onions thinly. Mix the beans with the leaves of the thyme sprig. For your sauce mix 3 tablespoons of olive oil together with 5 tablespoons of orange juice and season with salt and pepper. Mix everything together and you will have a beautiful lunch.

A trusted companion, my beloved Quiche
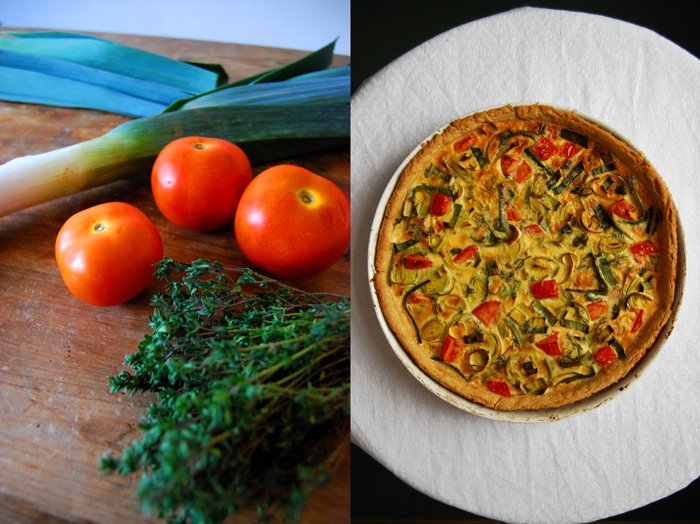
This recipe has been with me for a very long time. I think I cooked it for the first time nearly twenty years ago. And since then it has made lots of people very happy (including myself). My time trusted companion is a quiche with a wonderful crisp and buttery short crust base and a simple but perfect filling of leek, tomatoes and thyme. What I also like about it is that the egg and cream filling isn't as high and heavy as in many other versions of this famous French dish. There is still something light about mine.
In past years I tried out different fillings with spinach or broccoli but I still prefer the combination of leek and tomatoes. The taste is just perfect. I once covered the base with slices of pear and crumbled Stilton for a party, very nice too, and perfect finger food.

Quiche
Usually I double the amount and make two quiches, one to eat warm straight away, the other to eat cold the next day. I can't say which I prefer as the different flavours come through very strongly when the quiche has cooled down.
For one quiche you need a 27cm / 10.5" baking dish or tart pan. I use spelt flour type 630 (but you can use any other plain flour) and organic eggs.
For the short crust base
flour 250g / 8.5 ounces
butter, cold 125g / 4.5 ounces
egg, organic 1
salt 1 teaspoon
Combine the flour with the salt and cut the butter with a knife into the flour until there are just little pieces of butter left. Continue with your fingers and work the butter into the flour until combined (there shouldn't be any lumps of butter left). Add the egg and continue mixing with the hook of your mixer until you have a crumbly mixture. Form a disc, wrap in cling film and put in the freezer for 10 minutes.
For the filling
medium leek, thinly sliced, 1
tomato, cut into cubes, 1
thyme, leaves of a few sprigs
eggs, organic, 3
heavy cream 125ml
crème fraiche or sour cream 125ml
salt 1 heaping teaspoon
pepper
nutmeg, best freshly grated, a generous amount
Set your oven to 210°C / 410°F.
Mix the eggs with the heavy cream, crème fraiche, salt, pepper, nutmeg and thyme.
Roll out the dough between cling film and line your baking dish with the flat pastry. Prick it with a fork and blind-bake in the hot oven for 10 minutes. Take your baking dish out of the oven and set the temperature down to 175°C / 350°F.
Spread the leek slices and tomato cubes over your pre-baked pastry base and pour the egg / cream mixture over. Put the quiche carefully on a baking sheet in the oven and bake for about 40 minutes or until golden. Let it cool for about 10 minutes before you eat.
Bon appétit!


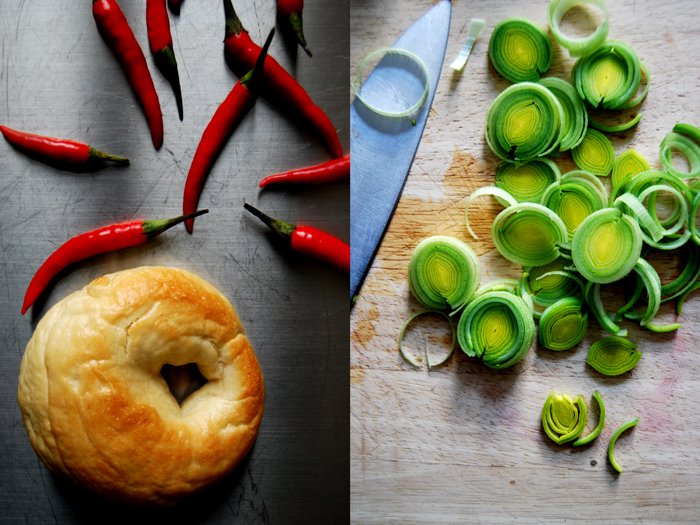
Tomato, Leek and Cream Cheese Bagel
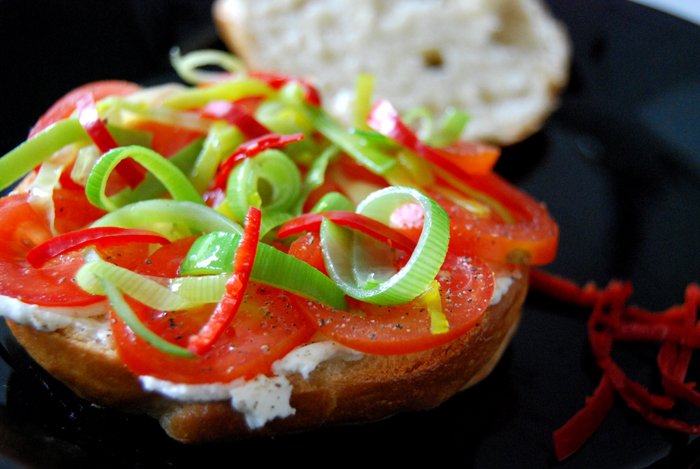
Today has been a busy day so we are going to keep it simple and make some sandwiches. I love trying out new variations as there are so many great things one can place between two slices of bread - or, in our case today, in a bagel.
Even though my bagels are really good (my recipe will follow soon), I must admit the true star of this snack is the filling of sour cream cheese together with spicy chilli, fried leek rings and fresh slices of tomato. Some salt and pepper on top and you have a most satisfying meal.
When I make bagels I bake them in bigger batches because it is very convenient to have a few of them in the freezer and you just have to warm them up in the oven for a few minutes whenever you feel like. For our sandwiches today I prepare two bagels which I had baked with spelt flour (my favorite flour). But four thick slices of any other nice, fresh white bread will work as well. While the bagels are defrosting in the oven, I gently fry thinly sliced leek (a thumb length piece) in some butter and cut a fresh chili pepper (4 cm) in very thin slices as well. Then I spread the cold cream cheese on the warm bagels, layer this with thinly sliced tomatoes (I use four cherry tomatoes) and scatter the leek and chili on top. Seasoned with some sea salt and pepper, this makes you feel like you never want to eat anything else ever again!

Chocolate Cinnamon Rugelach, Happy Hanukkah!

We are invited to celebrate Hanukkah together with our friends and godchild and I will contribute rugelach which is a wonderful flaky, croissant like pastry. They are made traditionally for the important Jewish feast Hanukkah, the "Feast of Light and Dedication".
When I tried them the first time I fell in love with their flakiness, they are buttery but still light. They taste divine, absolutely addictive, and due to their tiny size you end up eating lots of them. I enhanced the chocolate filling with cinnamon (which I love all year round), so it fits perfectly to the season. The pastry is a bit like short crust with added cream cheese which makes them so fluffy but still buttery. Look at the photo and you will want to try one!

Rugelach with Chocolate and Cinnamon
For 24 of these bite-sized sweets you will need
plain flour 150g / 5 ounces
icing sugar, 2 heaped tablespoons
butter, cold, 125g / 4.5 ounces
cream cheese, at room temperature, 120g / 4.5 ounces
a pinch of salt
bittersweet chocolate 80g / 3 ounces
sugar 40g / 1.5 ounces
cinnamon 1 heaping teaspoon
You will need a baking tray, lined with baking parchment. Keep in mind that the dough has to sit in the freezer for 30 minutes or in the fridge for at least 1 1/2 hours.
Mix the dry ingredients (flour, icing sugar, salt). Cut the butter with a knife into the flour mixture until there are just little pieces of butter left. Mix with the dough hooks for a few seconds. Add the cream cheese and work it into the mixture with a fork or the mixer to get a crumbly texture.
Form 2 discs and put them in the freezer for 30 minutes. The dough should be very cold but not too hard, still rollable.
Preheat the oven to 185°C / 365°F. Put baking parchment on your baking sheet. Chop the chocolate finely and mix with cinnamon and sugar.
Roll out one disc. I do this between floured cling film as it become too sticky otherwise. When the diameter is roughly 30cm / 12" you should have reached the right thickness of a couple millimeters. Cut the disc like a cake into 12 triangles. Take one slice after the other in your hand (the dough might still stick a bit to the foil but don't worry, it is elastic) and sprinkle with your chocolate mixture. Don't forget to set aside half the chocolate mixture for the second pastry disc. Now roll the little rugelach in the palm of your hand tightly into a croissant shape and put them on your baking sheet. Follow with the second disc or leave it in the freezer if you want to stop after the first batch of 12. I recommend doing them all at once as you will regret it if you don't. When you have rolled up all 24 (they should all fit on one tray) bake them in the oven for 13 minutes or until puffy and golden brown. It's best to check them after 10 minutes to be sure that they don't get too dark.
Let them cool on a wire rack for a few minutes and enjoy with your tea or coffee. They are also great for a late breakfast or brunch or even for a party as they are perfect fingerfood.


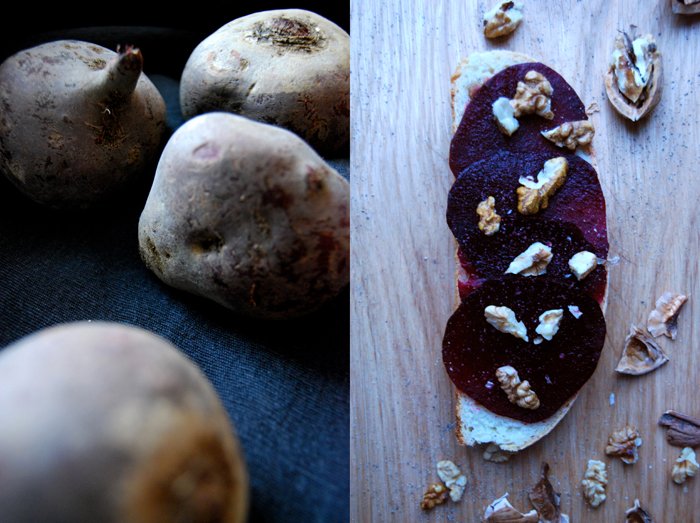
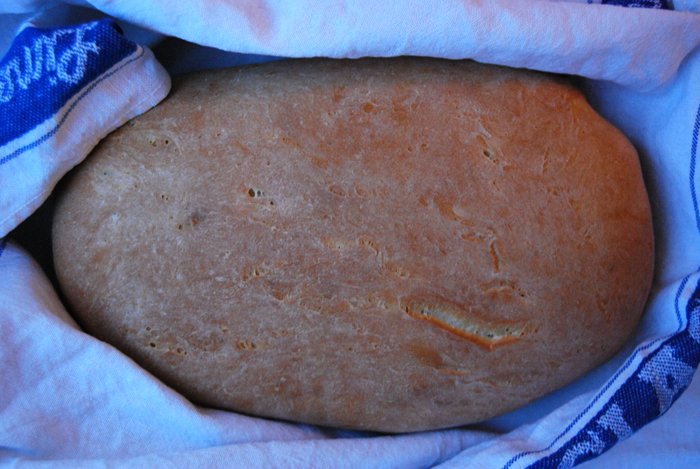
Juicy Potato Bread with Beetroot and Walnuts
I love bread, I'm virtually obsessed with good bread and I need my daily dose of this wonderful, ancient invention. Every culture has their own bread tradition all over the world and it is so important to keep this up and to support traditional bakeries.
Potato bread has a nice crust and is very juicy inside. The kitchen smells divine when the loaf is freshly out of the oven. I love to cut it into thick slices and then let some butter melt on it. With the first bite I know why I love to bake my own bread!
Today I want to prepare a little sandwich with cooked beetroot slices. I drizzle some balsamico and olive oil on top and sprinkle with walnuts. This makes a wonderful snack or starter for a dinner party.
Beetroot
Cook 1 or 2 beetroots together with 2 bay leaves in salted water for 45 minutes (more or less depending on their size). Check with a skewer, it should come out easily, and rinse under cold water. Let them cool, peel and slice very thinly.
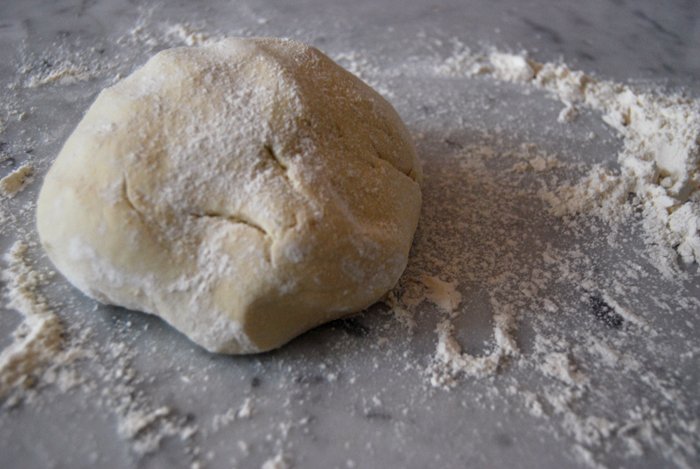
Potato Bread
For this bread I used spelt flour type 630 which I love to bake with but you can use any other flour. I chose dry yeast as it is a bit quicker to prepare but you can change to fresh if you prefer.
Sometimes I prepare the dough in the evening and let it rise overnight. This is convenient for the weekend if you want some warm fresh bread on the table for breakfast.
This makes 1 loaf of bread
potatoes, cooked, peeled, cut in cubes, cold, 150g / 5 ounces
potato water (the water the potatoes got cooked in), lukewarm, 150ml
plain flour 450g / 16 ounces
sour cream 3 teaspoons
olive oil 1 tablespoon
dry yeast 1 1/2 teaspoons
salt 2 teaspoons
Grate the potatoes or press through a ricer (mashing works as well).
Mix the potato water with the sour cream and olive oil.
Combine 350g / 12 ounces of flour with the salt in a big bowl. You will add the rest of the flour while kneading the dough. Add the lukewarm water to the flour together with the yeast. Mix with the dough hook of your mixer until everything is combined, add the potatoes and continue mixing for around 10 minutes. After a few minutes you can start adding the rest of the flour. Put the dough ball on a floured working surface and continue kneading with your hands. You can put all your energy in this which is good for you and for the fluffiness of the bread.
When I prepare the dough in the evening I place it in a clean, oiled and covered bowl in the fridge and let it rise overnight. You will have to take it out of the fridge 30 minutes before you can continue with the next steps.
In case I want to bake my bread the same day, I put the dough in a clean and oiled bowl, cover it with a tea towel and let it rise in the 35°C / 95°F warm oven for 60-90 minutes. This works really well but make sure that your oven is set to top/ bottom heat and not to fan.
When the dough is bigger and puffy punch it down and knead for a couple minutes. This one doesn't rise as much as dough without potatoes but you should notice a change in size. Now place your future bread on a lightly oiled baking sheet giving it the shape you want and cover with a tea towel. Give it another 30 minutes to rise in the warm oven again.
Set your oven to 230°C / 445°F (for bread it works best to use top / bottom heat and not the fan setting). Bake your bread for 10 minutes, take the temperature down to 190°C / 375°F and bake for another 20 minutes. Test by knocking on the bottom side of the bread, it should sound hollow. Let it cool on a rack before you start cutting it. I minimise this to a few minutes as I can't wait to try it. Not with this smell in my kitchen.

A hearty Potato and Parsnip Gratin
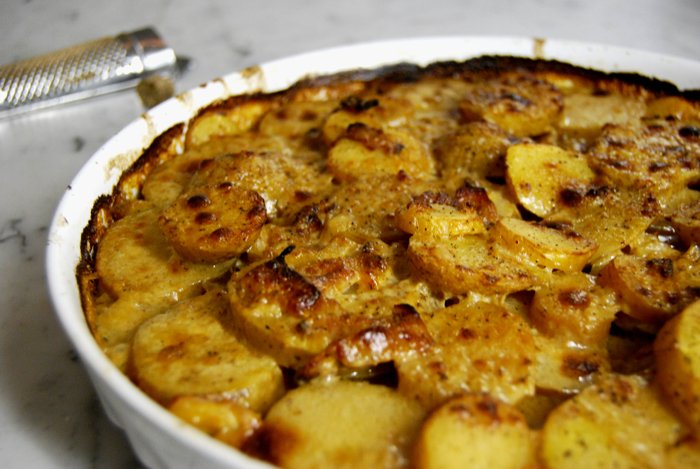
I feel really excited when I see food bubbling in the oven. I can sit in front of the glass oven door and watch it become golden, rising up and down and filling the kitchen with the kind of smell that you just achieve with oven dishes. Especially with a gratin! For tonight we will have a very hearty gratin with potatoes, parsnip, onions and bacon and enhanced with nutmeg, cloves and brandy. This creates an addictive combination of hearty and sweet through the parsnip and brandy. We always plan to make bigger portions to have some leftovers for the next day but with gratin we never manage. Today is the same - it is all gone already.
Potato and Parsnip Gratin
For 3 as a main, or 4 as a side dish, you need
large potatoes, peeled or rinsed and sliced, 4-5
large parsnips, peeled or rinsed and sliced, 4
small onion, cut into thin rings, 1
bacon, cut into small cubes, 40g / 1.5 ounces
butter 30g / 1 ounce
heavy cream 75ml
milk 200ml
water
garlic, crushed, 1 clove
nutmeg, preferably freshly grated
brandy for deglazing
sea salt and pepper
Set the oven to 220°C / 430°F. Our oven has a Rotitherm roasting setting which works perfectly for gratin, it combines the grill setting with fan circulation, but the top / bottom oven setting works as well.
Heat the butter in a large pan, fry the bacon and onions on medium heat until golden and add the garlic. Add the potato and parsnip slices to the pan and cook for 1-2 minutes. Deglaze with brandy and pour the cream and milk on top, add a little water until everything is covered. Now add the spices and season with salt and pepper. Let it simmer until the potatoes and parsnip are almost done. Arrange the potato and parsnip slices in a baking dish or roasting tin and pour the bacon/ milk/ cream mixture over the vegetables. Bake for 8-10 minutes in the oven until golden brown.

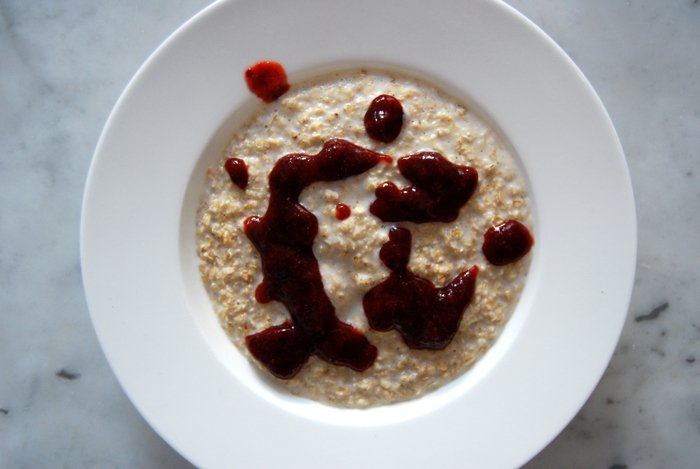
Oats and Plums
As a child I loved oats with cocoa powder and milk - the famous porridge. I loved it so much that I had to have a bowl of this every day. I think that was the beginning of my love for food; food, which I prepare for myself. It might sound like a rather simple start to the culinary wonders of life. But I must have been around 5 years old when I cultivated this daily routine of going to the kitchen, preparing my bowl with oats, unsweetened dark cocoa powder, sugar and fresh milk. Always in the same bowl. It felt like a very special treat for myself, a pure moment of pleasure, eating with relish.
This intuitive routine which I created just for myself made me realise that I need these recurring moments of simple pleasure and enjoyment - a treat, just me and my food. This never changed, my approach to food is still totally intuitive. Since those days I discovered so much (I don't concentrate on oats anymore) but I still feel the same satisfaction in the happy moments with my food, every day.
This morning I found a bag with puréed plums in my freezer which I had prepared originally for spontaneous ice cream ideas in winter (it makes such a wonderful ice cream when mixed with yoghurt). It was a very cold morning and I felt a bit nostalgic. I needed a bowl of steaming porridge and decided to sweeten it with my (warmed up) freezer-discovery. I took out a pan, cooked a bowl of oats together with milk until it bubbled and poured the warm plum sauce on top. I had made the plum purée from 300g / 10.5 ounces of plums mixed with a few tablespoons of sugar and some cinnamon.
So simple yet so delicious!


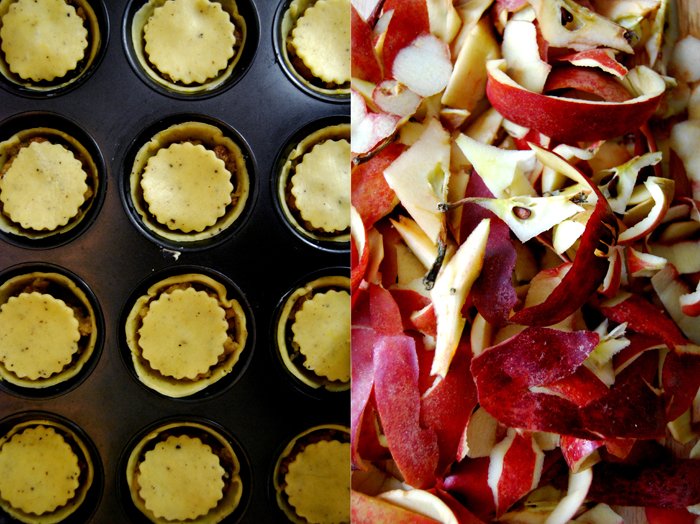
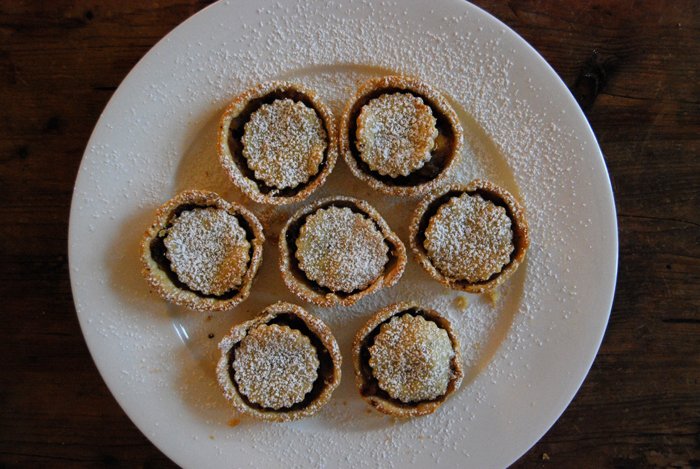
Mince Pies - November Dusk and Apples
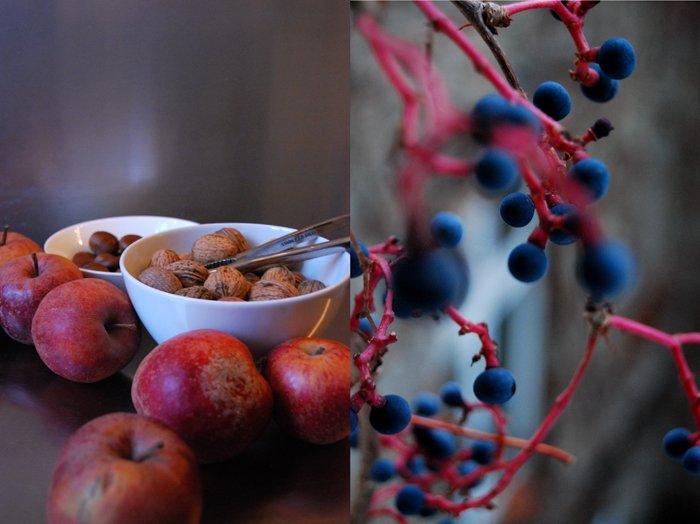
Finally it's getting really cold and crisp outside. And when I see the apples in front of me in this special November afternoon light I feel like making my mince pies. When I lived in Whitby in England I bought tons of them at Botham's, now I make my own.
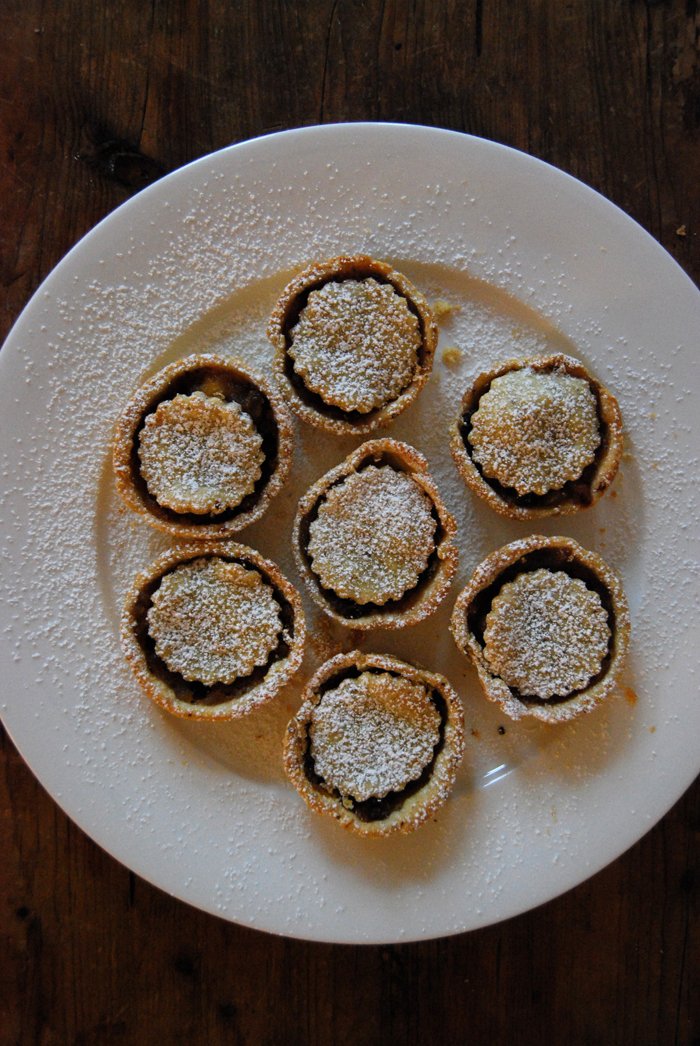
Mince pies are a wonderful combination of buttery short crust - which I love in all variations - and a juicy filling. Mine is a sour-fruity apple filling spiced up with cinnamon, cardamon, mace, allspice, cloves and brandy. I just love them for breakfast, tea time or dessert, I can eat them all the time - especially at Christmas time!Some buy the filling in stores, I like to make my own. It is a bit of work but if you make it in bigger quantities it is worth it.
Mince Pies
The filling for these pies is called mincemeat but don't worry there is no meat involved. It used to be made with meat and some recipes still include beef suet but mine doesn't. The ingredients below are measured to make a few batches of mince pies. If you never tried mince pies before maybe you should start with 1/3 of the filling. If you are a mince pie maniac like me go for the whole amount and keep it in jars in the fridge.
For the mincemeat filling
sour baking apples, peeled, cored and chopped, 1kg / 2 pounds
raisins 350g / 12.5 ounces
currants 100g / 3.5 ounces
candied peel, finely chopped, 40g / 1 ounce
orange, rind, 1
lemon, rind and juice, 1
sugar 200g / 7 ounces
apple cider 250ml
brandy 60ml
vegetable shortening 200g / 7 ounces
cinnamon, ground, 1 heaping teaspoon
cardamom, ground, 1 heaping teaspoon
cloves, ground, 1 heaping teaspoon
mace, ground, 1 teaspoon
mixed spice, ground 1 heaping teaspoon
Warm up a large pan with all the ingredients (except the vegetable shortening) and mix with a spoon until the sugar dissolved. Let simmer on medium heat for 20 minutes and stir once in a while. Take it off when it looks pulpy and stir in the vegetable shortening. Fill into sterilised jars and keep in the fridge.
For the pastry
Enough for 24 muffin sized mince pies (they won't be as high as muffins)
plain flour 300g / 10.5 ounces
vegetable shortening 75g / 2.5 ounces
butter 75g / 2.5 ounces
sugar 1 heaping tablespoon
mixed spice, 2 teaspoons
juice of an orange 5 tablespoons
pinch of salt
Mix the dry ingredients, cut the fats finely with a knife into the flour mixture and rub between your fingers for a few seconds. Add the orange juice and mix with the dough hook of your mixer until it crumbles. Shape two discs, wrap in cling film and put in the freezer for 10 minutes (or in the fridge).
For the Mince Pies
Set the oven to 220°C / 430°F and butter the muffin tray.
Roll out the pastry between cling film until it is quite thin. Cut out circles a bit bigger than the muffin mold circles and place into the molds. Cut out circles a bit smaller than the molds for the pie's lid. Fill the pies with your mincemeat and put the circled lid on top. Bake for 10 minutes or until golden. Take the mince pies out carefully and let them cool on a rack. Let the muffin tray cool for a few minutes before you continue with the second batch. You can dust the mince pies with icing sugar if you like when the pies have cooled down.